
Free 
Tesla Model 3 Behind-Screen Tissue Box Holder
MakerWorld
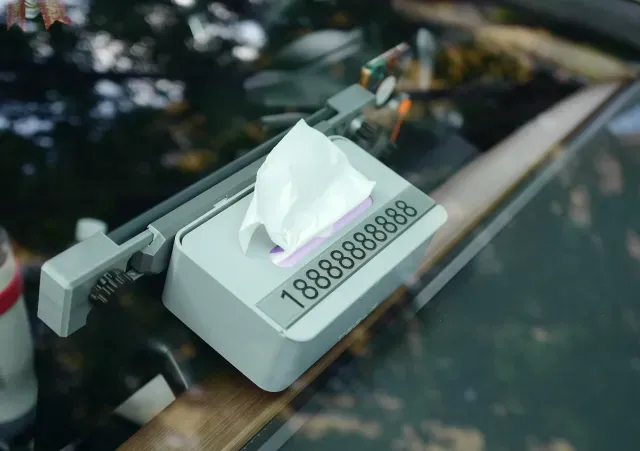
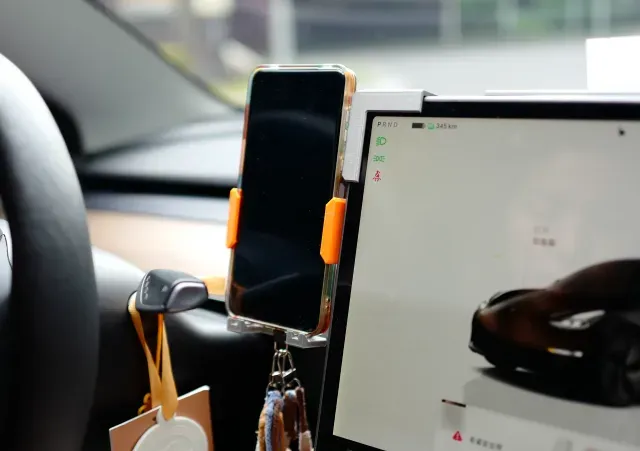
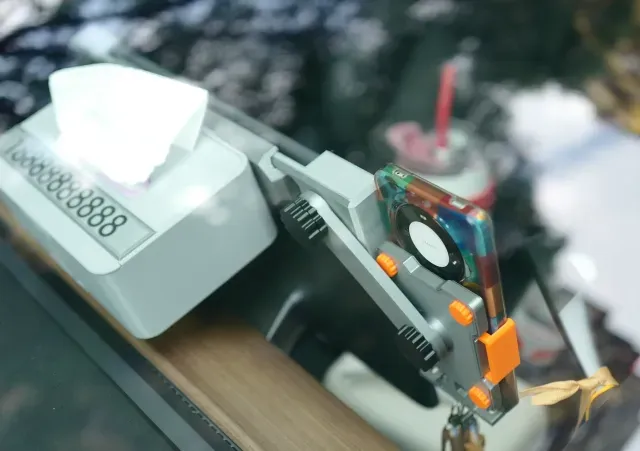
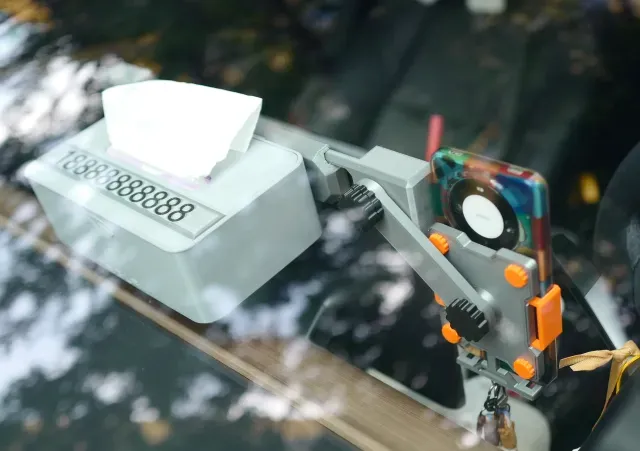
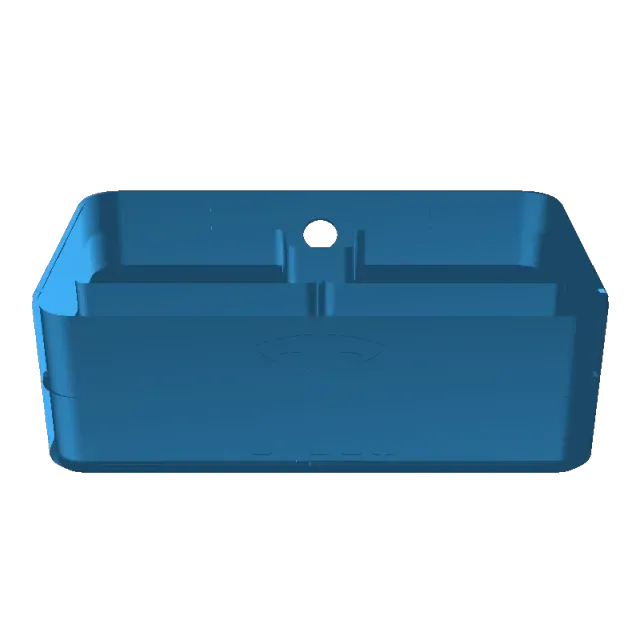
The entire design took over a week of repeated modeling and refinement. After multiple physical prints, real-world testing, and debugging, the finished product was installed in the car for trial use, and the competition entry was officially submitted only near the end of the event. In summer, after the car is exposed to the sun, the interior temperature can reach over 70℃. Ordinary PLA filament is extremely prone to softening and deforming at high temperatures, so high heat-resistant filaments such as PETG, ASA, and ABS are preferred. I usually park in an underground garage, and Tesla can automatically turn on the air conditioning to control the temperature based on the interior temperature. Considering the comprehensive usage scenarios, the entire set of works is uniformly printed using PETG material. To address the issue of bumps and vibrations while driving, all accessories adopt a double screw and nut locking structure, ensuring a firm fit without looseness, and making it difficult to shift or fall off during driving, structurally solving the core pain point of shaking and noise of car accessories. At the same time, adhering to the concept of non-destructive installation, the whole process requires no glue pasting and no drilling or modification in the car. Relying on a variety of combined connection methods such as mortise and tenon splicing, slider clamping, and thread fastening, all modules can be quickly installed and easily disassembled, which is convenient and does not damage the original car interior. Combining various practical pain points in daily driving, I have specifically designed the following functional modules: 1. Phone Holder: Sometimes the experience of using the original car navigation is not ideal, and there is a rigid need for a stable phone navigation placement. A custom car phone holder is designed (the third tray phone holder connector has two lengths to choose from: the 80mm short one can be fixed horizontally to fit close to the holder, and the 100mm long one can adjust the up and down angle to fit close to the holder); 2. Tissue Box (with TESLA Logo): There is a lack of a place to put tissues for wiping hands in the car. The tissue box is made right on the back of the main bracket for easy extraction. A closed sliding groove cover is designed to prevent the tissue packaging from being lifted when extracting;
3. Storage Partition Box: If you don't need the tissue box, you can use the partition storage box. An internal partition layer is added on the basis of the original tissue box (you can print one or two layers according to your needs).
4. Parking Sign: When parking temporarily outdoors, contact information needs to be left, integrating a hidden parking number sign. The parking sign is integrated into the closed sliding groove cover, and can also be used as a locking device for the storage box and tissue box covers to prevent the covers from shifting while driving. The parking sign number can be set in the slicing software. (When not in use, the parking sign can be pulled out and placed inside the box to avoid number leakage) If you have any good opinions and suggestions, please leave a comment. More modules can be added to meet everyone's needs.
The entire system adopts a freely combinable modular design. Car owners can freely match and assemble different functional components according to their own driving habits and actual needs, flexibly adapting to personal driving scenarios. The entire car modular system uses the main bracket on the back of the central control screen as the core base. It relies on 3D printed elastic clips combined with screw washers for non-destructive fixing, without modifying the original car structure. It is the load-bearing main body of the entire expansion system, compatible with car models with a screen width of 33-36cm and a thickness of less than 1.5cm (universal for TESLA MODEL3/Y). The phone holder focuses on enhancing driving shock resistance and stability during the design stage. It abandons redundant pitch adjustment structures, conforms to the original car's central control screen viewing angle, and provides a comfortable and natural view for watching navigation. It only supports flexible fine-tuning of the up and down position, combined with a double screw locking structure, completely eliminating the problems of bracket shifting and phone shaking caused by vehicle driving vibrations.
Here are the assembly steps. Just assemble according to the steps.
First, assemble the main bracket part. Prepare all printed parts.
Slide the inner cover into the sliding groove to leave the installation space for the clamping bracket. Then align the left clamping piece with the space and insert the large spring.
Next, push the sliding cover all the way to the left, snap in the right clamping piece, and then install the large spring. Then use a coin to tighten the two sliding cover fixing screws.
Next, install the phone holder part. Prepare all printed parts. Install the clamping pieces of the phone holder as shown in the picture (pay attention to the direction), and then snap in the small spring.
Then use the 4 small screws of the phone holder clamping pieces to fix the back panel.
Next, assemble the main bracket and the phone holder. Use 2 30mm long screws and nuts to fix the connection part of the phone holder and the main bracket with a double screw fixing method. The internal nut can adjust the tightness between the cantilever and the main bracket, and the screw can adjust the tightness between the main bracket and the screen (combined with the tightness of the original bracket spring, it will be very stable). The screws on the left and right sides are installed in the same way. Then fix the phone holder side with the screws in the fifth tray of phone accessories.
Then install 2 square washers on the left and right fixing screws of the main bracket screen. The washers have threads and can be screwed in partially. The washers can prevent scratching the metal.
Finally, install the tissue box and storage box assembly. Slide it directly into the back sliding groove and fix it with the smallest short screws (secondary reinforcement for vibration during driving).
If you need to use it for storage, you can print the storage partition and put it directly in (it is best to adjust the proportion of the inner box according to the print expansion and contraction ratio of your own filament to avoid being too tight or loose. I currently reduce the proportion by about 0.5%).
If you use it as a tissue box, you can put the tissues directly in, slide in the cover, and then slide in the number plate as a limiter to prevent the sliding cover from moving while driving. If you don't need the parking sign, you can delete the part in the slicing software. Installation completed.
Finally, take the entire assembly into the car, pull open the left and right clamping pieces of the main bracket, slide it in from the top of the screen, and then tighten the two fixing screws on the back.
Boost Me
Thank you
Boost


Names are used only to indicate the source of a result. Polyzon is not affiliated with the listed sites.