
Free 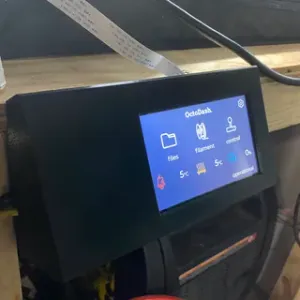
Console for Elecrow 5" HDMI Touchscreen and Raspberry PI
Printables

A mount for Adafruit 5" touch display ( https://learn.adafruit.com/adafruit-5-800x480-tft-hdmi-monitor-touchscreen-backpack ) suitable for use with octoprint/octodash or other purposes.
Note, if you're looking at buying a touchscreen, I also have the Elecrow 5" HDMI touchscreen, which I much prefer, not least of which because it's cheaper and has capacitative touch. I have a remix of this console that fits the Elecrow screen: https://www.prusaprinters.org/prints/122494-console-for-elecrow-5-hdmi-touchscreen-and-raspber .
The two-piece design here provides a console that can be either placed on a flat surface, or wall mounted. The console has room inside to also mount a raspberry pi and sufficient space for attachment of HDMI, USB and power cables as needed.
The raspberry PI mount is designed for a raspberry PI 4 but should also work with raspberry PI 3 since the mounting holes are the same.
You can either mount the raspberry pi internally (with a small internal USB and HDMI cable), or mount it separately and route the HDMI cable and USB cable to the console. Three cable entries are provided (for example CAT5, power, USB or just USB and HDMI, depending on use case).
If you are mounting the PI internally two slots are provided for camera ribbon cable ingress, appropriate for each orientation.
For wall mounting, screw fixing locations are provided on the back.
Two fan mounting locations are provided, one on each side. If you choose to do so, mount a standard 30x30mm raspberry pi case fan on one side, the other side is used as exhaust. Or mount two fans if you really want to. You may need to extend the power cables for the fan.
Required / Optional hardware
Cables
Micro-HDMI → HDMI cable (short/small as possible if mounting PI internally) Micro-USB → USB cable (short/small as possible if mounting PI internally) Small cable ties for securing whatever cables you route into the console
Required hardware
4 x M3x10 hex head bolt, for case back attachment. A little longer is not going to hurt.
4 x M3x6 bolt, for screen attachment.
For Raspberry PI (optional)
4 x M2.5x4 bolt
For Fan (optional)
30x30x7 case fan (5v) 4 x M3x12 bolt, 3xM3 nut
Screen Configuration
With this screen, you must edit /boot/config.txt on your raspberry pi to get it to work. Follow the instructions provided by Adafruit:
https://learn.adafruit.com/adafruit-5-800x480-tft-hdmi-monitor-touchscreen-backpack/raspberry-pi-config
Additionally, if using in wall mounted orientation, you must invert the display (you can't physically change the orientation since the cables won't fint). To do this, follow these instructions:
Add the following to /boot/config.txt :
display_hdmi_rotate=2
If you are using a raspberry PI 4, you will also need to comment out the following line:
dtoverlay=vc4-fkms-v3d
You will also need to invert the orientation of the touch sensor so that it matches the inverted screen orientation. To do this, edit the /usr/share/X11/xorg.conf.d/40-libinput.conf file. Find the InputClass section with the identifier “libinput pointer catchall” and add the following line:
Option "TransformationMatrix" "-1 0 1 0 -1 1 0 0 1"
The edited section should look like this:
Section "InputClass" Identifier "libinput pointer catchall" MatchIsPointer "on" MatchDevicePath "/dev/input/event*" Driver "libinput" Option "TransformationMatrix" "-1 0 1 0 -1 1 0 0 1" EndSection
Do not edit or remove the other sections.
Reboot the unit and verify correct orientation and touch behavior.



Names are used only to indicate the source of a result. Polyzon is not affiliated with the listed sites.
Comments