
Free 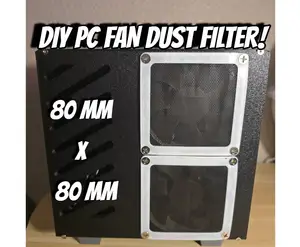
PC Fan Dust Filter
MakerWorld


Magnetic PC Fan Dust Filter — 80mm
About:
This is a magnetic frame for a dust screen filter meant to be used on 80mm PC / Server case fans. It is comprised of two parts; the main magnetic frame, and the screen attachment bracket. The 6mm x 3mm round magnets friction-fit into the holes in the magnetic frame, and the dust screen attachment bracket fits over the magnetic bracket with friction as well. No glue required! The "sandwich" can be easily separated to replace the dust screen if needed. The magnets are designed to attach to the screws holding the fan to the PC / Server case.
License:
This model is published with the CC-BY open-source license. I am a staunch open-source advocate, and encourage others to use, distribute, and adapt my models to further the maker community. All I ask for is proper attribution. The STEP files and the FreeCAD project file have been included along with the STL files to make editing / adapting them as easy as possible.
Bill of Materials:
- 3mm x 6mm round neodymium magnets (4x per fan filter) — Amazon
- PVC screen mesh dust filter — Amazon
Print Settings:
Property
Value
Material
PLA / PETG
Nozzle Diameter
0.4 mm
Layer Height
0.2 mm
Wall Loops
4
Bottom Layers
5
Top Layers
5
Infill
Gyroid
Infill Density
15%
Supports
None
Assembly:
- If your PVC dust screen came in a roll like mine did it will retain "memory" of that shape; making it want to spring into an arch. To solve this problem I recommend heating it with steaming water (200° F / 93° C). After cutting a piece off the roll I heated water in my kettle, put the pieces in a large bowl, and poured the water over the pieces of screen in the bowl. After heating the screen it will flatten out and feel pliable. Quickly remove it from the bowl and place it under a heavy, flat object (like a hard-backed book) and wait for it to cool.
- After your flattened screen has cooled, cut the screen to size. Try your best to cut circles around the magnets for maximum strength. I recommend using a standard hole punch used for paper. The diameter of the hole they create matches the 6 mm magnet's diameter almost perfectly.
- Place the cut screen filter into the attachment frame, and snap it over the magnetic frame.
Note: Due to the manufacturing tolerance of 3D printers you may print two identical parts and one will fit perfectly while the other needs a bit more clearance. If this is the case you can use a de-burring tool to widen the holes in the screen attachment frame. Since the print settings include five wall loops there is plenty of extra material there to widen the holes if needed. I have printed 10 of these so far, and I needed to widen the holes on two of them.



%2Fhttps%3A%2F%2Ffbi.cults3d.com%2Fuploaders%2F13759004%2Fillustration-file%2F07b81dac-4814-4512-be22-ce7ff80760b7%2FFan.JPG&w=300)



Names are used only to indicate the source of a result. Polyzon is not affiliated with the listed sites.
Comments