
Free 
NEW for 3 makes of Routers - LowRider v3 Floating-Z Dust Shoe and Router Mount, for 2.5-inch Vac Hose (VacMaster Shop Vac) v1.1
Printables


Update: New as of January 17, 2024: uploaded the new “Universal Slope-ie Ramp-ie Thing” (to glue onto the bottom of the shoe body). Full details below, or read about it on V1E forum . The new part was originally only available on the newer v1.1 of this.
This short video explains all about the new “Bubble Bumper Slopie Rampie” thing now included:
Plus, further down in this listing are all the other prior videos in the “Floating-Z Dust Shoe” series.
Note:
There is now a new version of this (v1.1) as of November 1, 2023! Here's the link: https://www.printables.com/model/625802-new-for-3-makes-of-routers-lowrider-v3-floating-z-
Also, another important note:
If you are doing a job where the dust shoe will be coming off from over the material, and dragged onto the material, it's probably best to leave the slide latch engaged, with the shoe up high. If it gets dragged on from an edge while its down low, it can get caught on the edge of the material. Then, instead of sledding, you could have it either pulled off, or cut through by your bit.
Note: If you have a 'normal' 2.5" hose and you're worried it won't fit, a generic hose adapter file is available here , which was designed by Jean-Philippe Cassar .
VIDEOS:
LowRider v3 DIY CNC - new floating-Z dust shoe - work in progress - part 1
LowRider v3 DIY CNC - new floating-Z dust shoe - work in progress - part 2
LowRider v3 DIY CNC - new floating-Z dust shoe - completion & test - part 3
Ryan's excellent design combo for Makita 700 series router mount plus dust shoe … works great for dust collection, except when riding high above the material where the gap is too great for success — and since cutting / pocketing deeply on thick materials usually involves riding high for at least part of the job , it's been a desire of LowRider makers to have a way for the dust shoe to stay close to the material for the whole job . Yet since the whole X gantry rises and descends (in the Z axis) on a LowRider, most dust shoe approaches of the CNC world are non-starters (most CNC designs have a gantry that does not travel in the Z axis). This has been discussed at length on the V1E, for instance here .
There are at least three or four approaches to tackling this:
- Add tape around the shoe, that extends below it, forming a flexible stand-in for bristles. - Add either cut plastic strips or printed TPU strips, etc, forming a flexible stand-in for bristles. - One workaround has been to remix taller slide-on shoes, and swap them out as needed by pausing the job and temporarily turning off the router, but this is not real convenient and less than ideal. - Create a secondary gantry, attached to the LowRider's YZ plates, that does not rise in the Z axis, and attach a height-adjustable dust collection, which can be set and stay at the same Z height the whole job. Engineering challenge: it needs to sync to the core in the X axis but not in the Z axis. An ongoing effort of this approach by Chris (@Fodder1 on the V1E forum) is currently underway. See some early screen shots of that effort here . - Create a floating-Z approach that attaches to the existing core, and can adjust on the fly as needed to stay close to the material. This listing is my effort toward this approach . If you're minded to do either of the first two options, above, consider that a remix of my shoe here that has a slot on the bottom for inserting soft EVA foam bristles made by cutting EVA foam… may be a solution for you.
As of October 4, 2023, this floating-Z approach (see below) has now been tested, and is definitely a solution that works.
Here are links to key parts/materials: 12" x 18" craft foam *, a 2.5" flex hose * (of which only about 110 mm or so is needed for this), some 2-1/2 Inch Key Hose Clamps (two of them to attach the hose), and a 100mm MGN12 linear guide with MGN12H bearing slide block *.
One caveat:
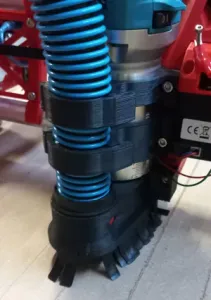
This mod has two things that “stick out” (to the left side of the core) more than normal: Use of a 2.5" hose (larger, compared to the vac hose of Ryan's original design), means the new wider dust shoe “sticks out” more. Also, the new mod's “Option B” rail mount (with the slide latch lever), has some added “stick out” as well. This can mean that you likely need to tweak your homing setup on the X axis. There are a couple of ways to this. One is you can try bending the blade on your end stop switch a little bit. The other is to install an M3 screw into the screw hole on the bottom of the X tensioner / end stop part, set such that the end stop switch would meet the screw sooner, instead of missing the tensioner part later. If you have your Y rail on the X-min side, likely the wider shoe is the first touch. If not, then if you use the Option B rail mount, that is likely your first touch. Either way, here is a post, with a screen shot, of Alex Eversmeyer (@aeversme) solving the homing issue with a screw in the X-belt tensioner: https://forum.v1e.com/t/lowrider-v3-floating-z-dust-shoe-and-makita-router-mount-for-2-5-inch-vac-hose/39530/61 Here's a pic of that in action:
About bristles:
There are at least three ways to create “bristles” (real or faux):
- EVA craft foam cut into a strip and notched to have “bristles” — see attached cut file. - Printed TPU bristles (see attached print file) or strips cut from some type of plastic. - Buying an actual dust shoe brush (an item made for CNC makers) — not ideal for this, see below, including a purchase link. Whichever option you choose, the “bristles” are to be inserted into a groove on the bottom of the dust shoe. This groove is 10mm deep, 3.2mm wide, and ~317mm long.
Below are some details on all three options. I'm doing EVA craft foam.
Needed items (to be ordered if you don't have on hand):
- 12" x 18" EVA craft foam * to be used for “faux bristles” — The craft foam linked here is about 2.33mm thick. A strip of it that's been cut to 317mm (12.48") in length (or up to ~322.4mm if you want to have little extensions on the ends to help close the gap), and in width anywhere from 24mm (just under 1") to 30mm (approx. 1-1/8") or 32mm (approx. 1-¼") should serve. My plan is to insert it with perhaps a little rubber cement added to help hold it in. I'm planning to laser cut mine (cutting the main profile and slits in the same job) using the attached cut file (see below). Or, you could manually cut a strip with no slits, and once it's inserted into the shoe, it can have the slits cut in it with scissors to create the flexible “bristles.”
- Alternatively , you can print bristles in TPU , using the attached STL file . If the TPU is too stiff, the “teeth” of the “comb” can be made thinner for more flexibility. The thickness of the inserted part of the file is 2.4mm. The thickness of the “teeth” (bristles) is 0.9mm.
- Alternatively , you could buy a dust shoe brush * and use its bristles. If the base of the brush strip is too thick to go into the groove, you could cut bristles and epoxy them into the groove. I did not on go this route . PS: I had previously bought the one linked here, and its brush strip is too thick to fit into the groove. It's about 5.33mm wide at the white part of its “base” — and the groove on the printed dust shoe is only 3.2mm wide. Again, I am not using actual bristles like this.
- Approximately 110 mm (or so) worth of a 2.5" flex hose * — this needs to be able to “compress” down to a minimum length of about 64.3mm when the floating-Z is maxed upwards, and “expand” out to about 115 mm when it's maxed downwards. I'm hopeful this one (linked) can contract that much, although I don't have the hose in my hands yet.
- 100mm MGN12 linear guide with MGN12H bearing slide block * (photo shown is a stock pic of a longer one). If you have a longer one, and have a grinding wheel to cut 100mm off it, you could do that. Here are two alternate listings in case the first one is unavailable: alternate listing #1 , and alternate listing #2 .
- Two 2-½" hose clamps (I like the “key” kind such as these below) to clamp the hose to the hose mounts.
Hardware note(s) - linear guide:
For strength, ease of sourcing, and familiarity, I chose to go with the very same MGN12 linear guide and MGN12H slide bearing used for the LowRider v3 standard side assemblies. This could be remixed to work with MGN9, and that may well be sufficient. Price difference between MGN12 and MGN9 seems negligible, so went with the better MGN12.
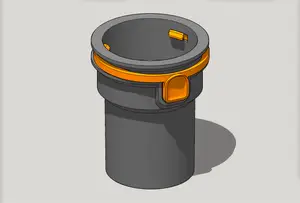
Here's an overview. This illustration does not show the flex hose, which would span between the top hose mount (colored red here) and the bottom hose mount (colored black here). Also, the EVA craft foam is shown here by a 3D model stand-in that is gray colored (slits not illustrated):
Yet another couple of overview images:
Functionality notes and choices:
To latch or not to latch:
One of the things I kept in mind is the want of a way to temporarily clip the floating-Z rig at max height while working on bit changes etc. One option is a printed bar with magnets in it, to stick to the linear guide and hold up the slide bearing. However, that will need to be parked elsewhere most of the time and becomes something else to keep up with. So, I thought about an attached latch (see below).
Consider my original floating-Z plan, compared here with one modified to add a “slide latch,” which is spring powered by a spring from a common retractable writing pen. The plan is to use a bolt, M5-30mm, as the “hinge pin” on the latch.
One thing I won't know until this is tried out , is whether the free motion of the floating Z would be hindered too much by the clip pressing slightly against the slide bearing as it moves up during a job. More soon. Did I mention that testers are needed?
Original — Linear Rail Mount v1.0-A




Names are used only to indicate the source of a result. Polyzon is not affiliated with the listed sites.
Comments 0
Loading comments…