
Free 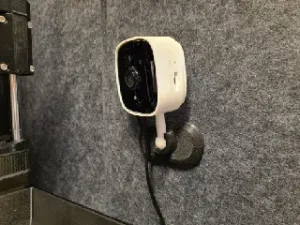
TP-Link Tapo C100 / C110 Base & Wallmount
Printables


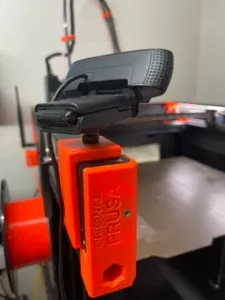
Update 2024/04/27: Published XLCam v2 . Better viewing angle and new mounting location.
Update 2024/04/02: Added link to screw assortment.
Update 2024/27/02: Added info for adjusting the camera aim.
Update 2024/29/01: Added links for USB-C right angle and long camera cable. Noted 4GB capacity used on RPi 4.
Printing
STLs are provided for left and right mounting. I printed in PETG, Black, Orange, White. Orient the model on the flat surface in PrusaSlicer then paint supports on the lower edges of the camera shroud. Set supports for enforcers only.
Assembly
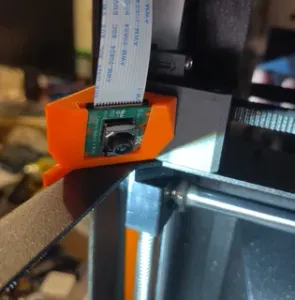
The Raspberry Pi 4 (I used a 4GB) and camera V2 are held in place with a couple of screws each. You'll need a longer ribbon cable for the camera and a right angle USB-C adapter for the power cord. The USB-C cable and ethernet cables can be routed down the slot in the aluminum extrusion. An STL is provided for a Chanel cover that snaps in place.
USB-C right angle Long camera cable Screw Assortment
A single 4mm screw and a T-nut are used to hold the case in place.
The camera module and Pi are attached with small screws (see link to screw assortment above; super handy for all sorts of projects).
You can add one or more washers behind the camera module on one or two of the posts to adjust the aim of the camera to your liking.
Software
I have my Pi set up to serve a video stream locally and also to upload snapshot images to PrusaConnect every 20 seconds. You can use any Pi software you like, the instructions for my setup are below:
Start with an image of the lite version of the latest RPi OS; I used Bookworm 64-bit. Set the host name; I used “xlcamera”. Set a user name and password.
Boot up the Pi and SSH into it at xlcamera.local.
Check Camera
libcamera-hello
Increase GPU memory
sudo nano /boot/config.txt
add the following line: gpu_mem=256
Get Packages
sudo apt update sudo apt install git sudo apt-get install imagemagick
Install Streamer - https://github.com/ayufan/camera-streamer
git clone https://github.com/ayufan-research/camera-streamer.git --recursive sudo apt-get -y install libavformat-dev libavutil-dev libavcodec-dev libcamera-dev liblivemedia-dev v4l-utils pkg-config xxd build-essential cmake libssl-dev
cd camera-streamer/ nano html/camera.html
<html> <head> <title>XLCam</title> <meta http-equiv="content-type" content="text/html;charset=utf-8"> </head> <body style="margin: 0; padding:0;"> <div> <img id="stream" src="./?action=stream" style="width: 100vw; height: 100vh; object-fit: contain; object-position: 50% 0%;" /> </div> </body> </html> nano cmd/camera-streamer/http.c
add: extern unsigned char html_camera_html[]; extern unsigned int html_camera_html_len; and { "GET", "/camera", http_content, "text/html", html_camera_html, 0, &html_camera_html_len },
Build
make sudo make install
Set up service
nano service/camera-streamer-printercam.service
; Official Raspberry Pi v2.1 8MP camera based on the Sony IMX219 chip ; https://www.raspberrypi.com/products/camera-module-v2/ ; [Unit] Description=camera-streamer web camera for Pi Camera on Raspberry PI After=network.target
; v2 camera ConditionPathExists=/sys/bus/i2c/drivers/imx219/10-0010/video4linux
[Service] User=root ExecStart=/usr/local/bin/camera-streamer \ --camera-path=/base/soc/i2c0mux/i2c@1/imx219@10 \ --camera-type=libcamera \ --camera-format=YUYV \ ; camera module v2 --camera-width=1640 --camera-height=1232 \ ; use full height for all streams --camera-snapshot.height=1232 \ --camera-video.height=1232 \ --camera-stream.height=1232 \ --camera-fps=15 \ ; use two memory buffers to optimise usage --camera-nbufs=2 \ ; bump brightness slightly --camera-options=brightness=0.1 \ --camera-options=sharpness=9 \ --camera-options=noisereductionmode=HighQuality \ --http-listen=0.0.0.0 \ --http-port=80 \ --rtsp-port
DynamicUser=yes SupplementaryGroups=video i2c Restart=always RestartSec=10 Nice=10 IOSchedulingClass=idle IOSchedulingPriority=7 CPUWeight=20 AllowedCPUs=1-2 MemoryMax=250M
[Install] WantedBy=multi-user.target Start Service
sudo systemctl enable $PWD/service/camera-streamer-printercam.service sudo systemctl start camera-streamer-printercam sudo systemctl stop camera-streamer-printercam
Status
journalctl -xef -u camera-streamer-printercam





Names are used only to indicate the source of a result. Polyzon is not affiliated with the listed sites.