
Бесплатно 
Carrot Pop! Memory Board Game
MakerWorld
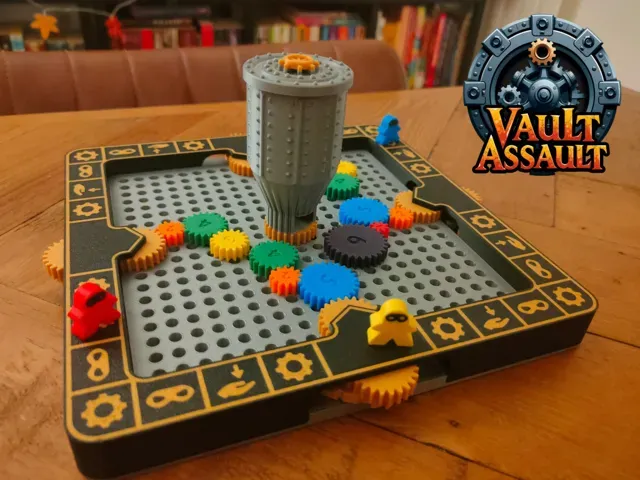
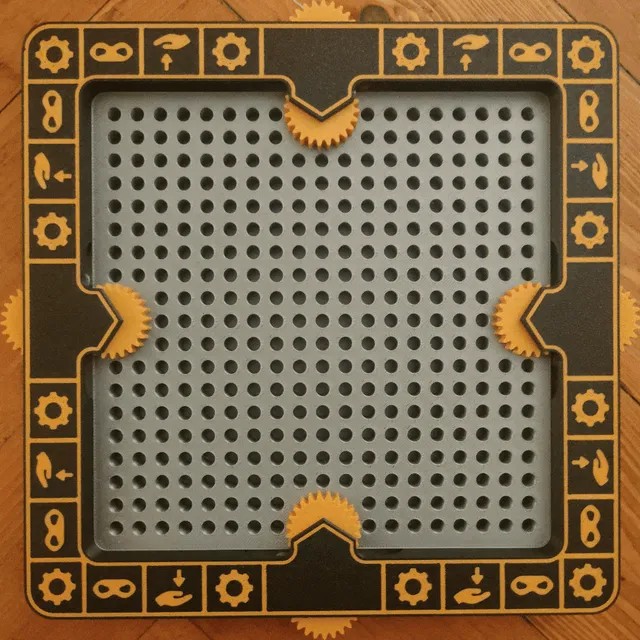
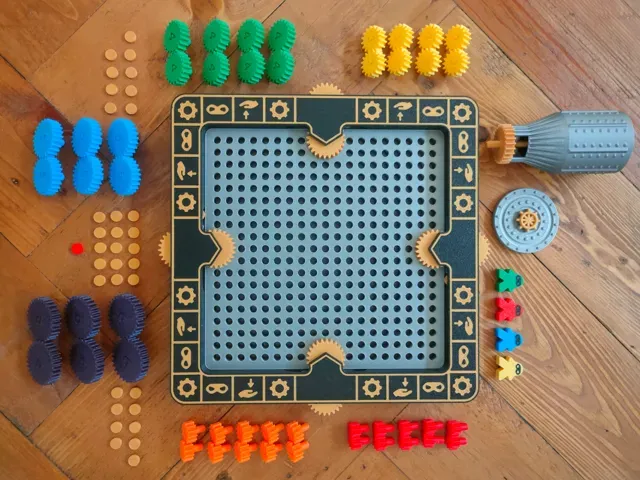
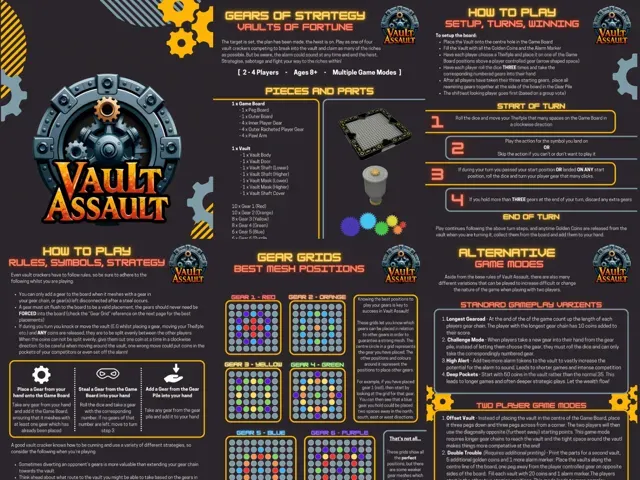
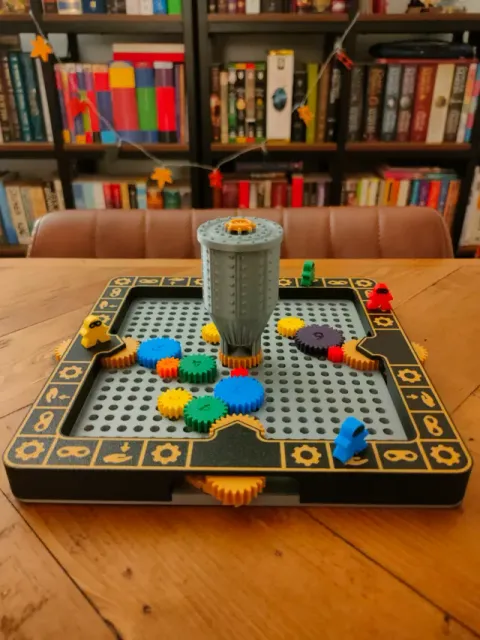
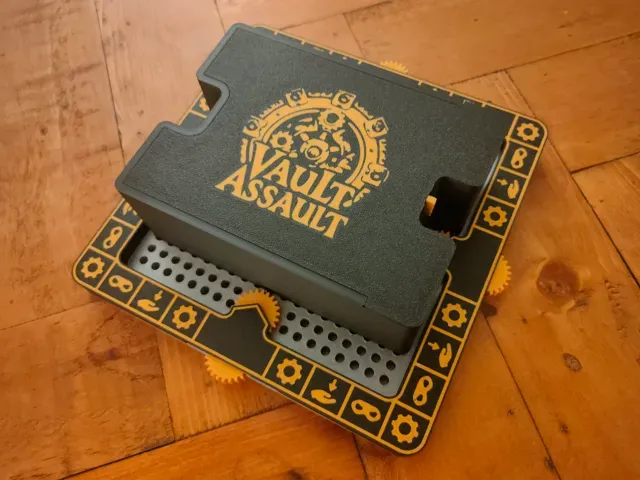
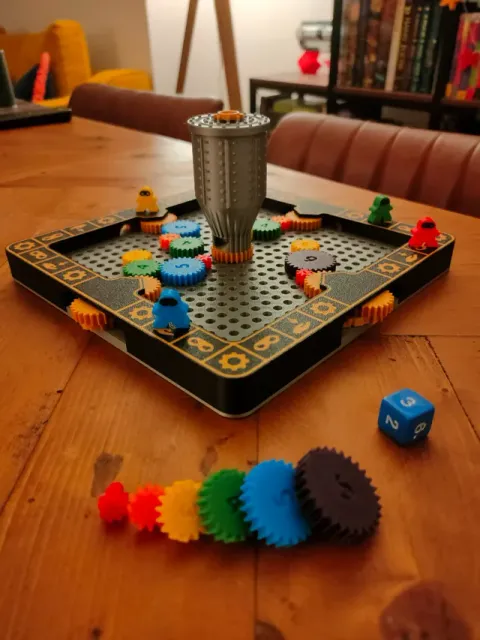
Update 1 (19/11/2024) - Rules V1.1, Minor Part Changes and Accessories Pack Added (see below for further details)
Vault Assault is an exhilarating 3D printed board game where players embody daring vault crackers on a high-stakes mission to break into a vault and seize its golden riches. With up to four players, aged 8 and above, this game combines strategy, cunning, and a touch of sabotage as participants place gears strategically on the board to connect to the vault and release the coins inside. The thrill intensifies as players navigate challenges, aiming to outmaneuver opponents and avoid triggering the alarm that could end the heist abruptly.
Key Features :
- Dynamic Gear Placement : Players use a variety of gears to create complex paths, connect to the vault, and collect coins. - Strategic Play : Includes opportunities for strategic stealing and redirecting gears to disrupt opponents' plans. - Interactive Mechanics : The game board, vault components, and dice rolls ensure no two games are alike. - Multiple Game Modes : From “Challenge Mode” to “Double Trouble,” players can enjoy variations that adjust difficulty and strategy. - Tense Heist Theme : The alarm adds an exciting unpredictability, keeping players on their toes until the very end. Vault Assault challenges players to think ahead, adapt their strategies, and skillfully manage their gears to outsmart their rivals and become the wealthiest vault cracker.
A full instruction manual PDF for the game is included below, be sure to check it out!
Design
This game has been a BLAST to design, and I started with just a few key concepts:
- 2 - 4 Player Game - Mechanical interactions, making the most use of the 3D printing element of board game design - Strategy over luck within the gameplay mechanics - High replayability (different games everytime, multiple game modes, expandable with future updates) I made sure the design minimised the need for support and limited purged filament, and although in total this print requires around 400g of filament, only 0.81g is used for support and 18.25g is used for flushing and tower (for the full colour version shown) . For the non-AMS version, the flusing and tower waste is of course 0g .
Print Profiles
I have incluided two print profiles for this project, one full colour version as shown in the images, and a no-AMS/Quick print version:
- “Vault Assault Full” - Full colour profile with correct settings dialed in (418g filament required, 9 colours, 19h48m print time) - “Vault Assault No-AMS” - Limited colour profile with no AMS required (396g filament required, 4 colours, 16h57m print time)
Game Board Build
I designed the Game Board to be a simple build and require a minimal number of extra parts. Aside from the printed parts only a few screws and springs/elastic bands are required. You can choose to build the rachet and pawl mechanism for each of the player gears with EITHER springs or elastic bands depending which is easiet for you, however the springs will give a better result and last longer. The full maker's supply part list and additional parts are listed as part of this model, but in summary:
- 12 x M3x10mm Countersunk Screws - 8 x M2x4mm Buttonhead Screws (Only required if using springs for rachet and pawls) - 4 x Extension Spring BA001 (Only required if using springs for rachet and pawls) - 4 x 12mm Elastic Bands (I used my partner's small hair bands) (Only required if using elastic bands for rachet and pawls)
Step 1
Once all the parts have been printed seperate out the elements required for building the game board, this consists of the Outer Board, Peg Board, 4 x Player Gear (with ratchet), 4 x Player Gear, 4 x Pawl. You can identify the player gears by looking for the gears which have a hole in the top side.
Step 2 - (Elastic band approach)
Take one of your elastic bands and wrap it around the silver pillar with the chamfered head on the peg board. I found the three rotations around provides the best amount of pressure. Once you have managed to get three loops around the pillar, whilst keeping the elastic band under pressure, thread the pawl through and encourage the elastic band to sit in the slot cut out on the pawl. You can then lower the pawl's peg into the hole to the left of the pillar and it should be held in place. Now take the Player Gear (with ratchet) and insert it into the other hole (you will need to pull the pawl out of the way slightly). The gear should now be held in place and the pawl should engage with the rachet. Both the gear and pawl might not sit perfectly flush at this stage, but don't worry, once the Outer Board is added it will pull everything into the correct position.
Step 2 - (Spring approach)
Place one loop of the spring over the screw hole attached to the main body of the peg board (ensuring the spring coil is facing up) and use one of the M2x4mm screws to secure it in place. Place the pawl into the hole to the left of the silver pillar and align the other loop of the spring with the cutout and hole in the top of the pawl (you may need to apply a little stretch to the spring to achieve this). Use a second M2x4mm screw to secure this end of the spring to the pawl. Now take the Player Gear (with ratchet) and insert it into the other hole (you will need to pull the pawl out of the way slightly). The gear should now be held in place and the pawl should engage with the rachet. Both the gear and pawl might not sit perfectly flush at this stage, but don't worry, once the Outer Board is added it will pull everything into the correct position.
Step 3
Repeat the previous step for all four player gears until your board looks like the image above.
Step 4
Place the Outer Board over the top of the peg board and it should slide neatly into place. Ensure that the little allignment pegs on the Outer Board go into the corresponding slots on top of each of the player gears. If the Outer Board sits flush to the Peg Board all the way round, then it is installed correctly. You can test the ratchet and pawl now by applying a little pressure to the top of the Outer Board and turning each of the outer player gears in a clockwise direction. (Isn't that sound SO satisfying?!)
Step 5
Applying some pressure to the Outer Board, turn the whole gameboard upside down and lie it on a flat surface. Using all 12 M3x10mm countersunk screws secure the two parts of the gameboard together.
Vault Assembly
- Take the Lower Shaft (the part with the circular face attached to it containing three holes), and insert the Higher Shaft (the shorter shaft with three legs on one side and a cross on the top) so that they are tightly connected. The three feet of the Higher Shaft should be flush or just beyond flush once pushed in. - Insert this assembled shaft with the Lower Shaft at the bottom into the Vault Body taking care that it goes through the hole at the bottom of the Vault Body and is visible below the gear. - Take the Lower Mask (the circular part with 3 holes in it) and push this down into the Vault Body ensuring that the little tabs align with the slots in the Vault Body . Push this all the way down until it won't go any further. Make sure you are moving it down evenly, I found applying pressure with both thumbs was a good way to start. I did find during my prototyping that different filaments will have very slightly different tolerances, so you might find this a quite tight fit. Once this is inserted you should be able to hold just the tip of the Lower Shaft which is poking out below the gear of the Vault Body , and turn the Vault Body . If everything is going correctly, the assembled shaft should remain stationary and the Vault Body and Lower Mask should rotate around it. - Take the Vault Shaft Cover (A circular piece with a round cutout through the side, and a cross indent in the centre of one side) and press this onto the cross on the top of the Higher Shaft . Ensure that the direct the round cutout is facing is different to the round cutout of the Lower Shaft one. This should be quite a snug fit, but won't require too much pressure. - Take the Higher Mask and insert it into the top of the vault in the same way as the Lower Mask . This one doesn't have a built in stopper to get in the perfect place, so just slowly press it down until it sits a little way off the Vault Shaft Cover (1mm or 2mm is fine, closer is better). Just ensure that it DOESN'T touch the Vault Shaft Cover or things will start to jam up, or all turn together. That's it! The Vault Door is just to keep the coins in place and hide what is going on and it is keyed so it will lock on when placed correctly.
Some filaments I tested had tiny variations that made the vault work better some times and worse others. The most important aspect is that when the vault shaft is placed into a hole on the board, it should be a pretty tight fit, as the central shaft must remain stationary for the vault to work correctly. When I was building the final version I found that adding just 0.05mm to the shaft diameter made it go from agressively tight to just perfect, so these small differences really do make a difference!
Expansions!
I have already been planning a number of expansions for this game, and designed it in such a way that it was versitle to change, modification and future additions. Depending on the popularity of this project I will hopefully complete some of these soon and share them with you, but here are some of my ideas:
Gears Galore - There are MANY more potential viable gears that would work on the same grid and open up different placements. I am also experimenting with the idea of “broken gears” which are missing some teeth, and after a certain amount of turning cease to work and MUST be stolen back from the board to progress (a great way to limit/hamper your opponents!)
Vaults Aplenty - The vault has been designed as a modular unit on purpose so it is easy to change out the “masks” and “covers” inside to alter how coins interact and behave within the vault. This expansion would make use of that by providing a variety of different masks and covers to change vault behaviour and vary game length.
Conclusion
This has been a real passion project for me and I have LOVED creating my first board game, I hope that you all enjoy playing it as much as I've enjoyed making it! I should also note that although I have done a fair few play tests with different numbers of players and a variety of people, I am only one person, and the rules may not be in their final form yet. So it would be AMAZING if you could all feedback your experience in playing Vault Assault and let me know what went well, what went wrong, or if you think anything could be improved!
Update 1 (19/11/2024) - Rules V1.1, Minor Part Changes and Accessories Pack Added
Firstly I want to say a MASSIVE thank you for the great comments and feedback I recieved on this design, it has been really appreciated, and it great to see how well recieved it has been. Based on feedback I've had from users here, and from a few more round of further play testing I've made a few changes and added the new “Accessories Pack” print profile.
Rules V1.1
From further play testing there has been an overhaul of the core game loop of the rules to change the focus on more gear play and less travelling around the outerboard without interacting your gears. The main changes are:
- You can now steal ANY gear of your choice without needing to roll the dice - Turning your player gear can now happen any time you land on the gear symbol (you can choose which action to take) - I am recommending using only 4 (instead of the original 6) of both gear 5 and gear 6 , as once people start to learn some of the placement options, these gears can be abused and limit dynamic gameplay The full details of all the rule changes have been added into the V1.1 of the manual which can be found below. I've also added an “Easy print” version of the manual too if you want to print one out for reference (no images, mostly black on a white background, no cover page).
Vault Assault - Accessories Pack 0.2mm Layer Height
15% Infill
0.4mm Initial Layer Line Width (to ensure good quality printing for the player cards and logo)
Vault Assault - Full 0.4mm Nozzle
0.2mm Layer Height
15% Infill (100% Infill for pawls)
Vault Assault - No AMS 0.4mm Nozzle
0.2mm Layer Height
15% Infill (100% for Pawls)
Gears Filled, Slow First Layer, 0.2mm layer I filled in the numbers on the gears because I felt that made them much easier to read. I recommend using a lighter color purple if you have one.
I also slowed the first layer speed down from the original for more consistent adhesion. I found that going to fast tended to lead to one or two gears being slightly deformed unless I cleaned my print bed between each print.
Complete game, Filled Gears n˚, accessories - on low plates Optimized printing the game and accessories by regrouping same color plates (mainly the player's accessories, figurines and gears)
0.2mm layer, 2 walls, 15% infill for A1 Mini A print profile for A1 Mini. Split the large parts into separate parts, that need to be glued together.
Dé de jeu 6 faces _ 0.12mm layer, 2 walls, 100% infill Dé de jeu 6 faces
Hauteur de couche : 0.12 mm hight quality
Storage Case for Extended Vault/Magnetic Door - with Insert .4mm nozzle, 2mm layer, minimal support with support blocker modifier and painted non-support.
I finally got around to modifying Applepie's storage case to fit the vault extension/magnetic vault cover that I posted a couple weeks ago. Everything in this case is exactly the same as the original designer's except a longer compartment to allow the extended vault to fit and I also added an insert module that holds the coins, thieves, and die (up to 16mm).
The insert has a lower storage compartment that has a "jail" for the thief player pieces (will hold up to 6 so you can have a couple of additional player colors from the designer's profile). The "jail" has a gate that safely locks the little criminals away! If 4 optional magnets are used, it will have 2 positions, minimum security and maximum security! The top part of the insert has a compartment that stores the game coins (regular and expanded amount) and it will also hold a die up to 16mm. The coin compartment has a slidable cover to keep these little suckers from bouncing around, can't be risking losing gold coins with the state of the economy and all!
The insert assembly has pockets for 3 x 2 disk magnets in the insert body and the gate that are optional - it works a lot "cooler" with the magnets, but the thieves will be unable to escape even if you decide to forego the magnets. Double check magnet polarity before pressing in, should be able to install them without glue. The lower section of the insert has minimal support - for the 2 slots on the side and the for the roof of the jail cell. Be sure to remove any straggling support material form the "cell" area so the little fellas don't get hung up when being locked away!
Thanks again to Applepie for sharing this phenomenal model!
Vault Magnetic Body and Door -0.2mm layer-2 walls-15% infill Add-on extensions for vault body and door with optional 6x2mm disk magnets. These parts snap on to the existing AWESOME Vault Assault model provided by Applepie. It provides for a little more room for extra coins but mainly keeps the door secure during gameplay or storage. This allows the door to sit “inside” of the vault body so the 6x2mm magnets are optional (for some added vault security!).
Insert the magnets into the recesses, make sure polarity is correct. They should press in, but if too loose they can be glued with a very small amount of CA adhesive. To install the extensions, just line up the tabs/notches between the door/extension and vault/extension and press in place. If they are still a bit loose (due to different printers/filaments/settings), a tiny dab of CA adhesive will do the trick to keep it in place.
NOTE: If you are using the add-on storage case, the vault with the extensions installed may no longer fit into the compartment. I will be printing the case and I will be adding a slot (negative part in Bambu Studio slicer) that allows the pin to fit in the compartment.
Before uploading this part profile, I did run this by the original designer to make sure it was OK to do so. Applepie did a fantastic job with this! I am also looking to design a “coin tube” for each player to easily track the amount of coins each possess as well as a themed 6-sided die.
The vault extension should be printed with an internal brim (already in the profile) as the surfaces contacting the build plate are rather small. There will be a very narrow brim located within the slot, be sure to remove that (comes out very easily) before snapping onto the vault body. I was able to print 3 sets with no issues using the provided profile.
Printed in X1C with Bambu PLA Basic bronze and silver at .2mm 15% Gyroid infill, slightly slower first layer/infill speeds of 40/90 mm/s (all in profile).
Vault Inner Rod Horizontaly 0.2mm layer, 2 walls, 15% infill Print with no support, add a drop of glue when assembling
TPU feet TPU feet to cover the screws, so there is no scratching
No AMS, coloured - 0.2mm layer, 2 walls, 15% infill The version with coloured board and things separated on the plates.
Consist two types of board:
- regular Board with the holes in the places where the graphic should be - set Board + Overlay with raised graphics. Board printed in two parts must to be glued together with ‘Overlay’ using ‘Board Alignment Jig’. To use it place ‘Overlay’ upside down and then Board on it.
Two-Piece Board: Smooth top playing surface A two-piece print profile for the main board. In printing the main board upside down, a smoother playing surface is achieved when using a high-temperature, non-textured plate. Making the board a two-piece reduces the printing time to seven and a half hours, versus printing the one-piece board upside down, which had more than an 11 hour print time, and had a lot of support material to remove. The upside down one-piece board also resulted in a rough surface of mating geometry that contacts the input gear and pawl components. Once the two pieces are printed out, the flange can be attached to the board by super glue. Assembly proceeds normally from there. Added logo to the reverse side of the main board.
Pressure Fit Base Plate to Cover Screws Screws scratched up my table, so I made a base plate to cover them
Extend game across multiple boards I am a big fan of the creativeness and possibilities of this game that Applepie created, and many others have shared print profiles on. I thought you could simulate robbers tunneling from the basement of the building next store by combining two boards. Lots of variations:
- Multiple players on the left try and rob the vault on the right - Three players on each side try and rob the vault on the opposite side - Three players on one side try and rob two vaults on the opposite side… - Lot's more that others can contribute! This print configuration lists the additional components needed to combine two boards. You will need to print out double the components of the main game, plus the items in this print profile. This profile contains:
- Larger storage box - Attachment brackets to store one board below and one board above the storage box - A “tunnel” piece that is a bracket that holds the boards together - A special gear that transfers movement from one board to the other “through the tunnel” The connecting gear is placed on the middle position of one of the player aids, the assembly is then placed in between two boards. The tunnel bracket holds the two boards relative to each other and against the middle transfer gear.
The expanded storage contains room for:
- Double components - Print in place containers to hold Gears 1-4 - Stacking trays to hold the double quantity of Player Aids and Gears 5-6 - Secure locations for Two vaults with @3Dja's magnetic vault doors and two of his awesome “Jails” - Print in place container to hold Axl_print3D's (@axloury) beautiful dice Many thanks to Applepie, 3Dja, and Axl_print3D (axloury).
Названия используются только для указания источника результата. Polyzon не аффилирован с перечисленными площадками.