
Бесплатно 
Safety Knife PRO ● Auto-Retract (PiP mechanism)
MakerWorld

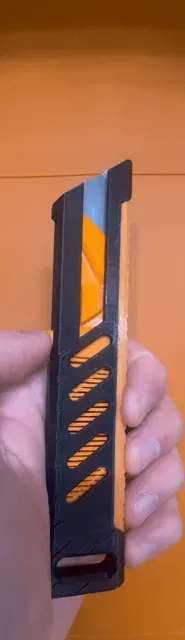

Introduction
Have you ever worried about the safety of using a utility blade or struggled with bulky, uncomfortable designs? I’ve been there too. After spending hours cutting materials and not always remembering to retract the blade, I ended up cutting myself more times than I’d like to admit. While working on various projects, I realized the need for a safer, more ergonomic solution that could still deliver the precision and reliability of a traditional blade.
That’s why I designed this Safety Utility Blade —a tool that combines comfort, customization, and automatic blade retraction to prioritize safety without sacrificing performance.
This utility blade isn’t just safe; it’s easy to use, quick to assemble, and designed to make your work faster and stress-free.
Model Description
This Safety Utility Blade is the ultimate cutting tool for DIY enthusiasts, crafters, and professionals alike. With its innovative design, you get safety, comfort, and functionality in a simple, customizable package.
Why You'll Love It
- Safety First : The blade retracts automatically, minimizing the risk of accidental injuries. - Ergonomic & Comfortable : Designed to fit perfectly in your hand for extended use without strain. - Aesthetic Design : Clean, sleek lines make it look as great as it performs. - Customizable : I’ve included a parametric STEP file, allowing you to adapt the design for other blade sizes. The snap-fit design ensures you can assemble it without glue and later disassemble it easily for adjustments or maintenance. - Easy Blade Replacement : Swap out blades effortlessly. - Support-Free Printing : The model is designed to print without supports, saving you time and filament. No post-processing is required, provided your printer settings are dialed in correctly. - Minimal Parts : The assembly consists of just three parts, making it quick and straightforward. (A fourth part can be added if you choose to include the optional TPU grip.)
Safety Disclaimer
While the design minimizes risks, always exercise caution when using a utility blade. Treat the blade with care, store it safely, and follow all safety guidelines during use.
What to Print
To assemble the Safety Utility Blade, you need 3 parts :
- 1 Case (smooth, medium grip, or high grip) - 1 Knife Case - 1 Spring If you want to add a TPU grip, print the corresponding TPU file along with the case, making it a total of 4 parts .
Recommended Print
Print the Main Safety Knife Set for an easy and complete setup. It includes all parts in the correct orientation and uses the medium grip without TPU. (Total of 3 parts)
How to Print
To achieve the best results:
- Orientation : Orient the parts as shown in the included image. - Support Settings : Ensure supports are off. - Knife Case Walls : Use 4 or more walls to increase durability. - Brim Tips : If you add a brim to the knife case, sand or deburr the edges afterward to prevent interference during assembly. Do not add a brim to the spring, as it can be difficult to remove. I printed this model on my K1 Max using Orca Slicer , and it came out great with no problems at all.
How to Assemble
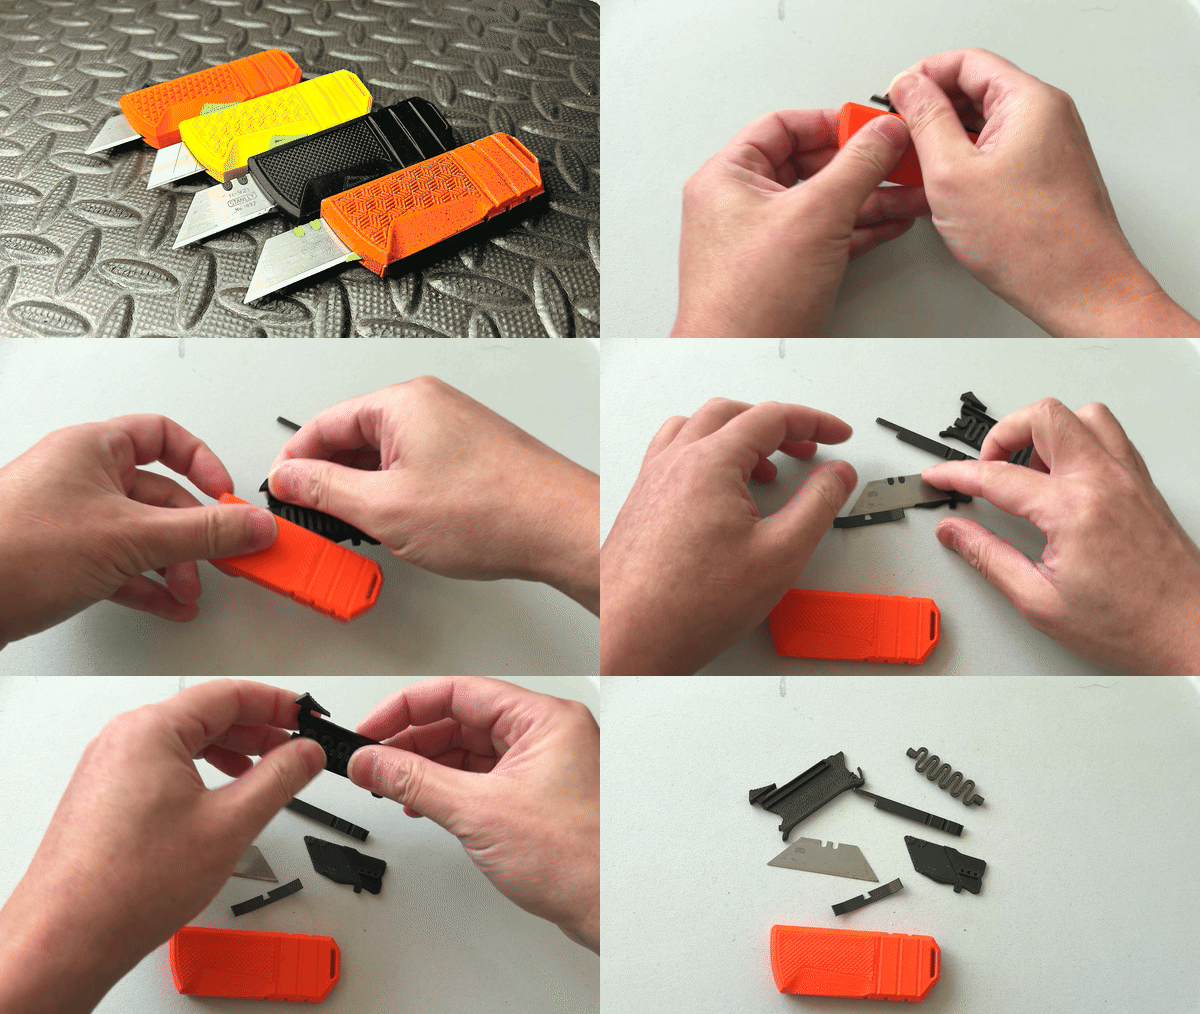
Follow these steps carefully to ensure a safe and functional assembly:
Glue the TPU Grip (Optional)
- Apply glue to the TPU grip and attach it to the main case. While not necessary, the grip adds comfort and enhances the overall aesthetic.
Attach Spring to Knife Case
- Push the spring securely into the knife case. - If you want a permanent fit, add a small amount of glue for extra strength. Insert Spring and Knife Assembly into Main Case
- Slightly flex the main case to fit the knife assembly inside. - Be cautious while bending the layer lines; this step requires care, but with 4 walls , the print should hold up without issues.
Snap the Blade In
- Use a thin, flat tool like a screwdriver to snap the blade into place. Aim for the 3rd to 5th coil at the end of the spring and push it down firmly until you hear a snap. - Test the mechanism by pulling the knife case to extend the blade.
Insert the Blade
- Finally, slide the blade into the assembled unit. Congratulations! You now have a fully functional Safety Utility Blade ready for everyday use without the worry of accidental cuts.
Extras and Maintenance
Retention the Spring
Over time, the spring may weaken. To retension it:
- Insert a thin rod (like a screwdriver) between the 5th and 10th coil near the top. - Press downward to restore the spring’s tension. If this doesn’t work, the spring may need to be replaced. Follow the disassembly steps below to remove and replace it.
How to Disassemble
Remove the Blade
- Push a thin rod into the hole and pull the blade out.
Remove the Spring from the Case
- Use a rod (like a screwdriver) to push the spring out of the case (snap mechanism). - Flex the main case slightly to remove the knife assembly. - Lastly, lift the spring out of its socket.
Special Thanks
I want to give a huge thanks to 3D Printy , Extrutim , and Doug Kremer for their contributions and inspiration. This model took countless hours of prototyping, testing, and refining, and it wouldn’t have been possible without the ideas, resources, and designs these amazing creators shared.






Названия используются только для указания источника результата. Polyzon не аффилирован с перечисленными площадками.