
Бесплатно 
Prusa Tool Box - CORE ONE (+) - CORE ONE L - MK4S - MK4 - XL - MK3.9 - MK3.5 - MK3 - Mini+ - Mini
Printables

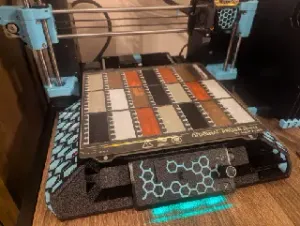
This print is only 40 minutes, uses only about 1.5g of each filament. The layout matches the purge matrix so you can easily enter your values after eyeballing the clean point. You will get cleaner prints and probably save a lot of filament!
Fun Fact: I made this 100% inside PrusaSlicer using internal features, no models were loaded.
The main problem I had to work out was distributing the wipe tower because sequential printing (required here) does not work with default wipe tower. It took a while to figure out the magic incantations but I am happy to find a good working solution. Bottom line is I used the ramming sequence from MK4 (Nextrduer) with MMU3 so likely won't work on older printer models as is. See how I made it below if you want to adapt it. Feel free to reach out for help.
HOW TO USE:
Just print it to get all 5 filament combinations (20 tool changes). I included a gcode with all 5 PLA for a 0.4 mm nozzle which you should be able to just use as is.
If you have other filament types or nozzle size, or you want to use a subset of the 5 possible filaments, then you will want to slice the 3mf file (see below).
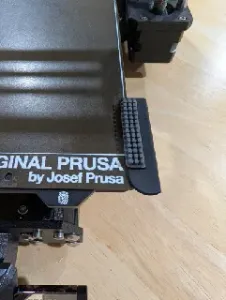
The center infill of each patch is 250 mm^3. There are 10 marks on the right edge showing each 25 mm^3. The color change starts at the bottom and moves up. Look for where the color is clean.
In this example (sorry for poor photo) hopefully you can see the dark extends up to around the first tick mark (25 mm^3). It gets subtle quickly. I went over this a bit to 40 mm^3 to make sure it is clean.
The perimeter can help as a reference clean color since it is printed last. Write the value on the patch. If you knock it off writing just put it back after.
Pro Tip: take a photo and jack up the saturation to help see the bleed (not used above).
When you are done, just copy all the values directly into the purging volume matrix in PrusaSlicer. You are done!
If you want you can keep the patches to refer to later. There is a loop in the corner to slide onto a piece of filament.
SLICING:
Use the 3mf as supplied. Only make these changes:
- filaments types - removing row/column as described below Any other changes will probably mess it up. It is set up carefully to expect certain settings. If you need to change the printer, make sure to copy over the tool change gcode. I found it does not transfer automatically.
NOTE: if you mix filament types, they need to use the same temperature.
To use a subset of filaments, remove the row and column of the omitted filament. Do NOT remove the empty square as it throws off the wipe tower coordinates.
In this example I removed filament 4 by deleting those patches from the plate, represented by red X I drew on the picture. You can see the slice automatically adjusted and got the right combination of wipe towers.
BACKGROUND INFO:
You have to extrude some of the new filament color to clean out any remaining color from the prior filament. How much depends on the color and filament quality/brand. Prusa sets a slightly conservative value to cover most bases. The ramming sequence on the MK4, primarily aimed at getting a good tip shape, also does a good job cleaning out most of the old filament. So you will find you can get away with smaller values in many cases which saves filament and a smaller wipe tower.
But in some cases you need more. In my example print I picked my most saturated deep red PLA and my absolute cheapest weak barely white PLA and pitted them against each other. From red to white needed over 200 mm^3 to get clean (I rounded up to 250).
HOW I MADE IT (so you can too):
I created a color patch inside PrusaSlicer using native shapes. I made some print setting changes (see list attached) so I could carefully control how much filament is laid down in a pass. I used a spreadsheet to calculate the sizes. Then I validated the gcode output to verify it is using the correct amount of filament.
I use a thicker first layer so that the color is easier to see. I print a perimeter (last) so that the full size is known in case the nozzle priming is not complete at the start, which happens on my HF nozzle. It is also helpful to use to contrast with the transitioning color when you are eyeballing it later.
Once I was happy with the patch, I replicated it and arrayed it to match the purging volume matrix and ordered them correctly to capture all change sequence permutations, assigning to correct extruder.
Now is the tricky bit. This only works as a sequential print because we need to control the color change order. PrusaSlicer does not allow a wipe tower with sequential. But it is critical to mimic both the ramming sequence and the nozzle priming of a filament change. That way the patch only represents the amount of purge (wipe) that is needed. I tried using tool change gcode which can do the ramming but not the priming and it had extra insertions. I tried to use filament end gcode but that gets inserted in the wrong places.
Tool tips to the rescue. So reading the tool tip revealed the secret. You can put the tool change into the tool change gcode and slicer will suppress its own tool change statements! Now I copied the ramming and priming sequences from a normal wipe tower print, sized appropriately. I put the tool change in the middle and it worked! Except of course the wipe towers all collided. So I changed to relative moves, tediously translated all by hand. Now it was so close. The first tower is in the wrong place and there is an extra one from the purge line. I tried to use some conditionals but turns out many of the “placeholders” didn't work. I finally found functional ones and got it all working.
Caveats: There are no temp changes in the tool change sequence. This means switching between, say, PLA and PETG won't work if the temps are different (likely). It might be able to be implemented with the right placeholders but I haven't investigated yet.





Названия используются только для указания источника результата. Polyzon не аффилирован с перечисленными площадками.