
Бесплатно ![#0181 Nautilus 2 Rotating Caddy [2 Variants]](https://cache.polyzon.org/api/img?url=https%3A%2F%2Fmedia.printables.com%2Fmedia%2Fprints%2F962699%2Fimages%2F7772480_aed874a0-8e59-4082-aa40-22364583e4ac_452d0fb7-a734-499a-b576-6802986d5fbc%2Frl-20240929-003.jpg&w=300)
#0181 Nautilus 2 Rotating Caddy [2 Variants]
Printables



*** Thanks for checking out this model! ***
If you appreciate what I'm doing, buying me a coffee would be a wonderful show of support! Good quality designs take time, skill, and CAFFEINE! ;-)
And then check out my other models for something else you might like!
**********
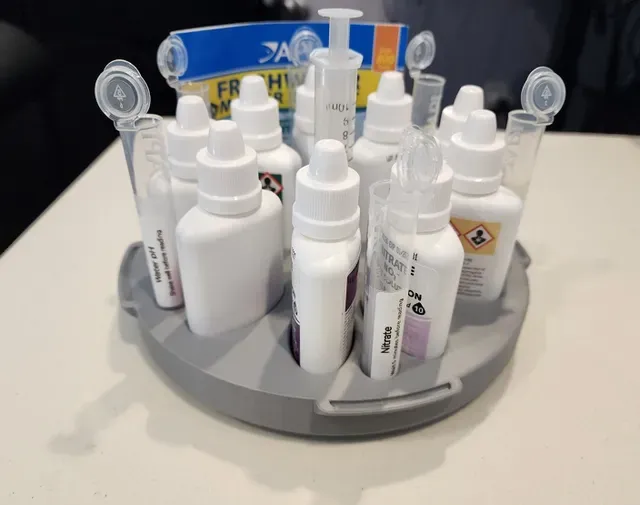
Keep your tests and their tubes grouped and organized. Rotate to each test as needed.
This is for the API Master Water Tester Kit plus room for the GH and KH tests too. If you have ever used the kit's container, it is awkward to open and close and (at least for my kit) damages the test vials. So I created a better way to organize the kit.
**********
Key Features:
- Nine pockets for the testing fluid bottles, grouped together in 6 groupings to help clearly identify which test vials to use for each test.
- 6 pockets to hold each vial steady while preparing for tests.
- Center position is to store a 10ml syringe - used to extract water from the tank and inject into each vial precisely.
- Designed for the Freshwater Test Kit but should fit the Saltwater Test Kit as well.
Recommendations:
- Print using PLA. 0.2mm layer, 0.4mm nozzle.
- I printed mine in Polymaker PLA Pro.
- 2 vertical walls.
- You can try other settings if you want.
Assembly Instructions :
- There is a 1 layer thick bridge on the base that is there to allow for printing the screw hole without support. Clear this hole for the M3 screw with a small Philips eat screw driver or similar tool.
- NOTE: the hole in the caddy is slightly smaller than 3mm, so that the screw threads into the walls.
- You may need to chase the screw hole on the base with a 3mm drill bit for proper clearance.
- Note the assembled orientation of the ring (see pics). Place the ring on the base.
- Drop 6x 6mm bearings in every other hole position of the ring.
- Place the caddy on top of the base.
- While holding the assembly FIRMLY, flip the assembly over.
- Install the M3 screw - tighten to finger tight then back off 1/2 turn, or just enough to allow the caddy to spin freely.
- Enjoy!
Other things you'll need:
- 6x 6mm ball bearings
- 1x M3x8 or M3x10 socket head cap screw (pan head also ok).
- Optional: 10ml syringe.
**********
If you add this to your collection and/or download the model, please >click< the LIKE button and give it some STARS !
Remember, you can earn some Prusameters if you post a pic of your make! Plus, it would make my day to see it. ;-D
Happy Printing!
P.S. Please post some constructive feedback if you'd like to see something improved.
![#0180 Nautilus 1 Rotating Caddy [2 Variants]](https://cache.polyzon.org/api/img?url=https%3A%2F%2Fmedia.printables.com%2Fmedia%2Fprints%2F962700%2Fimages%2F7601178_650380a2-fd76-4e2a-b338-08d492096819_84f556a4-23ca-4c80-8467-ca76fa9da8aa%2Frl-20240906-013.jpg&w=300)






Названия используются только для указания источника результата. Polyzon не аффилирован с перечисленными площадками.