
Бесплатно 
Prusa Tool Box - CORE ONE (+) - CORE ONE L - MK4S - MK4 - XL - MK3.9 - MK3.5 - MK3 - Mini+ - Mini
Printables


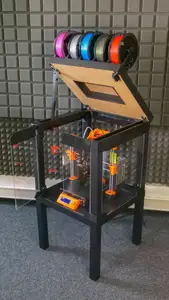
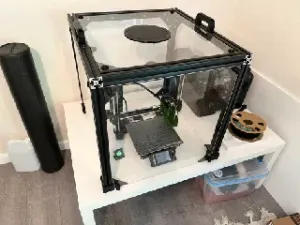
For those who think that the Original PRUSA Enclosure is too expansive, or that it is inconvenient to have a box that prevents 360° access to the printer during maintenance, or who do not want to disassemble or modify the printer's bed just to put it into a box, or who are particularly sensitive to filament fumes (as me) and absolutely do not want to breathe them, then this is the project for you.
I become very sensitive to filament fumes, and since I'm do not own a farm and I print as a hobby at home, it was necessary to do something right away to stop the fumes.
I wanted to build the original PRUSA i3 MK3 enclosure based on the IKEA Lack table but soon I realised that it had some flaws, that should be fixed. So I decided to redesign the whole thing applying the required improvements to the original version.
IMPROVEMENTS
- ✅ The box is not air tight, so the only way to avoid that fumes exit from the box is to have a lower air pressure in the box, so that air can only enter and not exit. In my case this is done via a suction hose connected to a PWM pump that expels the air out the window via the air conditioner vent.
- ✅ Even if the box is based on the IKEA Lack table, (55x55) and it seems smaller than the metallic Original PRUSA Enclosure , the additional space inside has been engineered carefully with a clever design trick, so that there is lot of extra space for the bed cable, and it does not require to be dismounted and have the plug replaced with an angular or 90° version. As result the Lacklosure requires less space at home compared to the Original PRUSA Enclosure, and it is ideal for people that do not have space to the big one. The space for the cable has been obtained adding a semi sphere that allows the cable to have enough space to move, and avoid the cable to hit the box.
- ✅ All the legs have been lengthened to increased box height. Now there is enough space for the PTFE tube to avoid that when the Nextruder is in a high Z position (e.g. > 180) the exiting PTFE tube hits the top covers and create an excessive curvature which creates strong friction in the filament.
- ✅ The new enclosure internal space size is 55 x 55 x 55 cm. Lot of space 😄. I think also an MMU3 could be fitted inside, even if I would prefer to install it outside.
- ✅ The filament is not inserted in a central hole on the top as the original model, but it follows the Original Prusa Enclosure standard (from the right side). You may choose to swap the panels and have it on left or right, depending your preferences. However if you decide to have the filament inserted from the top centre of the box, you may drill a hole in centre of the top panel and insert the tube from there using this adapter for 1/8" BSP or this one for PC4-M10.
- ✅ The new legs are stronger and there is no risk that they break when they are not perpendicular.
- ✅ If you install LED Lights inside, you can connect them through the special SNAP/IN Magnetic connectors, so no need to disconnect any cable when you need to remove the cover shell.
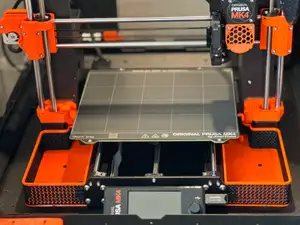
- ✅ To fully access to your printer, simply unhook the PTFE from the Nextruder and lift and remove the supporting structure cover using the comfortable handles, and the MK4S will remain fully accessible at 360° on the Lack table below, without any hindrance from electrical wires to detach or pins or screws. It take less than 10 seconds.
POSSIBLE CONFIGURATIONS
- ✅ BASE VERSION (only IKEA LACK and printed plastic. No electrical parts)
- ✅ ADD-ON #1 : LED Lights
- ✅ ADD-ON #2 : FUMES EXTRACTION system towards the outside with Fan
- ✅ ADD-ON #3 : Boxes for tools.
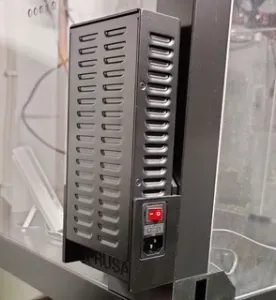
- ✅ ADD-ON #4 : Electrical Plugs & Switches.
- ✅ ADD-ON #5: Advanced Filtration for PRUSA Core ONE instead of the vacuum tube
- ✅ Everything else based on your fantasy.
BILL OF MATERIALS:
BASE VERSION
- 5 Plexiglas panels (3 mm thickness, that should be cut on measure. See the PDF of the cut drawings)
- 2 IKEA LACK tables.
- 54 cm PTFE tube 4 mm diam. ( PRUSA type )
- 1 Fitting M5-4 (to connect the PTFE tube to the Nextruder)
- 2 Spools (at least) of PRUSAMENT ORANGE PETG
- Spool of PRUSAMENT JET BLACK PETG
- Spool of transparent PETG
- Spool of WHITE PETG
- 1 Pneumatic fit PC4-M10
- 1 Pneumatic fit PC6-¼ inches
- 4 Wood screws M6 40 mm
- 4 Wood screws M6 30 mm
- 8 M6 washers
- 8 Wood screws M4 20 mm
- 8 Wood screws M4 25 mm
- 30 Wood screws M3 20 mm and 25 mm . I suggest to use a kit.
- A set of micro screws . It will used to fix object to Plexiglas if you don't want to use glue.
- 1 LCD Hygrometer




Названия используются только для указания источника результата. Polyzon не аффилирован с перечисленными площадками.