
Бесплатно 
Universal wide angle viewfinder V2 (large FOV, smaller image)
Printables


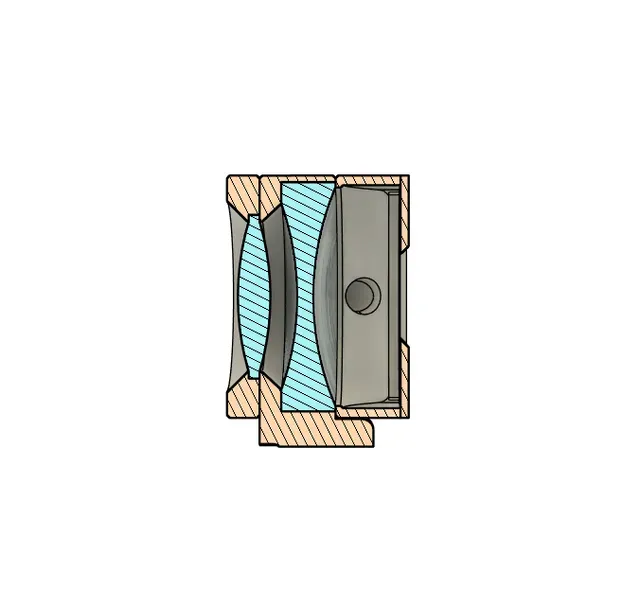
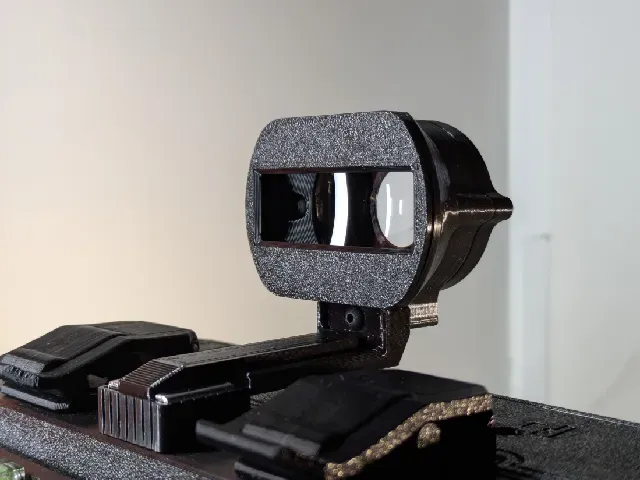


Could not find any easy to use, easy to make, cheap and compact viewfinder to use with Fat Shot 617 - Medium format 6x17 modular panoramic film camera so I made my own. It uses optics from a widely avaliable " wide angle 0.45x smartphone lens " (shoutout to @LucaVascon_574275 for the idea).
With very wide angle lenses (20-25 mm focal length, 80-90 degrees horizontal FOV) consider using the second version . It's easier to frame the shot with a smaller image, when you can see the whole frame at once.
Features
- Easy to source optics.
- Easy to print and easy to build design. No 3D printed threads and no supports needed.
- Wide FOV that corresponds to about 20 mm equivalent focal length.
- Image size of about 65 degrees horizontally (same as a 60'' screen from 1 m away).
- Swappable masks to use with different formats. I've added 6x12, 6x14 and 6x17 for 90 mm focal length and an empty slate for you to edit it.
- Multiple mounting options.
- Almost rectilinear image. There is of course a slight fish eye distortion but it is almost unnoticeable because of the large image.
The design is not at all perfect, of course. There are a couple of drawbacks:
- Image is very large, about 65 degrees horizontally. For wide angle framing, such as with 6x17 format with 90 mm lens, I would prefer for it to be smaller to be able to easily see the whole frame at once (solved in version 2 ).
- Mask is pretty close to the objective to make the whole assembly as compact as possible, and therefore it's edges are blurry (not an issue in version 2 ).
- The viewfinder is 60 mm wide, 50 mm tall and 35 mm deep, so still not the smallest. This won't be a problem for medium format or other bulky cameras, but on smaller ones this viewfinder can look out of place.
- Significant parallax caused by the large size of the ocular lens (less of an issue in version 2 ). This means that the framing will depend a lot on the position of your eye with respect to the viewfinder's central axis. Use Eyepiece 20 mm or Eyepiece 10 mm versions if this is a problem for you. Smaller opening helps in framing by forcing your eye to be centered.
Hardware
- Smartphone lens (see below) - x1
- M3x8 screws x2
- M3x12 screws x3
Preferably use black screws.
The lens
Search for " wide angle 0.45x smartphone lens". The images used by the sellers look something like this:
IMPORTANT NOTICE : There are versions of this smartphone lens with plastic and glass lens elements. Both have their pros and cons. For example, plastic lenses are much lighter, but glass is much more durable. There is not much difference in image quality though.
To know which version isbeing sold, pay attention to these details in user reviews:
- In the version with glass optics both front and rear lens elements are held by metal threaded rings with visible notches for a lens wrench. Plastic version has press-fit plastic rings without notches.
- There is a nice center-pinch lens cap included with the version with glass optics. Plastic version has front and back push-on caps.
There are files for both versions, but I don't update the plastic version and it's a bit outdated . Parts are almost the same but because the elements have slightly different dimensions and different optical properties, they are not interchangeable. Only shoe mount adapters are the same.
Assembly
- Choose the version you want to print, for plastic or for glass optics, and use the files from the corresponding folder.
- Choose the version of the eyepiece. Use the Full Opening version to have the largest opening that is easy to view through but have the largest parallax. Use 20 mm or 10 mm version to have a smaller opening and more precise framing.
- Choose one Mask and one Shoe Mount. Other parts should be printed one of each. No supports needed for any of the models. If you stumble upon overhangs, then flip the part upside down in the slicer. Print shoe mounts solid or with thick walls, they better be tough.
- Take out the lens elements from the metal housing. In a version with plastic optics they are being held by plastic rings that are just press fit there. Cover them with some fabric and push them out. Glass elements are held by threaded rings that have to be unscrewed. Pictured below are the plastic lens elements.
- Use two M3x12 screws to screw together the Eyepiece and the Body with the convex lens between them.
- Place the concave lens inside the Body part. This lens has a flat section on one side, and this side should face the Eyepiece part.
- Use two M3x8 screws to screw together the Cone and the Body .
- Use the remaining screw to secure the shoe mount adapter on the viewfinder body. There are two variants of the adapter and both of them can be screwed two ways: on the front and on the back. Overall you have four options with a step of about 20 mm.
For the Fat Shot 617 the last option should be used with the viewfinder placed as far back as possible to clear the thick cassette.
UPDATE : Or skip this and use the "Embedded shoe mount" version of the Body part. Only avaliable for the glass VF.
- Snap on the mask.





Названия используются только для указания источника результата. Polyzon не аффилирован с перечисленными площадками.