
Бесплатно 
Prusa Tool Box - CORE ONE (+) - CORE ONE L - MK4S - MK4 - XL - MK3.9 - MK3.5 - MK3 - Mini+ - Mini
Printables


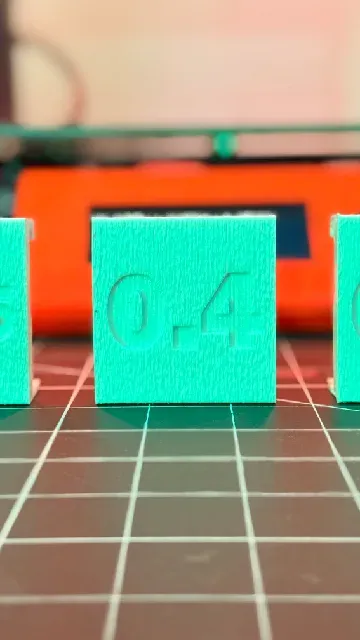


Don't just guess your nozzle size.. Be sure of it!
This frame attachment is for those who have multiple Prusa printers and utilize a variety of nozzle sizes for your prints. These nozzle size indicators offer a simple solution to knowing which nozzle size is on which printer at a glance.
Snap-fit Nozzle Size Indicators
These indicators snap directly onto the top of the aluminum frame on any Prusa MK3, MK3S, MK3s+, MK4, or MK4S - just like Prusa's factory spool holders. Once installed, the tolerances are just loose enough for you to slide the indicator back and forth to your liking.
Available Nozzle Size Indicators:
- 0.25 mm
- 0.4 mm
- 0.6 mm
- 0.8 mm
Instructions & Suggestions:
- Slicing the Model
- Infill - 100% *****
- Brim - None
- Print Orientation
- Rotate 90 degrees so that the model forms a "C" flat on the print bed *****
- *If you don't orient the model properly & use 100% infill, the print will almost certainly snap during installation
- Paint-on Fuzzy Skin
- Once rotated, only select the left, right, and front faces.
- Be sure to select any of the smaller faces inside the numbers as well
- Fuzzy skin settings: 0.3mm thickness & 0.8mm point distance
- Paint-on Supports
- Enable smart-fill, highlight overhang by > 25, smart-fill angle > 15
- Enable "support enforcers only" before slicing
- Installing the Nozzle Size Indicator
- Place top of the indicator on the aluminum frame first
- Apply a moderate amount of pressure downwards & into the frame to snap the indicator in place
- Slide the indicator left/right to your desired position
- Colored Nozzle Size Numbers for Greater Contrast
- Easy Way
- Apply some acrylic paint to the inside face of the numbers
- Tricky Way
- When slicing, orient the model so the face with the nozzle size on it is flat on the print bed
- Use the color change slider to initiate a filament change before the face of the numbers appear (if using 0.3mm layer height, this will be at 1.4 on the color change slider)
- Initiate another color change at least 3 layers after the first one to return back to the primary filament color (if using 0.3mm layer height, this will be at 2.3 on the color change slider)




Названия используются только для указания источника результата. Polyzon не аффилирован с перечисленными площадками.