
Бесплатно 
Prusa CORE One/+ SKADIS mod
Printables


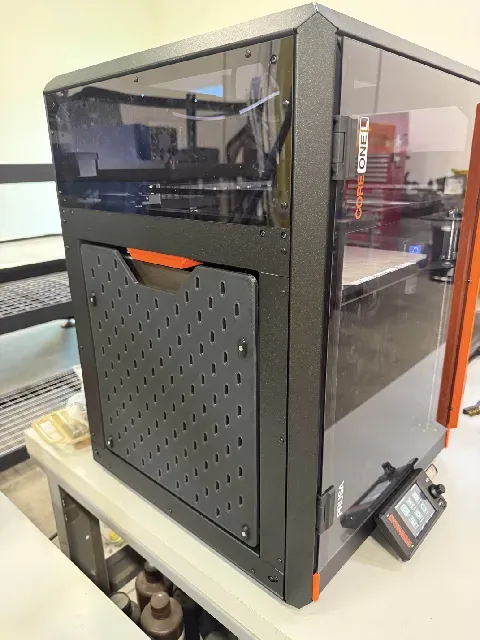

Hardware:
- 4* 6x3mm magnets
- 4* M3x12mm screw to mount skadis panel on printed parts
- 2* M5x15mm (to M5x20mm)for the hinge parts
- 4* M3xD5xL4 Heat Set Inserts (Voron Spec)
- 4* M3x8mm Pan Head screws for mounting to CORE One L MAKE SURE THESE ARE PAN HEAD SCREWS, THE HEAD MUST BE THIN ENOUGH TO FIT BETWEEN THE BED AND THE SIDE PANEL
Printing and Filament:
- I printed all the parts except for the SKADIS panel out of PETG, the panel was printed in PLA.
- All parts were printed with 30% gyroid infill, 0.2mm layer height, 4 perimeters, with support.
- I have included a .3mf file of all the parts minus the panel on one plate if you would like exact settings and orientations.
- There is a split and full version of the SKADIS panel just like Scott had, if you have a print bed that is 330x330 or larger you can print the full plate at once. The split model can be printed and glued together if printing all parts on your CORE one L.
There is a folder of alternate files if you would like to print the 3 build plate style holder, so far it has been holding up for me. I did not originally include these models because there is a thinner wall where the third plate gets inserted that may be weak depending on your filament choice and print settings. Assembly Instructions:
For the most part you will be following Scott's original assembly instructions found here
Changes to their instructions are as follows:
- DO NOT install any magnets in the hinge pieces, only install the 6x3mm magnets into the ends of the upper rails. (there aren't holes for you to install the other magnets anyway)
- The panel no longer just gets placed into the recess as indicated in Scott's final step (not magnetic anymore)
New Instructions:
- Add heat set inserts to both hinges:
- Add heat set inserts to both upper rail adapters:
- Insert one 6x3mm magnet into each adapter:
- CRITICAL: MAKE SURE TO MATCH THE POLARITY TO THE CORRESPONDING UPPER RAIL MAGNET
Installation:
- First install both of the upper rail adapters in their corresponding positions using the M3x8mm pan head screws.
- Next place the entire assembly you made by following Scott's Instructions into the opening.
- The magnets from the upper rails should help hold it in place temporarily, but you may need to hold the entire assembly with your hand to support it.
- Secure the assembly by threading the remaining M3x8mm pan head screws into the inserts in the hinges.
IMPORTANT POST INSTALL CHECK
Before starting your printer after installing the mod, look from the top down to visually verify that your screw heads will not collide with the bed!!!
As a secondary check you can manually move the bed up and down to verify before starting your next print.
Updates:
- Jan 30, 2026:
- Added DXF file so people can laser cut the SKADIS panel
- Feb 5, 2026:
- Added STL files with option for 3 build plates
- Altered model description and instructions to include this as an option
- Feb 11, 2026:
- Updated heatset insert description from M3x5x4 to M3xD5xL4 for clarity
- Deleted SolidWorks Pack n Go as it was not up to date, I can send an updated one upon request


Названия используются только для указания источника результата. Polyzon не аффилирован с перечисленными площадками.