
Бесплатно 
CHAMELEON v3 - Modular Arcade Stick
Printables


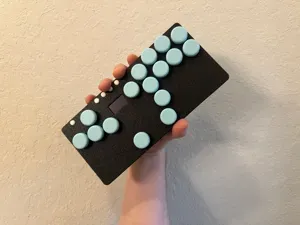
Introducing... VIPER! This is my first enclosure specifically for leverless / all button controllers.
As always, I'm open to any/all suggestions – feel free to drop them in the comments!
RAF
= OnShape Documents =
- 0.4 - Current version
- CHAMv3 Panels - VIPER uses these panels (only those without a lever)
Any provided OnShape links are to my working documents, are the most updated version of the project, and may differ from the files uploaded here.
= Future Changes =
- Compatibility with levers... possibly.
- Updates to guide.
= Change Log =
- Null
= Introduction =
VIPER. This is my first enclosure specifically for leverless layouts. I do not recommend this build if it is your first time making a controller. At 35mm tall, it will require creative solutions if you decide to use traditional arcade buttons. This potentially means bending the pins on your switches and hand-wiring everything to your PCB. It also means doing your research to make sure things will fit. If I haven't scared you off, please continue reading!
BUTTON CONSIDERATIONS. The low-profile buttons that use Kailh Chocv2 keyboard switches tend to be quite low-profile, as well as the mouse switch buttons that are becoming more popular. As previously mentioned, traditional arcade buttons can work but may require you to bend the pins. This can permanently damage the microswitches of your button! For this reason, I do not recommend using them with this build.
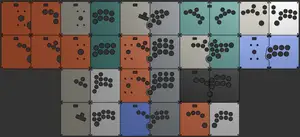
PANEL COMPATIBILITY. VIPER is compatible with leverless CHAMv3 panels.
- Please click HERE for the CHAMv3 Button Panels Printables page!
MAGNETIC VARIANT. The magnetic version of the case utilizes these 8x3 mm magnets from Amazon. The true height of these magnets is actually 2.7mm (not 3mm) and I designed the slots accordingly. Use super glue gel to join x8 to the case and x4 per bottom panel. Let the glue fully cure before putting them under load.
**This reduces the BOM by x8 M4 HSIs and x8 M4x16 countersunk bolts. All other instructions for the magnetic variants are the same, and they are still compatible with the iFRAME.
= Printing Suggestions =
WARNING: The completed build takes ~800g of filament! Ensure your printer & slicer are well-tuned before attempting this project!
- All VIPER Parts:
- 4 Walls / 20-30% Cubic Infill / No Supports
- Tested in PLA and PETG
- BODY may need to be oriented diagonally in your slicer.
- The corners of each part may lift from the build plate – ensure strong adhesion!
- The JOINT should be oriented upright
- BUTTON PANELS (located HERE ):
- 4 Walls / 20-30% Cubic Infill / No Supports
- PLA preferred over PETG for rigidity (and prettier colors)
- The exterior face of the panels should face the build plate.
= Bill of Materials =
WARNING: Do not use M6 bolts longer than 35mm! It will puncture the case!
Part
Quantity
Notes
M6x30mm
10
I use THIS set from Amazon. 2 of them are for the iFRAME, optionally.
M6 Nuts






Названия используются только для указания источника результата. Polyzon не аффилирован с перечисленными площадками.