
Бесплатно 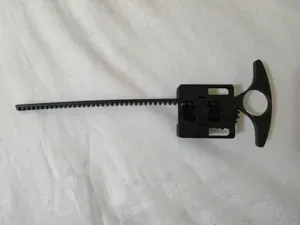
Simple Geared Launcher: Left & Right Spinning
MakerWorld
![A Simple Geared Launcher [V3.5]: Works With Left & Right Spinning Tops! (INCLUDED)](https://cache.polyzon.org/api/img?url=https%3A%2F%2Fmedia.printables.com%2Fmedia%2Fprints%2Fb4307c7a-42c1-4a31-b7ba-1fbbbf0aea2e%2Fimages%2F13301301_12e8a97d-eff7-415d-b1b6-d9fad72abeca_5f426e63-7f52-486a-aa08-d0b131b0082a%2Fimage.png&w=640)
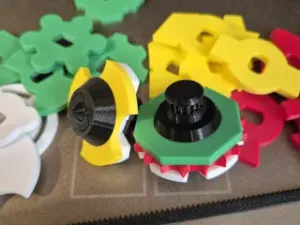
![A Simple Geared Launcher [V3.5]: Works With Left & Right Spinning Tops! (INCLUDED) — Фото 2 из 4](https://cache.polyzon.org/api/img?url=https%3A%2F%2Fmedia.printables.com%2Fmedia%2Fprints%2F7c2fda29-3fb5-4730-9f02-f334e2bbb1f6%2Fimages%2F13301290_c562ea49-8455-4e05-b6d1-13681d9d4191_a6d12cf5-8fb3-4d7e-9cc4-8d873dda939a%2F2026-07-0710-02-43-ezgifcom-video-to-gif-converter.gif&w=640)
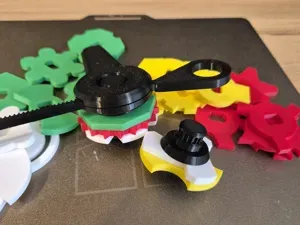
![A Simple Geared Launcher [V3.5]: Works With Left & Right Spinning Tops! (INCLUDED) — Фото 3 из 4](https://cache.polyzon.org/api/img?url=https%3A%2F%2Fmedia.printables.com%2Fmedia%2Fprints%2F1b4efe1b-6027-4326-a2e1-9f6e07c03f5c%2Fimages%2F13301287_081fedf3-b3e3-40dd-8d02-dc5dcd49a081_aa983acb-df27-4291-963e-2ad1370fd854%2F4242.jpg&w=640)
![A Simple Geared Launcher [V3.5]: Works With Left & Right Spinning Tops! (INCLUDED) — Фото 4 из 4](https://cache.polyzon.org/api/img?url=https%3A%2F%2Fmedia.printables.com%2Fmedia%2Fprints%2F4e6b522e-c7d7-45b5-8b04-701b5b91cbde%2Fimages%2F13301288_5c5da31b-51ce-48c9-b9dd-208ba22dff55_04b7ce84-cb39-4b9b-b337-57278d5f6313%2F4248.jpg&w=640)
Version Notice
Currently this is the V3.5, it works well but there are some major changes for a V4 that will be released soon. The majority of the launcher parts are not compatible between V3 and V4 however the spinner parts are compatible so you can still download those.
Description
Most tops spin right, but left spin is where the real fun is at. Spin-stealing, hard-hitting attackers, and all kinds of unique tops create interactions you just don't get otherwise, especially when two tops meet spinning in opposite directions. That love of dual spin is what drove this build: a simple launcher, working like the Hasbro Beyblade Burst launchers, where you just flip the ripcord and feed it in from the other side to switch launch direction.
The launcher and spinning tops were created as part of the Open Sauce 2026 Spinning Battle Tops Contest and meet all the criteria.
Image of V2 Launcher (Top), V3.5 Launcher (Middle), and Spinning Top (Bottom)
How to Print
For the Launcher it is required to print two copies of the Launching Element Hook and Shaft Nut , for every other part you only need to print one copy. Individual instructions for each item are provided with the files. Supports should be turned on!
Note: You can auto align each part, however for the Launcher Hooks orient them as shown in the photo below.
Printing Settings: I used 15% infill w/ .2mm layer height with tree supports turned on.
For the spinner , blades are compatible with both left + right spinning tops, however every other part uses either a Left or Right Hand thread depending on which direction it spins so they aren't compatible. Check the folders to make sure you are downloading the right part.
The Absorption Blade is designed to be printed in TPU to act as a shock absorber, however you can print it in any other filament and it will still perform well due to being a perfect circle.
For the blades infill higher than 15% is recommended for durability, however 15% still works fine.
Launcher Assembly
Once all the parts are printed its time to assemble. The launcher is relatively easy to assemble and gifs have been provided below to aid in assembly.
- First insert the two Launching Element hooks into the Launching Element as shown below.
- Next slide the Launching Shaft down the rear hole and slide the Launching Gear Spacer and Launching Gear up the shaft from the bottom in that order. Do not completely press the launching gear all the way down otherwise the launcher will not spin freely, there needs to be a small gap for the gear.
- For V3.5: Slide the Gear Stack Shaft down the front hole then slide the Gear Stack onto it from the bottom and then retain them with a Shaft Nut.
- Now add the rear housing of the launcher, use the alignment pins to secure it. This will act as a second point of support for the shaft, reducing bending.
- Now you can slide the Launching Element with both hooks facing down up into the Launching Shaft, then lock it using another Shaft Nut.
- Done! Enter the ripcord through either the "L" or "R" for right and left spin tops respectively.
Spinning Top Assembly
This is a simpler assembler so there aren't any assembly gifs here.
- First thread the bolt into the top plate
- Now attach the blade, be sure to line up the three pins into the holes if you are using a locking blade
- Now thread the superlight armor plate onto the bolt
- Now finish the assembly by tightening on the bottom plate!
- To connect this to the launcher first check if you have a left or right spinning top. If you have a right spinning one, put your ripcord into the slot marked "R", then while preventing the ripcord from rotating, rotate the spinning top counter-clockwise to lock it in. If you are using a Left spin top insert the ripcord into the "L" slot and rotate clockwise instead.
Closing Note; Changelog (V3)
All feedback is appreciated! I had a ton of fun building this and went through a ton of prototypes. I went through multiple versions, my very first one ( see image below ) didn't work well at all because I forgot to add a backing wall in the case that prevented the ripcord from coming out. I also realized that I could save a good bit of material by using a latching mechanism rather than having the gear be part of the top, as if I wanted to create another top it would require another gear.
The latching mechanism also went through a few revisions. I used the heaviest design I had (No superlight armor), to make sure it was durable and the entire launcher exploded on my first test. To remedy this I added the integrated nut into a shaft which fixed the issue, but I ran into a new problem where the latch hooks were breaking off. To fix this I switched the print orientation by splitting into 3 total parts, lowering the piece to the ground, and chamfering the exit and the edges of the latches so that they could leave easily.
V3: I initially published V2, however after repeated tested realized the nut was loosening and I would need another integrated nut + shaft. I also realized that the gears were getting too tight, so I added an extra .2mm of backlash. The changes worked very well and in testing there is no jamming. Updated files have been provided.
Design:
With the left spin top, it should theoretically be possible to spin steal as well as absorb using a rough (jagged/not a perfect circle) TPU blade.
Another really fun design that I tested was wheel spinners, by launching the top sideways you can have it mow down other tops. It was something I had seen in beyblade burst with Bahamut and with these tops works well with an absorption blade printed in a solid material.
Issues and Solutions
One issue that can present itself is the ripcord not gliding smoothly. This happens due to there being excessive forces on the gear. The simple fix for this issue is to slightly loosen (move up) the launching gear. This will loosen the entire assembly allowing to move easily.
If you find any issues please let me know so I can fix them






Названия используются только для указания источника результата. Polyzon не аффилирован с перечисленными площадками.