
Бесплатно 
Custom Braille Card Embosser - Hand Operated
Printables


Custom Braille Embosser V2 - Tactile Friendly
I started this project about a year ago because I couldn't find a quick and affordable way to make custom braille business cards. The tools that exist are a slate and stylus, a Perkins-style brailler, or an electronic embosser that costs more than most people will spend on a few cards. None are a simple way to make a small batch of cards with your own text. Version 1 of this embosser fixed that for me. However, many people who printed that version were kind enough to guide me on what needed to be changed to make it more accessible. Version 2 is the result of those experts' feedback.
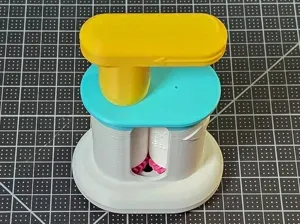
[Computer rendering of every part lifted apart in a column: the Base at the bottom, the two cylinders with their gears above it, then the Knob, the Lid and the Handle.]
[Animation of the twelve assembly steps, rendered from the part files: each part travels into its place, from Cylinder A and its gears to the Lid and the Handle, and the Handle turns at the end.]
What's new in Version 2
- A wrong assembly is nearly impossible. Each of the four gears has a differently shaped peg, and each end of each cylinder has a hole that takes one peg only. A wrong gear will not go in, so trying is a fair way to find the right one.
- Built to be assembled by touch. Every cylinder carries a column of tactile triangles, raised on one cylinder and sunk on the other, that nest when the pair is lined up. Both top gears carry a cross shape, which means that side faces up. Every step was designed for tactile-only assembly, and a printed tactile assembly map lets you learn every keyhole, peg and notch by touch before you start.
- One-piece Base. This version has the grip extension built in, with the addition of raised arrows on its side that show which way the card travels and which way the card's information should face.
- An optional Push-out Plate tool. This extra part helps lift the cylinders out of the Base when you want to make a change.
- A seam channel on the cylinders. A built-in design that gives your slicer somewhere to hide its layer seam, so it never lands on a braille dot.
Step 1: make your cylinders with the web app
The embosser files don't include ready-to-print cylinders with your message on them. Customizing the message on the cylinders, generating the STL and downloading that file is the first step of the project you need to complete. There are two ways to make the custom braille cylinders, and the one I would start with is the web app I built for this project because it translates the text for you:
https://braille-cylinder-stl-generator.vercel.app
[The generator's page: the 3D preview on the left, the form on the right, with the Embosser setup choices marked in red.]
Select Version 2, type your text, press Generate, and download one file with both cylinders spaced for printing on one plate. Translation is done for you by Liblouis , the open-source braille translation engine used by screen readers and braille displays worldwide. It comes with more than fifty language tables and both contracted (grade 2) and uncontracted (grade 1) braille. If you read braille yourself, the translation lands in an editable field first, so you can change any cell before you generate.
[The Translate to Braille button and, under it, the braille field filled with the translation of the word Washington, both marked in red.]
Everything runs in your browser and your text never leaves your computer. The app is built for screen readers and keyboard use, and it has a help page of its own if you need it.
![The web app's 3D preview showing the two generated cylinders side by side, Cylinder A with raised dots and triangles, Cylinder B with dimples, and the status line Both cylinders are ready.]
The step-by-step Web Generator Guide in the download walks through every control with a marked screenshot.
### Optional path 2: the OpenSCAD customizer
The same generator exists as an OpenSCAD model, and a copy of it is also on MakerWorld as a customizer: Braille Cylinder STL Generator — Embosser Version 2 . It makes the same cylinders with the same dials. There is an OpenSCAD Generator Guide in the download files that walks through it, including the offline copy for your own computer.
[The OpenSCAD window with the generator open: the Editor, the preview with the two cylinders, the Customizer panel and the Console, each marked in red.]
The largest difference for path 2: the customizer does not translate. It takes braille characters only, so you must turn your text into Unicode braille yourself with a translator of your choice (the guide shows one) and paste it in, one row at a time. The translation is then entirely yours to be responsible for, with no Liblouis behind it; that's why I would start with the web app.
Printing
[All eleven parts laid out on a cutting mat: grey Base, cyan Lid, two white cylinders, four pink gears, yellow Knob and Handle, and the white Push-out Plate.]
The main assembly parts. For the main assembly parts you can use your printer's default 0.2 mm profile: 3 walls, 15 % infill, supports off. Nothing needs supports, seam painting or slow speeds.
Two customized cylinders. The customized cylinders do better at 0.12 mm layers or finer, at least 3 walls, 15 % infill, with the Arachne wall generator rather than Classic, supports off. An example STL pair is included with slicer settings for the X1C.
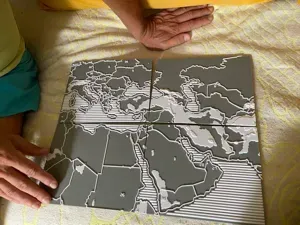
The tactile assembly map (optional). This tactile assembly reference is four flat plates that print best at 0.2 mm, no supports, also sliced for the X1C.
Print times and filament. From the sliced X1C projects, the nine parts take 6 h 11 min and 188 g of PLA on one plate; a cylinder pair 2 h 46 min and 37 g; the map's four plates 2 h 44 min and 107 g over two beds.
Assembly
[A numbered instruction panel: Top Gear A held above Cylinder A with a red dashed arrow from its peg to the keyhole; a box at the top right sketches the gear's two faces and the cylinder end it goes onto.]
There are twelve assembly steps. The first step is to build Roller A (a cylinder with its two gears), then build Roller B, pair them so the triangles nest, drop the pair into the Base, then the Knob, the Lid and the Handle.
The download files have three editions of the assembly guide, all built from the same steps:
- the Maker Guide , the short edition;
- the Assembly Guide By Touch , which describes every step for tactile users, with a Check and a By touch block in each section, so the embosser can be built without sight;
- the Visual Assembly Guide , pictures only, with the part to find sketched beside each step.
Using it
[One hand holds the embosser on its side while the other lowers a card into the slit along the top of the tower.]
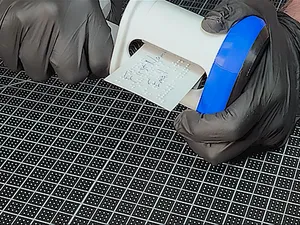
[The embossed card coming back out of the embosser between two hands, its braille dots raised, the large arrow on the tower pointing toward the Handle.]
Turn the Handle to home (grip level along the Base, pointing right), lay the embosser on its side with the slit up, drop a card in, turn about half a turn, turn the embosser over and keep turning until the last row has come out. With the card still held in the cylinders, roll back and forward over the rows twice more, then let it out: a card that has left the cylinders can't go back in the same place. The User Guide covers it with a picture for every step, including changing the message. The pair is made for 0.4 mm card, which is most business cards; if a pair punches holes through your card instead of leaving rounded dots, the guide says when to generate one at 0.3 mm.



Названия используются только для указания источника результата. Polyzon не аффилирован с перечисленными площадками.
Комментарии 0
Загружаем комментарии…