
Бесплатно 
Steam Deck POWERpACK slim LIPO
Printables




Without the Powerpack the Deck made it up to 1 hour 24 minutes before shutting down
With the Powerpack attached it shut off after 2 hours and 28 minutes. It extended the playtime by 1 hour and 4 Minutes which is quite good in my opinion. The performed test was set to draw max power from the Deck ( 27 Watts)
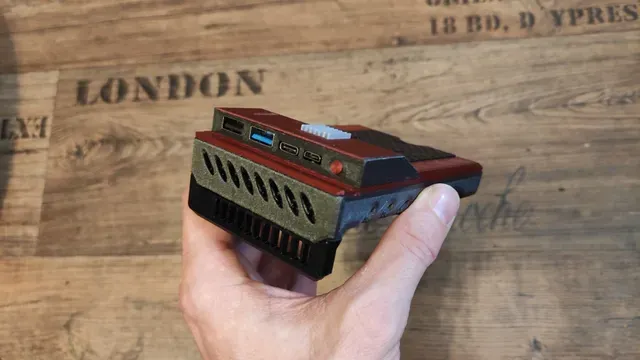
A third iteration of the Powerpack 10000mAh lipo Powerbank, cut down to the bare minimum for the lowest weight possible. Featuring a unique "lens bump" normally known from phones to pack better camera hardware in, with the main body still remains as slim as possible.
Things to know:
Give the finished Powerpack a good rest before using it on your Steam Deck ! The Superglues Vapor can harm the decks plastic shell! if not fully dried. Especially when clipped on and the steamdeck heats up, the amount of superglue vapor will increase drastically. Give it enough time to be sure all the glue has hardened!!!
IMPORTANT! After building several prototypes of the "Lens bump" Powrpacks I encountered a problem you can easily avoid. The superglues vaper it emits when drying after closing off the PCB housing does attack the battery indicator button on the pcb itself, causing it to oxidate and so it wont register the button press anymore ( it will after using wd40 and pressing like 100 times) AVOID this forehand by spraying the small push button with silicone oil or WD40 to protect the switch membrane from the superglues vapor before you close it off!!
The battery indicator button is longer as it needs to be, as the button travel is like only 0.5mm you have to file or cut it to perfect working length yourself, keep that in mind when you place the pcb in the pcb housing, it wont fit in its original state!!
I redesigned the PCB cover to be printed without the bend as a result the surface looks so much better that way. It needs to be bent before being glued on, just bend it along the line slightly, this worked out great for me and so it should for you.
you need access to a soldering iron ( two simple solder spots to connect)
The OEM charging board ( its a set of 2)
https://de.aliexpress.com/item/33039428180.html
as the charging board can get quite warm to the touch I would recommend using a 14x14mm heat sink:
https://de.aliexpress.com/item/4000607424570.html
its not mandatory as the pcb itself has a heat dissipation area but enclosing heat it is never a good thing ( the heat does not affect the battery at all as it is in a separated housing but still) You can print the PCB base and PCB base lid in PLA but I would recommend PETG to be on the safe side. ( I printed mine in PLA and its totally fine still )
2 round magnets with 8mm in diameter and 1mm thick. for the kickstand. ( DONT forget to glue one of the magnets on the back of the top lid before you glue it to the base!!)
For the battery indicator and button use a translucent material so the LEDs light is visible through it.
and the source of the power a lithium polymer battery. A single Cell (1S) with 10000mAH 37WH:
https://www.ebay.de/itm/402909638443
Link is to a german ebay site, but you should be able to find that battery on many more shops all over the world.


Названия используются только для указания источника результата. Polyzon не аффилирован с перечисленными площадками.