
Бесплатно 
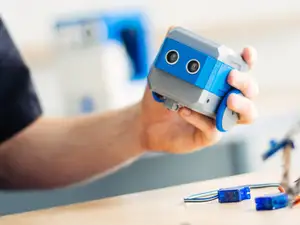
Otto DIY Humanoid robot
Printables
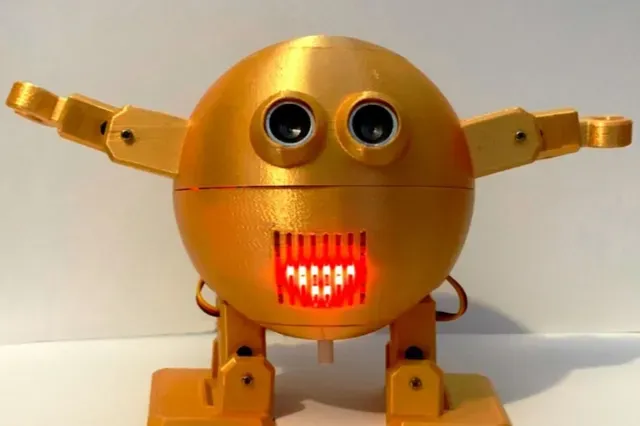
For Mad Scientists, Evil Geniuses, and those who just like small robots
This is a remix of the original Otto Humanoid variation. As well as having a rather smart spherical body he now has room for a much larger internal battery - up to a 18650 dual battery shield. There are also mountings for additional sensors such as an MPU6050 IMU and two extra LEDs.
A number of variations are provided for by the design files:
Two or four piece body construction. This changes how the pieces are supported during printing, and is purely cosmetic. The four piece version ends up with a better surface quality at the top and bottom of the body, but needs gluing.
Armed or armless, but how can he cause mischief without hands?
Servo motor MG90S, MG90D or SG92R. These are all similar, but not quite identical. Minor changes are needed in the positioning of the mounting holes and the space needed for the servo body.
Built-in printing supports or add your own.
Level of difficulty: ⭐⭐☆☆☆ Assembly can be a bit fiddly but nothing is difficult
⏱Time to print? 2 days
⏱Time to build? 2 hours
✏Release Version: v1 (Internal development version: high)
🔧instruction manual link? Use Otto Humanoid for now
🧊3D files link ? STL files available for printing, with STP and F3Z for easier editing
💻Code link? Use Otto Humanoid for now
📱Control with app? Compatible with the Otto app
Part List
3D Printed Components
See the Fabrication section for which variations to pick. About 250g of filament is required - about 85m at 1.75mm diameter.
- 1x Head (upper hemisphere) - 1x Body (lower hemisphere) - 2x Leg - 2x Foot - 2x Arm (unless armless) - 2x Hand (unless armless) Internal Components
Any links are provided as examples, not endorsements, and may not be the exact brand used by the designers. Ebay or far-East vendors such as BangGood are other possible, and probably cheaper, sources, and were used by the designers.
- 6x MG90D/S or SG92R Servos (4 if armless) - 1 x Nano ATmega328 - 1 x Nano I/O shield - 1 x USB-A to Mini-USB Cable - 1x MAX7219 8x8 LED matrix e.g. https://www.amazon.co.uk/HALJIA-Seamless-Cascadable-MAX7219-Display/dp/B06XDRSW4Z (use the square version with the SMD chip, not the rectangular version with the DIL chip such as at https://www.amazon.co.uk/iHaospace-MAX7219-Control-Display-Arduino/dp/B077P1CW1R ) - 1 x Ultrasound sensor HC-SR04 - 1 x Buzzer e.g. https://cpc.farnell.com/multicomp-pro/mckpt-g1210-3916/piezo-buzzer/dp/SN36947 Must fit in a 12.5mm round hole. - Up to 30 Female/Female Dupont Wires depending on sensors fitted, 15 or 20cm long, or connecting wires and crimping terminals. e.g. https://www.amazon.co.uk/Kamtop-Crimping-Connectors-0-1-1-0mm²-Connector/dp/B078K9DT69 - 1 x 18650 battery shield e.g. https://www.amazon.co.uk/diymore-Battery-Shield-Type-C-Raspberry/dp/B08B852L32 - 1x or 2x 18650 battery - 1 x Toggle Switch e.g. https://cpc.farnell.com/alps-alpine/spph410100/switch-pcb-dpst-latching-spph410100/dp/SW04790 Must fit in a 9mm square hole. - Extra screws (M2 or M2.5 6mm) - Clips to hold components. e.g. https://www.amazon.co.uk/TANCUDER-Mounting-Brackets-One-Side-Waterproof/dp/B087WSXT9F (200 is rather excessive - only 3 or 4 are needed). An STL file for a suitable clip is provided, but moulded ones are stronger. - 1x MPU6050 movement sensor (optional) - 2x LED with integrated resistor for 5V usage (optional)
Tools
3D printer
Soldering iron - needed for internal battery shield and power switch connections. Dupont style push-on connections can be used for everything else.
Computer running Arduino IDE
Small Phillips screwdriver
3D print finishing tools. e.g. knife, sandpaper, small drill or bradawl for clearing out holes
Fabrication
STL files for 3D printing are provided. If modifications are required then the STP or F3Z (Fusion 360) versions are easier to manipulate.
Servo selection
If the same servo type is used throughout then component selection is consistent and easy. However, servos can be mixed between the different parts, subject to the following rules:
The head and arm servo names must match.
The leg and foot servo names must match.
The body servos are independent from other components.
Sphere pieces
3D printing a sphere cleanly is difficult. A number of choices are provided for:
Hemisphere pieces are for a two part body. These print open side up so that the component mountings print cleanly, but this can lead to a poor surface quality on what becomes the highest and lowest parts of the body.
Equator and pole pieces are for a four part body. The pole pieces print outside up, giving a better quality visual surface. The pole pieces are compatible with any servo equator piece. Because of the need for supporting the body pole piece to allow the internal mountings to print, the joining surface is likely to need sanding smooth after removing the supports. The head pole piece prints directly on the printer bed, so should always be smooth. The pole and equator sections need to be glued together. UHU All Purpose adhesive works very well for PLA, but the pieces should be clamped or taped in place while it dries.
The join between the two halves is consistent across designs. It is possible to use a single hemisphere for one half and an equator plus pole for the other half.
Foot pieces






Названия используются только для указания источника результата. Polyzon не аффилирован с перечисленными площадками.