
Бесплатно 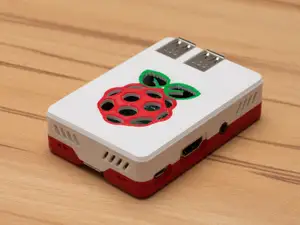
Malolo's screw-less / snap fit Raspberry Pi 3 Model B+ Case & Stands
Printables


Please note: This is an adapted version of my Raspberry Pi 3 case ( https://www.prusaprinters.org/prints/4038-malolos-screw-less-snap-fit-raspberry-pi-3-model-b ) that I modified to fit the Raspberry Pi 4. I do not yet own the Raspberry Pi 4 myself. However Thingiverse user Haz1 ( https://www.thingiverse.com/Haz1/about ) was kind enough to patiently print several iterations of the case and send me pictures to check the fit. Thank you Sebastian :-).
Since I did not yet print this thing the pictures only consist of a few renders. If you want to see how it will look printed please have a look at the Raspberry Pi 3 version ( https://www.prusaprinters.org/prints/4038-malolos-screw-less-snap-fit-raspberry-pi-3-model-b ). It's the identical case but with a few differences due to the different board layout of the Raspberry Pi 3 .
There already is a plethora of raspberry pi cases on the internet and the last thing we need is yet another one ... well - I created one anyway ... because I wanted to and I had a lot of fun doing it :-).
I tried to achieve the following key features:
- Easy to print without support (no steep overhangs or long bridges and stuff).
- Top and bottom layer printable on print surface (so I could make good use of my recently acquired awesome powder-coated/textured print sheet).
- No screws or glue needed (snap fit).
- Slim/compact outline.
- Acceptable ventilation without fan.
- Good looking (very subjective - I know).
- I also wanted a stand to put it on.
I tested the Raspberry Pi 3 version with 0.2mm and 0.1mm layer height. Both worked well so this settings will also work for the Pi 4 version. I would recommend to use PETG for better heat resistance.
If you have any questions, suggestions or requests don't hesitate to let me know.
Designs
There are several different designs for top and bottom
Bottom
- Base design without ventilation holes
- Hexagonally shaped ventilation holes
- Simple slot shaped ventilation slots
- Hexagonal mesh covering the whole bottom
Top
- Base design without ventilation holes
- Hexagonally shaped ventilation holes
- Raspberry logo as ventilation holes
- Simple slot shaped ventilation slots
- Hexagonal mesh covering the whole bottom
Stands
There are three different stands
- Vertical stand
- Horizontal stand
- Flat stand
The vertical one also has a version that routs the Rasberry Pi status leds to the front. To achieve this you have to print the file "Stand_Vertical_LED_Guide.stl" twice using a transparent filament and slide it into the according holes of file "Stand_Vertical_LED.stl". It's difficult to explain - just have a look at the pictures.
OpenSCAD Customzier scripts
Since I wanted to add more variants and features but still give people the choice which features they want, I came up with a solution in form of OpenSCAD Customzier scripts. The model itself isn't designed in OpenSCAD. The scripts just cut/combine different imported stl meshes to generate the desired result.
I still added some ready-to-use stl mesh files but none of those contain accessory slots (for camera and display cables or to have access to the pins). If you need those you can generate a custom stl file via the customizer scripts.
Please note: OpenSCAD really does an excellent job at combining mesh files (unlike Meshmixer which is a bit of an irony). The rendering process may take a few minutes though.
Important: For the customizer scripts to work properly you will need all of the stl mesh files that start with "z ".
Using the customizer:
- Download and run OpenSCAD . I highly recommend to get the latest 2019.05 version since that one has a built in cutomizer gui.
- Open one of the scripts in OpenSCAD (the files named "...Color1..." are used for single material prints as well).







Названия используются только для указания источника результата. Polyzon не аффилирован с перечисленными площадками.
Комментарии