
Бесплатно 
Cyma CM127 external Hop Up
Printables
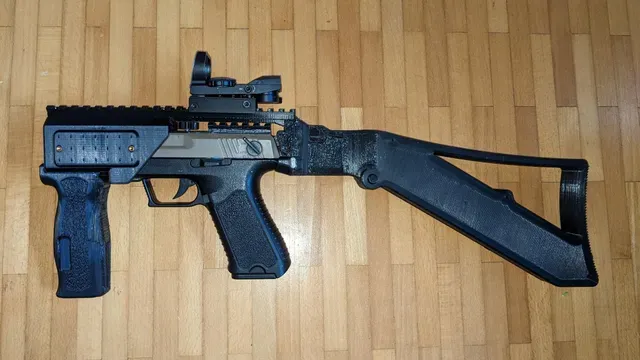
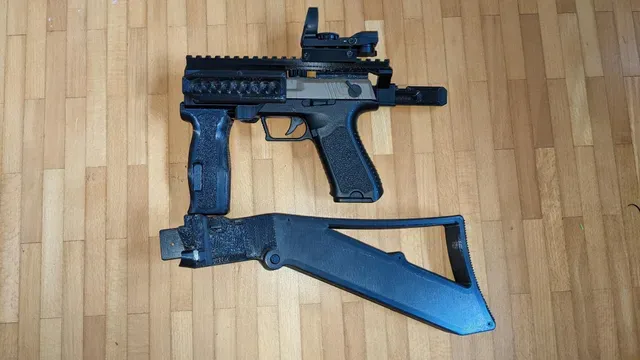
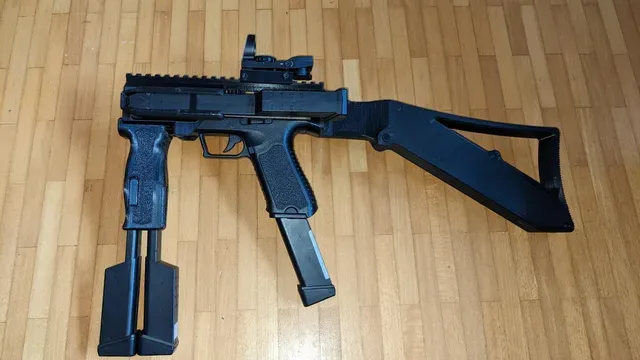
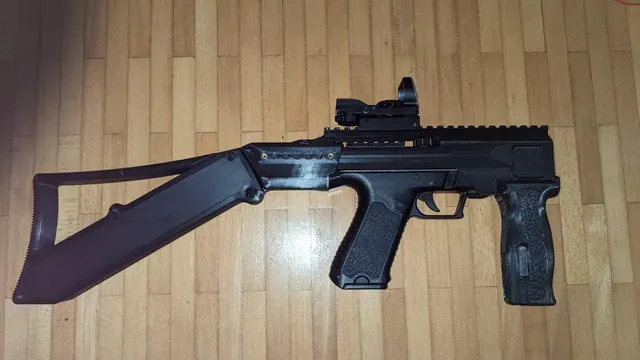
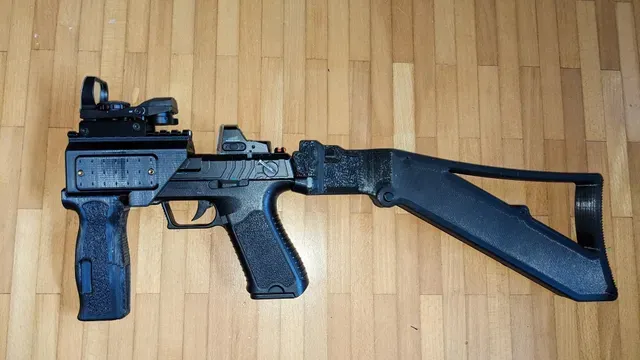
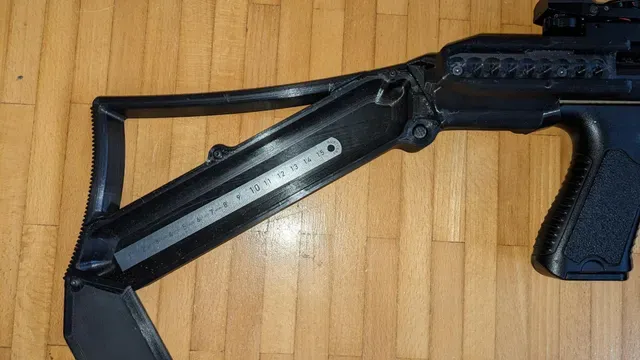
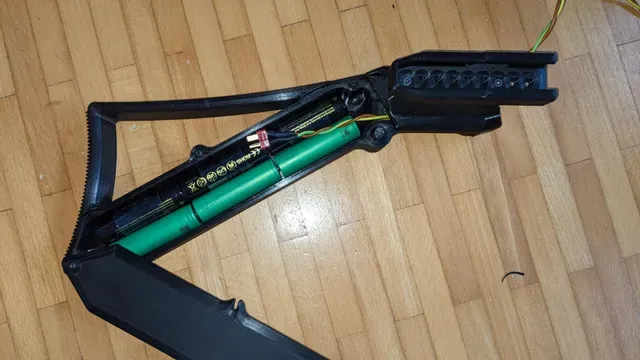
All the pictures of the printed parts are of an older verion. The files have been slightly. Biggest differences to the pictures are in the upper part of the frontgrip (nicer transition from grip to body) and an additional tool compartment in the stock above the battery compartment.
----------------------------------------------------------------------------------------------------------------
Here is my take on a simple Carbine Conversion for the Cyma CM 127. Goal was a simple and practical kit, that I can use instead of my primary without changing any of my other equipment.
I will start with a pros/cons list, so you can decide if this will work for you. Afterwards I will show and explain more details, follow with printing instructions and finishing with assembly instructions.
Pros: + huge battery compartement + allows accessibility of all external controle elements + flexibility with sights (no need to take the installed sights of) + lightweight (~1100g with CM 127 and foregrip; about 650g of printed parts + screws) + can fit in most backpacks for tranportation (longest part is 33cm) + can be used with a meshmask without needing a riser + integrated storage room for allen keys or similary sized magnetic tools + storage for up to 4 extra magazines integrated in the kit + only the relatively cheap slide has to be modified to use external hop-up and battery + works with the new (Begadi) Gen 5 metal slide and the classic plastic slide + very quick assembly if you only want to use the body for better handling + multiple attachment points + small enough to be printed on a 200x200x110 mm printer
Cons: - can't adjust hop-up while assembled, if slide is not modified - can't use external battery compartment, if slide is not modified - somewhat slow to assemble if you want to use the battery compartement
Parts List:
must have: (only use as shoulder stock)
- 1pc ball pen spring - 1pc 6mm BB - glue (for PLA I recommend “Pattex Sekundenkleber Ultra Gel” or “Loctite Super Glue Power Gel”)
other:
- 7pc M3 thread inserts (e.g. ruthex “RX-M3x5.7”) - 7pc M3x6…10 countersunk screw - 1pc M3x18 zylinder head screw or 1pc M3x6…18 grub screw - 1pc M3x4…8 zylinder head screw - 3pc M3x8…30 lens head screws - up to 8pc ∅10*3 magnets - ~52cm extension cord (any plug the size of a Dean T-plug or smaller will fit) - lubricant
Printing instruction:
The moving parts have been designed with 0,3mm clearance. With my out of the box Cr10 V2 this works great with 0,4mm Line With and 0,2mm Layer Height . In case your printer has tighter tolerances, I would try 0,6mm Line With and 0,3mm Layer Height to ensure a snug fit. With PLA I recommend a Wall Thickness of 4mm , with more shock resistent material you can go down to 3mm. Since we have thick walls, a Infill Density of 5% is enough. The model is designed with 61° Support Overhang Angle in mind. If your Printer can't handle this a lower Angle will also work.
For print orientation , see pictures:
Part_1_Front
Part_1.1_Connector_Rod
Part_2_Stock (if too big for your printer, print “Part_2.0.1_Stock_split” and “Part_2.0.2_Stock_split” and glue together)
Part_2.1_Rear_Reciver
Part_2.2_Lock
Part_2.3_Spring_Stop
Part_2.4_Battery_Cover
Part_3_Pin ( Support Placement: Touching Buildplate )
Part_4_Magazine_Grip + Part_4.1_Magazine_Grip_Texture ( Fuzzy Skin)
Part_5_Picatinny_Rail
Part_5.1_Picatinny_Rail_Short (can be used instead of “Part_5_Picatinny_Rail” when you don't want to dismount the optic already installed on the slide)
Part_6_Transportation_Support
Modifications to the slide:
To use the external battery compartment , you need to cut a small hole in the front part of the ejection window, so your plug and wire will fit through it.
For the external hop-up adjustment : https://www.printables.com/de/model/569974-cyma-cm127-external-hop-up
In case you would like to use the old slide with Begadis CM 127 Gen 5: https://www.printables.com/de/model/566370-cm-127-gen-5-fireselector-internal-lever
Assembly:
Start by gluing “Part_1.1_Connector_Rod” to the right side of “Part_1_Front”. The glue will adhere better, when you scrape the surface smooth with a metal tool (Knive, Ruler, Screwdriver) and clean it with rubbing alcohol.
Now proceed by inserting “Part_2.2_Lock” into “Part_2_Stock” from the left side. Drop a 6mm BB and then a ballpen spring into the hole at the front of “Part_2_Stock”. By holding the spring in with your finger you can test, if the “Part_2.2_Lock” snaps firmly from left to right. You can lube the lock with silicone grease or other lubricant. If everything works to your liking, seal the hole with “Part_2.3_Spring_Stop”.
Next, screw “Part_2.1_Rear_Reciver” to “Part_2_Stock” with two of the "M3x6…10 countersunk screw”. In case you don't have any, just tape the part in place for now.
To test the fit, insert your CM127 into the front pice (I recommend to put some lube on the picatinny rail of your airsoft before inserting it for the first time) and slide the back pice on. If you have forwards/ backwards play, or you can't slide it in far enough to close the lock you need to modify “Part_2.1_Rear_Reciver”. Simply glue something under it, or grind away some material. Now that everything is perfect, you can glue it to the stock if you don't have the right screws.
To attach “Part_2.4_Battery_Cover” to the stock, you use the three “M3x8…30 lens head screws”. Place the cover in position and screw the screws in to the three holes. Keep them loose enough to let the cover rotate. To lock the cover, insert “Part_3_Pin” in to the big hole.
Now install as many of the “∅10*3 magnets” in the tool compartment (inside the stock, above the battery compartment) as you like and insert the “M3 thread inserts”. You will find two ∅4 holes on the right side of the stock and on the left side of the front part. Those are ment to attach my " Cyma CM127 Magazine Holder + Belt Clip ".
On the front part under the muzzle opening is a further screw point to fixate the “Part_4_Magazine_Grip” with a “M3x6…10 countersunk screw”. The last screw point on the front part is on top at it's back end. Here you can use the “M3x18 zylinder head screw or M3x6 grub screw” to press the airsofts slide to the frame for better hop up continuity when using the external hop up. When using the grub screw you have the advantage that you don't have to completely unscrew it to remove the picatinny rail. The last thread insert is to be put into the front hole of the picatinny rail. When the rail is in place, you can use it to fixate the rail with the “M3x4…8 zylinder head screw”. When using the ruthex “RX-M3x5.7” thread inserts, you will have to file the last of them down to 3mm lenght. On the model are further ∅1 holes. In case you printed with at least 3mm wall thickness, you can drill them out and use them for additional mounting points.
To finally use this, start by installing the extension cord to your airsoft.
Proceed with installing the front part.




Названия используются только для указания источника результата. Polyzon не аффилирован с перечисленными площадками.