
Бесплатно 
Goblin FPV Drone
Printables


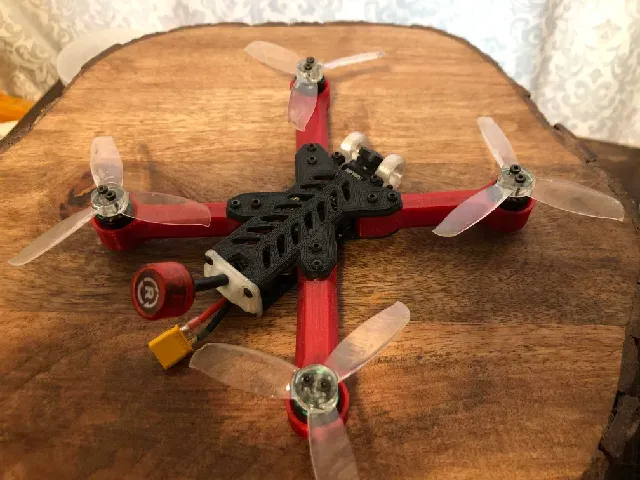


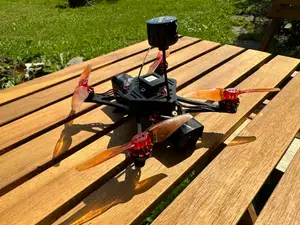
Countless hours spend poring over a screen into the small hours of the night. Many a cup coffee chugged. All so you could power trip while flying the 3d printed equivalent of a mosquito on steroids. Enjoy my friends, the majestic [REDACTED] drone.
Now to get a bit more technical:
This is a 3 inch drone frame. Mine is printed using carbon fiber PETG for the plates and translucent red PETG for the arms. I'll list out the specific electronic and mechanical hardware that I used below, I know this combo works and pretty damn well at that. If you don't wanna choose parts for yourself, follow this list.
Electronics:
- AIO flight controller ESC - JHEMCU GF16-BMI 16X16mm 2-4S Stack: https://www.aliexpress.us/item/2251832697381294.html?spm=a2g0o.order_list.order_list_main.4.1ad71802ASurZg&gatewayAdapt=glo2usa&_randl_shipto=US
- VTX - HGLRC Zeus Nano: https://www.aliexpress.us/item/3256802524762750.html?spm=a2g0o.order_list.order_list_main.55.1ad71802ASurZg&gatewayAdapt=glo2usa&_randl_shipto=US
- Camera - RunCam Nano 2 w/ 2.1mm lens: https://www.aliexpress.us/item/3256803814960647.html?spm=a2g0o.order_list.order_list_main.59.1ad71802ASurZg&gatewayAdapt=glo2usa&_randl_shipto=US
- ELRS receiver - (Ok literally any micro ERLS receiver will do, but I used the HAPPYMODEL EXPRESSLRS 2.4GHZ EP2 w/ ceramic antenna) https://www.defiancerc.com/products/happymodel-expresslrs-2-4ghz-ep2-nano-tcxo-receiver?_pos=3&_sid=974c3de92&_ss=r
- Motors - flashhobby A1106 1106 6500kv Brushless Motor: https://www.aliexpress.us/item/2251832722738055.html?spm=a2g0o.order_list.order_list_main.89.1ad71802ASurZg&gatewayAdapt=glo2usa&_randl_shipto=US
- Battery - Only 2s OR 3s (At 3S the ESC can handle 3020 props at most, and the motors can't handle 4s at all) battery between 500 and 1000mah. At the moment my favorite battery to use for this drone is this one: https://www.amazon.com/TATTU-Battery-650mAh-Torrent-Lizard/dp/B071GBGBB4/ref=sr_1_2_sspa?crid=AOCXSAFRMEE3&keywords=tattu&qid=1688486035&sprefix=tattu%2Caps%2C83&sr=8-2-spons&sp_csd=d2lkZ2V0TmFtZT1zcF9hdGY&psc=1
- CONTROLLER - Any 2.4ghz ELRS transmitter will do. I am using the iFlight Commando 8: https://www.defiancerc.com/products/iflight-commando-8-expresslrs-2-4ghz-radio-transmitter?variant=40149241593925¤cy=USD&utm_medium=product_sync&utm_source=google&utm_content=sag_organic&utm_campaign=sag_organic&gclid=CjwKCAiAuaKfBhBtEiwAht6H73xb5lqtmJCr2-SpOMYZx0KNoJ802KjWH14zCv9fZTnCzhpVU2akDxoCWRIQAvD_BwE
Mechanical Parts:
- 22x M2x3 insert nuts (16 for the arms, 6 for the plates)
- 32x M2x6 screw (16 for securing arms to plates, 16 for attaching motors)
- 4x M2x5 screw (for securing rear cover)
- 2x M2x16 screw (for securing camera guards)
- 4x M2x14 low profile* screw and 4x M2 nut (for attaching flight controller esc stack)
- Additional* - You will need 2x M2x7 screws for attaching the camera and 8x M2x7 screws for attaching the propellers, but at least in my case, plenty of M2x7 screws were included with the motors I ordered.
- 4x 3020 propeller (or any another 3 inch propeller, or even 2.5 inch for that matter)
- 10mm x 180mm velcro strap: https://www.getfpv.com/lumenier-indestructible-kevlar-lipo-strap-10x180mm-3pcs.html
*low profile screws are preferable for mounting the stack because that way the heads will not protrude from the bottom of the drone and will allow you to safely strap batteries to the bottom.
Total Cost Estimate:
- Drone: ~ $120 before tax
- Transmitter : $90+
Assembly Guide:
(please have some prior drone experience, that said I'll be happy to help just leave a comment or something if you've got a question )
- Go ahead and print off all the parts. I'll wait. Oh, I should mention - use the good settings, no supports needed for anything, and I strongly recommend using TPU for the camera guards and rear cover, and a nice, strong, heat and impact resistance material like PETG or ASA for everything else.
- Prepare the parts by putting all the insert nuts where they need to go.
- Each arm has four holes for M2x3 insert nuts, two on its top and two on the bottom. Use a soldering iron to install them.
- The bottom plate takes four M2x3 insert nuts, two in the front and two in the back.
- The top plate needs only two M2x3 insert nuts, both of them in the back.
- Now, for the electronics. Start with the motors, thread the wires through the drone's arms, then tighten the motors down with sixteen M2x6 screws, be careful not to overtighten.
- Snip the motor wires so that there is 15-20mm of slack poking out of the arms.
- Strip back about 2mm of bare wire
- Poke the four M2x14 screws through the flight controller mounting holes of the bottom plate. Seat only the ESC half of the stack on those screws.
- Prepare your battery connector of choice, and solder it to the battery pads of the ESC. In my case, that would be the XT-30.
- Make sure the power wires are at least 18 AWG
- Make sure the power wires are about 60mm long, to ensure there will be enough slack.
- Route the power wires between the VTX mounting pegs.
- If you wish to add a capacitor, now's the time to do it, though make sure it's small enough to fit.




Названия используются только для указания источника результата. Polyzon не аффилирован с перечисленными площадками.
Комментарии