
Бесплатно 
NEW Year Clock Gearbox
Printables


What is this?
This is a project that I've been wanting to make for a while, but I haven't had the time to do so because of school and classes.
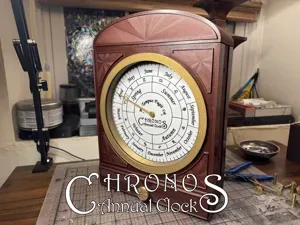
It's a circular calendar that is 2ft in diameter , and uses a standard clock motor and several gears to rotate an arm around the circle once every year. It also has press-fit pins and little “event”/holiday markers for every even day in each month. These have different surface layer heights, so that you can vary the color on each marker.
*UPDATE (July 10th)~~ New pins have been added, along with a new lid for easier assembly.
*UPDATE (September 7th 2022)~~ A new gearbox has been designed and posted. please use that one as it's much easier to assemble and print.
How can I tell what day it's displaying?
The 10th, 20th, and 30th of each month are marked with long lines, and the 5th, 15th, and 25th are marked with shorter lines.
How accurate is it really?
Very accurate. Each day is exactly 0.9856 degrees, which equals 3mm wide. Also, don't worry about having to set it back a day for that annoying February 29th every four years… I designed it so there's an extra quarter of a day dispersed throughout the entire year, therefore making it be 100% accurate. (This does have a side effect of making the calendar be up to ¾ of a day off, but it will still cross the date marks on the correct day.)
Printing Instructions
To print out the month slices; simply turn on supports for the build plate only, and add a color change after the Z Height of 5mm. Print this in whatever color or material you want to.
For printing out the Snap Pins; use a layer height around 0.15mm, enable the brim, and print in a strong material such as PETG .
For the gears and gearbox; Please use the new updated parts found here: link .
For the alignment tool, and the hand; Print at any resolution and material that you would like. I recommend printing the hand with a lighter material (foaming filament), but because it's so thin, it shouldn't make a huge difference.
Finally, for the Snap Pin Toppers; Print at either 0.15mm or 0.2mm, and add in color changes wherever you see fit. If you can't find a topper that fits your needs, let me know and I can make it!
Assembly
-Gearbox
First, we'll start by assembling the most important part of the clock; the gearbox. The clock motor that I found was from Amazon, and you can find it here .
UPDATE! Please use the NEW and improved gearbox listed here: link . Do not follow the instructions below, except for step 6, to glue the small gear onto the clock motor.
Gearset
Gearbox halves
Hand
Clock Motor
Tools
OLD 1: Take the gearbox and the thin gear with a track cutout , and snap it into place.
OLD 2: Turn the entire gearbox over, and place the motor in the cutout, and press it in all the way.
OLD 3: Next, take the tiny Hex Nut that came with the motor, and screw it on using a wrench, or any other tool that fits.
OLD 4: Place the second thin gear (without a track) into place with the large gear. They should snap into place.
OLD 5: Place the assembled gears into their places in the box.
---------------------------------------------------------------
Use this step here for the new motor assembly! 6: Take the smallest gear with a hole in it, apply glue to the hole, and attach it to the clock motor. If you do not glue this gear on, the motor will lose grip on it, and it won't be able to turn the gears. Be sure to only glue it to the hour hand.
---------------------------------------------------------------
OLD 7: Place the single gear without a cutout in the axle into place, along with the tall double gear .
OLD 8: Get the gearbox Lid, the hand, and the final gear with a slot in the axle. Push the gear through the hole in the lid, and then attach the hand to the gear.
OLD 9: Place the gearbox lid ontop of the gear assembly, and tape down the hand , so it cannot move.
OLD 10: If the lid doesn't fit on perfectly on the first try , move the gears around using something thin and long, or try tipping the box upside down, and shake it around to see if anything falls into place. After the lid is in place, there should be no gap between the base and the lid, if it rests on a flat surface.
UPDATE: The Lid has been modified to guide the gears more easily. If you have the old version, please download V2 (It'll save you a few minutes of fiddling with it).
-Calendar Circle
Next, we need to assemble the date-keeping part of the clock. Again, the table below shows all of the needed parts for this.
Month Slices
![[OLD] COBRA System for Original Prusa Enclosure](https://cache.polyzon.org/api/img?url=https%3A%2F%2Fmedia.printables.com%2Fmedia%2Fprints%2F338523%2Fimages%2F4530559_01a22827-cafc-4c56-ab5c-ea3e4f38533c%2F58.jpg&w=300)





Названия используются только для указания источника результата. Polyzon не аффилирован с перечисленными площадками.
Комментарии