
Бесплатно 
Netgear GS305P Switch Rackmount Adapter
Printables


I had three Netgear gigabit switches (GS105, GS108, GS116) sitting on Rack shelves. I wanted to move them off the shelves and add them to a standard 19" server rack.
1. Non-printed Parts Required
- (4) Server rack Cage nuts - (4) M6 x 14mm (or longer) screws for rack mounting - (12) M3 nuts, for switch Coupler plates - You can get away with only (8) if you don't need it very secure. - (12) M3 x 16mm (or longer) screws, for switch Coupler plates - You can get away with only (8) if you don't need it very secure. - M3 Driver (slimmer is better)
2. Printed Parts
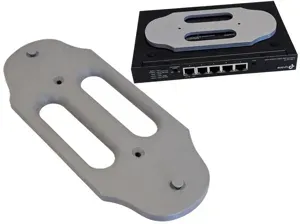
- (2) GS105-Bracket, one for left side and one for right side - (2) GS105-Coupler, one for top and one for bottom - Two coupler types are available; one solid and one with cutouts to help save plastic. You can choose any combination as long as you end up with two coupler plates. - I was able to print the cutouts variant of the GS105 Coupler with no supports on my MK3s, YMMV ;)
3. Adapter Assembly
- Each Coupler plate has outward-facing rectangular slots that securely hold the M3 Nuts. Press-fit your M3 Nuts into the slots of each Coupler plate - some force will be necessary! If you want it very secure, fill all 6 slots in each of the Coupler plates (total of 12 nuts required). If you don't need it very secure, simply fill 4 corner slots in each of the Coupler plates (total of 8 nuts required). I used only 8. Set the plates aside for now. - Each Bracket has a flat overhang feature on the front side and small rounded features in each rear corner. Choose a starting side and firmly push the Switch into one of the Brackets, ensuring that the Bracket's flat overhang feature is on the front side of the Switch and the Bracket's rounded corner features are at the rear of the Switch. - Firmly attach the remaining Bracket to the opposite side of the switch, ensuring that the Bracket's flat overhang feature is on the front side of the Switch and the Bracket's rounded corner features are at the rear of the Switch. - Set one of the Coupler plates between the Brackets, ensuring that the M3 Nut Slots are facing away from the Switch and that the flat edge of the Coupler plate faces the front of the Switch. The M3 Nut Slots will be aligned with the Bracket's M3 screw holes when you've got the correct orientation. - After ensuring alignment between the Coupler plate's M3 Nut Slots and the Bracket's M3 screw holes, drive the M3 x 16mm screws through the Bracket and into the Coupler plate. - Carefully flip over the assembly and set the remaining Coupler plate between the Brackets, ensuring correct orientation. Drive the remaining M3 x 16mm screws through the Bracket and into the Coupler plate. - Using your Cage nuts and M6 screws, mount the assembly into your rack and enjoy the saved space :)
Check my profile for GS108 and GS116 Switches






Названия используются только для указания источника результата. Polyzon не аффилирован с перечисленными площадками.
Комментарии