
Бесплатно 
Beyerdynamic Hinge Slider Replacement/Upgrade for DT770 Pro, DT770 M, DT990 Pro, DT990, DT880, Custom One Pro Plus, TYGR 300 R and MMX300 MK2
Printables


Do this at your own risk!!
Did your DT770s break after the warranty expired, and you don't want to pay for the OEM speaker assembly? That happened to me…
I thus came up with the idea to use a pair of mini speakers I had lying around to fix them. If I had bought speakers specifically for this purpose, I probably would've chosen slightly larger ones.
Compared to the DT880 600ohm they sound a little less bassy, and the midrange (I think) is a bit stronger, especially around the ~250hz to ~600hz area (even with EQ).
It probably isn't good for your phone or DAC or whatever since they aren't meant to be used as headphone speakers, but after about a day of testing I haven't noticed any damage to my DAC. Though I did notice that at high volume on my phone (Sony Xperia 1 IV) it would start clipping and sound awful.
Despite the listed frequency response starting at 240hz, I can hear them at 36hz (my hearing goes down to 25hz). In my build I can hear distortion from 44 to 46hz and from 62 to 105hz.
I printed it with PETG at 20% infill and 0.2 layer height.
Please note that I don't have any headphone measurement devices, so the supplied EQ may not be perfect, but it does improve the audio quality significantly. Though even if I had a perfect EQ, it'd only be perfect for my build as your build may differ slightly in cotton pads/cotton rounds and stuff.
PARTS:
- Beyerdynamic DT770 PRO* - 2x Dayton Audio CE32A-8 - 2x ~1" (~2.5cm) length of small wire - 3x Heat shrink tubing** - 2x Cotton pads/Cotton rounds*** - Soldering iron + Lead-free solder - Hot glue gun + Hot glue - The 3D-printed part (duh) *It doesn't matter which ohm version they are (250ohm, 80ohm, etc.). The non-PRO version probably works. But you may have to change the EQ a little, as the clamping force and earpads seem to differ.
**Optional, but it's good to use.
***This is optional. I haven't tried it without the cotton pads/Cotton rounds, and I made the EQ while using them.
I bought the speakers from SoundImports .
HOW TO DO IT:
Step 0: See if you can fix your DT770s, it could be a simple fix! If you still have warranty, you should claim it.
Disassembly
- Disassemble your DT770s. You need to remove the earpads, then you should see a plastic ring holding the felt. Carefully remove the ring by taking (for example) a flathead screwdriver and sticking it between the ring and felt (see photo 5) and twisting it. After the ring has been popped out you can remove the felt circle, the speaker should now fall out if you turn it upside-down. Follow a tutorial video if you can't figure out how to do this.
- Carefully de-solder the original speakers and remove the speaker assemblies (the whole thing that was held in behind the felt circle).
Attaching the speakers to the adapter
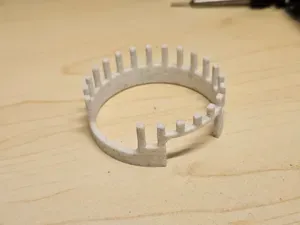
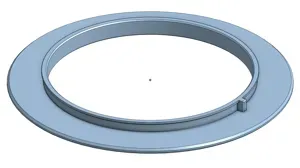
- Attach the CE32A to the 3D-Printed adapter with the negative (non-red-marked) facing the bottom (it should be a tight fit). The bottom is the side that doesn't have the notch. Carefully press on the speaker magnet while using your soldering iron to melt and flatten the pins sticking out from where you attached the speaker. You can also use hot glue to seal the speaker by gluing the side of the speaker to the 3D-Printed adapter.
Soldering
- Solder the short wires to the positive terminal of the speakers, make the other end of the wire face the negative terminal. See photo 2 to see how it should look, the wire I'm talking about in this step is the long red one coming from the left.
- Left earcup: Solder the white (from the cable coming from the top of the earcup) and black wires to the negative terminal of the speaker. Then you should solder the white wire (from the bottom of the earcup) to the end of the red wire that you soldered to the positive terminal in step 4. Then solder the two remaining red wires to each other. See photo 2 to see how it should look like. DO NOT REASSEMBLE YET! Before doing this, you should put a small length of heat shrink tubing on the wires so that you can protect it against shorting out. Just make sure to slide it as far away from the place on the wire where you're soldering so that it doesn't start unintentionally shrinking. You could also use a little bit of electrical tape.
- Right earcup: Solder the red wires together (you can use heat shrink tubing here too), then solder the white wire to the negative terminal on the speaker. DO NOT REASSEMBLE YET!
Reassembly
- Put the plastic ring with the felt on the outside on to the speaker assemblies you just made. It should now look like photo 2. If it is too loose (or if you just want to be safe) you can hot glue it to the pillar things like I did in photo 2.
- Optional: Fluff up a cotton pad/cotton round (I don't know if it makes a difference if you fluff it up or not), then carefully press it on to the plastic pegs of the plastic thing with the felt. See photo 3 to see how it should look like.
- Carefully put the speaker assemblies into the earcups. Then place the felt circles and plastic rings back. It should now look like it did at the start after you removed the earpads. Put the earpads back in place, this step can be a bit tricky. I've read that applying some heat with a hair dryer can soften the plastic on the earpads making them easier to put on.
Usage
- Before using them, you should download PEACE , which is in my opinion the best EQ GUI for Windows. To do this, you should follow the instructions on the download page for PEACE.
- After downloading PEACE you should download the .txt file that I uploaded under "Other Files" after doing that you should replace “.txt” with “.peace”. Then you can open PEACE and press “import” and import the .peace file. If this doesn't work, please select “Equalizer Default” and copy all the parameters from photo 6.
- Enjoy your slightly worse, but now functional DT770s!
Please comment if I am unclear in my explanation or if you have any tips & tricks!




Названия используются только для указания источника результата. Polyzon не аффилирован с перечисленными площадками.
Комментарии