
Бесплатно 
Dual Color Domino (2 part single extruder multicolor game)
Printables



Looking for a small but usefull Multicolor print?
These little Desktop Stands are the perfect home for your favourite picture or your business cards. And they will look absolutely beautiful on your desk.
And you need only one extruder and no paint to create them!
I designed them especially for small amounts of filament, like small samples or leftovers which are usually too small for a print.
The multicolor effect is created by filament swaps, which means you pause your print at a certain height, change the filament and resume the print.
This can be done in different ways. For a quick overview watch this video:
I'm currently working on tutorials for this method, so stay tuned for more videos to come.
The instructions can be found in the Post-Printing tab.
Enjoy!
Print instructions
Category: Office Print Settings
Printer Brand: Prusa
Printer: i3 MK3
Rafts: No
Supports: No
Resolution: 0.2
Infill: 20%
Filament: eSUN PLA various
Notes:
I used the filament from an eSUN sample pack with 20 colors, 5m each.
Post-Printing
Instructions
For each stand you need:
- 1 x "Backside.stl"
- 2 x "Triangle_2x.stl"
- 1 x "Hearts.stl" or "Rainbow.stl"
Also different colors of filament (I used eSUN PLA) of your own choice. These should be from the same type (all PLA or all PETG etc.) and have a similar melting temperature.
And a few drops of super glue for assembly.
The "Backside.stl" and the "Triangle_2x.stl" are printed in only one color.
Slice them as usual and print the parts.
The "Triangle_2x.stl" file is quite tiny, because it is designed as a spacer to hold only one picture. If you want to use it for business cards, you should make the two triangles longer. For this you can adjust the Z-height of the file in your slicer. Make sure to only increase the Z-height, not the x or y dimensions, or it will not fit correctly.
If you are new to color changes during a print, I suggest to start with the Hearts Stand.
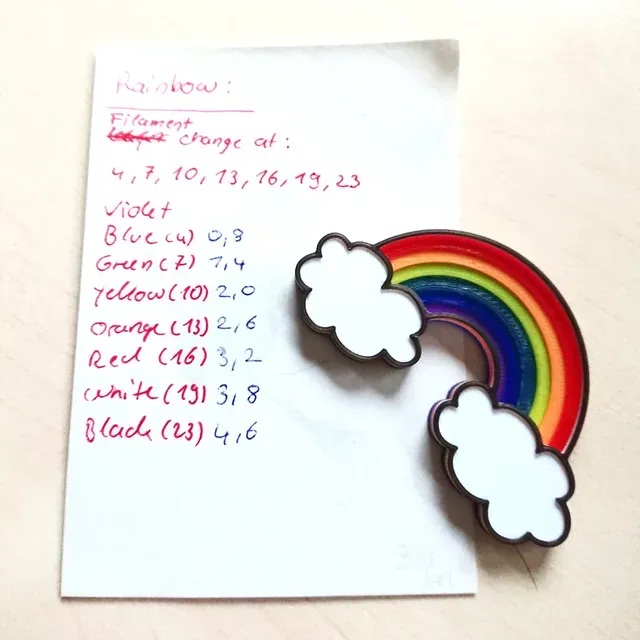
For the hearts you only need to do one color swap.
Slice it with a layer height of 0.2 mm and pause your print manually after layer 20 (4.0 mm height) is finished or layer 21 (4.2 mm height) has just begun.
Now remove the filament and insert another color.
Resume your print and wait until it is finished.
Voilá - you just created a dual color print with only one extruder.
Now all that's left to do is to glue the parts together.
You simply put a drop of super glue in each triangular shaped hole (both backside and hearts), insert the triangles in the holes of the backside and push the holes behind the hearts over them.
Let it dry and that's it.





Названия используются только для указания источника результата. Polyzon не аффилирован с перечисленными площадками.
Комментарии 0
Загружаем комментарии…