
Бесплатно 
Falin Staff - Dungeon Meshi (Delicious in Dungeon) - FDM
Thingiverse


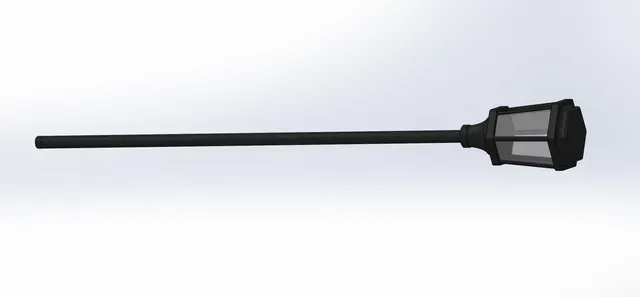





This is my version of Falin's Mace-Staff from Dungeon Meshi. She's seen using the staff in various flashbacks and in some of the post-end of the main manga series content (keeping it vague for spoilers for anime-only watchers). The staff uses ¾" PVC pipe (1" OD) as the body of the staff, while all other non-electronic components are 3D printed.
For the non-electronic version, simply print the solid version of the Base and omit the Stem Insert component. The files are pre oriented. The Electronics Lid (at the tab locations) and Lantern Base (inside the battery compartment), and Tip (around the edge) may require some light supports. I also recommend printing the Electronics Lid and Columns with brims for added adhesion due to their height and slender nature.
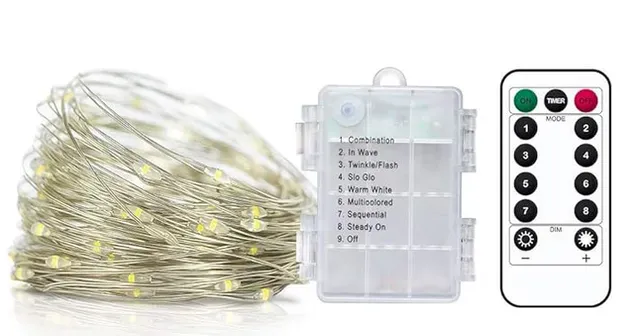
I used a string of faerie lights to provide illumination inside the lantern for a “magic glow” effect, and the cavity is designed to hold the control board like in the following faerie light listing. I cut down the on/off/mode button on the board (shortened the plastic button post) but left the electronics of the button unchanged. This project also may require re-soldering the lights back onto the board as they are very easy to tear off of it when removing them from the battery case housing and hot glue blob that seals the case. The lights are just loosely balled inside the lantern with their leads passing through the small cutout notch in the Battery Lid
https://www.amazon.com/gp/product/B07X42BR7D/
The included AA batteries were far too large to fit into the base of the lantern, so I de-soldered the battery leads and a instead used a AAA battery holder like the kind used in LED flashlights. The particular one I purchased was this listing.
https://www.amazon.com/dp/B07TXPN6MM
To activate the lights I wired a magnetic switch in parallel to the existing push button on long leads. Instead of needing to turn on the lights with the push button, add the Electronics Cover back onto the base, and then put the Top back on and close up the whole lantern, the magnet allows you to turn on the lights with hidden magnets in your cosplay. I used a red ribbon wristband that matched the choker of the Marcille in my cosplay group but you could easily use a flesh tone and attempt to hide it entirely. The magnetic switched I used was this listing.
https://www.amazon.com/Gebildet-Normally-Induction-2-5mm%C3%9714mm-Multi-Use/dp/B07YFBQ4HS
Simply wave the magnets past the magnetic switch and the lights will turn on. Then repeat activating the magnetic switch until you are on the faerie light setting you want (steady, pulsing, flashing, etc).
Solder wires onto the two contacts that the push button uses on the PCB. Solder the magnetic switch on the other end of the wires. Feed the switch and wires from the control board down past the batteries into the circular hole in the Lantern Base and inside hole in the Stem Insert. The rectangular hole in the round end of the stem insert provides access to the magnetic switch directly under the PVC, thus improving the sensitivity of the switch on one side of the staff. The hexagonal end of the Stem Insert and the hole it goes into in the Latern Base means that the most sensitive side will always be on the same side, in case you wish to mark it for ease of access or just try to remember which side it is while using the prop.
The Window Panes are also printed, and in my case I chose to use a PEO sheet with a broken glass pattern to give it a nice crystalline pattern. I slightly tweaked Adam L.'s PETG “glass” settings to achieve a nice clear prints. I would recommend using a larger nozzle than I did (0.4) for an even more clear print, but in my case I wanted it to look a little bit frosted to hide the individual faerie lights.
https://www.printables.com/model/613741-print-glass-with-your-bambu-x1x1ep1sp1p-printer-or
The tops of the columns have a slight taper to facilitate easier removal of the top by pushing the Lantern Top directly upward. I found that post painting the parts were a tight enough fit that the lantern could simply be tension fit together, but in case your parts come out looser, the Lantern Top has recesses for 5 mm cubic magnets, as do the Lantern Column Magnet Recesses variant files.
These files are provided for all noncommercial uses. Should you wish to use or produce them commercially please contact me to arrange details.






Названия используются только для указания источника результата. Polyzon не аффилирован с перечисленными площадками.