
Бесплатно 
Mantis Mosquito Orbiter for BLV Cube Metal Kit
Thingiverse


*** Update*** 06.02.2023 New Bottom V2 Part with additonal mount to the metal carriage - much more rigid and highly recommended New (Super) PINDA mount for the HF Version (UHF should work but untested) with melt insert - small remark. Screw the insert tight before melting, so you get the angle right. New longer fan ducts for the UHF Model - Thanks a lot to Farleken for the adaptation New hotened mount with extra screws between top and bottom part - hanks a lot to Farleken for the adaptation
---- This is a remix of the Phaetus Rapido HF / Orbiter 2 Hotend mount from sifago.
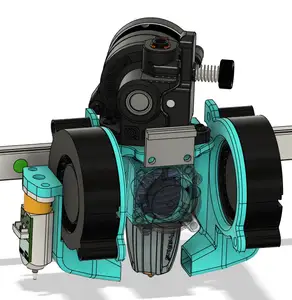
I have adapted the mount to fit to the BLV MGN Printer using the metal kit. The mount consists of the top an bottom part, a fanduct left and right for twin 5015 fans as well as an BLTouch bracket for left or right mount. The cable holder is optional.
So you have to print everything but only one BLTouch mount...
All screw connections are designed for melt inserts. I used Ruthex but others should fit as well if they have similar dimensions. In total you need :
10 x M3 inserts (8 if you just use two screws for the hotend fan, like I did) 2* M2 inserts. (Screw count and length will follow)
****Note to consider**** In order to use this mount you have to turn the Z-Axis MGN Rail mounts by 180° in order to get the bed frame higher. This is needed as the whole setup is so short that you the normal setup won't reach high enough to get to the nozzle.
Basic assembly. Install the melt inserts: Top has one left and right Bottom has two on top, four for the fan, two M2 left and right on the lower half Fan ducts have one each on the lower half( the hole with the extra depth)
Remove the V6 mount on top of the Pheatus Rapido. Install the Rapido in the bottom part with 4 M2.5 screws. Feed the connection cables through the whole on the right side.
Install the top part on the x carriage (with or without the cable holder)
If you have already the right length of PTFE tube between the Orbiter and the Rapido, skip the next step, otherwise I recommend the following
Measure the depth of the metal insert at the bottom of the Orbiter. Note that number. Slide the bottom part under the top part and tighten it with two M3 screws. Put a PTFE tube in the hole above the hotend and push it down as far as it goes. Mark the length you have measured before on the tube sticking out of the top part. Remove it and cut it at your marking. Remove the temporary screws from the top part
Put the bottom part under the top, align the holes and push the PTFE connector tube inside the hole right above the Rapido. Put the Orbiter on top and tighten it with two M3 screws
Install the fanduct left an right with an M2 screw.
Put the 5015 blowers in the fanduct, align and tighten with two M3 screws.
If you use the BLTouch Bracket, this has to be placed on the 5015 blower and the screws have to be longer for that side
As this is work in progress, there could be some flaws in it. If you find an issue please contact me.


Названия используются только для указания источника результата. Polyzon не аффилирован с перечисленными площадками.
Комментарии 0
Загружаем комментарии…