
Бесплатно 
ESP32 Stream Cheap Deck - BLE / USB Macro Keyboard
MakerWorld


## Mini ESP32 TV (remix) <pre>
</pre> This Mini ESP32 TV project is remix of Moononournation's [Mini-Retro-TV](https://www.instructables.com/Mini-Retro-TV/) Instructable. I wanted to try something with a PCB, and the slightly cheaper D1 mini ESP32. It has a front facing on/off button, and a single multi function button that can change movie clips forwards and backward and mute the TV if needed.
Licensing: My PCB Gerber files and STLs are released under [The Unlicense](https://unlicense.org/). Everything else retains the licenses assigned by their creators. I take no responsibility for anything.
Notes #1: Some adjustment of the front panel STL might be needed to completely centre the LCD display module with the screen bezel. Notes #2: The bin file's source code source is unavailable. However, alternate code that functions in same way is available [here on GitHub](https://github.com/DynaMight1124/ESP32-MiniTV-Player) by DynaMight1124. <pre>
</pre> >## Supplies
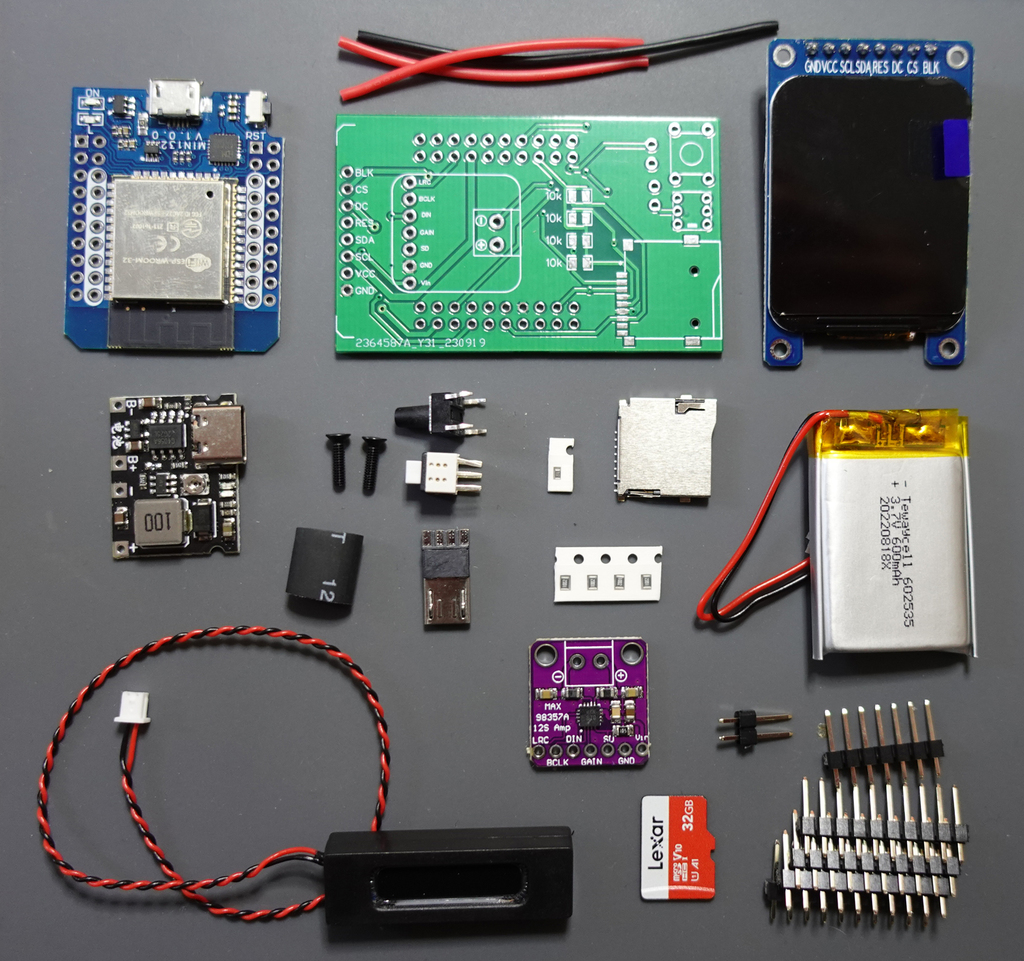
The PCB. This can be ordered from a PCB fabrication manufacturer Like JLBPCB : [Gerber File Zip](https://drive.google.com/file/d/1rlbfgUXOx48QaWByRG_6N7U-xAw_XhOt/view?usp=sharing) (Use default PCB board settings. 1.6mm thickness etc. Just upload the gerber zip and order)
*Notes : When ordering parts, make sure they correspond with the ones in my pictures.For example there are two (or more) different 1.69 LCD displays out there, and many different D1 mini's. Deviate from the BOM at your own risk*
1.69" LCD display module: [https://www.aliexpress.com/w/wholesale-1.69%252522-LCD-display-module.html](https://www.aliexpress.com/w/wholesale-1.69%252522-LCD-display-module.html)
D1 mini ESP32: [https://www.aliexpress.com/w/wholesale-D1-mini-ESP32.html](https://www.aliexpress.com/w/wholesale-D1-mini-ESP32.html)
Max98357 I2S module: [https://www.aliexpress.com/w/wholesale-Max98357-I2S-module.html](https://www.aliexpress.com/w/wholesale-Max98357-I2S-module.html)
4 x 10k SMD resistors (size 0805) 1/8W: [https://www.aliexpress.com/w/wholesale-10k-SMD-resistors-0805-1%252F8W.html](https://www.aliexpress.com/w/wholesale-10k-SMD-resistors-0805-1%252F8W.html)
1 x 5.1k SMD resistors (size 0605): [https://www.aliexpress.com/w/wholesale-5.1k-SMD-resistors-0603.html](https://www.aliexpress.com/w/wholesale-5.1k-SMD-resistors-0603.html)
9pin Micro SD card slot connector: [https://www.aliexpress.com/w/wholesale--9pin-Micro-SD-card-slot-connectors.html](https://www.aliexpress.com/w/wholesale--9pin-Micro-SD-card-slot-connectors.html)
(The exact one used was this one: [https://www.lcsc.com/product-detail/SD-Card-Connectors_G-Switch-GT-TF003-H0185-01_C5155563.html](https://www.lcsc.com/product-detail/SD-Card-Connectors_G-Switch-GT-TF003-H0185-01_C5155563.html))
Battery Charger Boost Module TP4056: [https://www.aliexpress.com/w/wholesale--Battery-Charger-Boost-Module-TP4056.html](https://www.aliexpress.com/w/wholesale--Battery-Charger-Boost-Module-TP4056.html)
1 x 5.8x5.8x7mm Tactile Push Button Latching 6 Pin: [https://www.aliexpress.com/w/wholesale-5.8x5.8x7mm-Tactile-Push-Button-Latching.html](https://www.aliexpress.com/w/wholesale-5.8x5.8x7mm-Tactile-Push-Button-Latching.html) (mine came from Amazon)
1 x 6x6mm 9.5mm(total height) Momentary Push Button Switch: [https://www.aliexpress.com/w/wholesale-6x6mm-Momentary-Push-Button.html](https://www.aliexpress.com/w/wholesale-6x6mm-Momentary-Push-Button.html)
Ghxamp Mini Speaker 8Ohm 1W 34.8mm*11.2mm*6.0mm: [https://www.aliexpress.com/w/wholesale-Mini-Speaker-8Ohm-1W-34.8mm-11.2mm-6.0mm.html](https://www.aliexpress.com/w/wholesale-Mini-Speaker-8Ohm-1W-34.8mm-11.2mm-6.0mm.html)
2 x M2*8mm Black Hex Countersunk Screws (total length 8mm): [https://www.aliexpress.com/w/wholesale-M2-8mm-Black-Hex-Countersunk-Screws.html](https://www.aliexpress.com/w/wholesale-M2-8mm-Black-Hex-Countersunk-Screws.html)
1x Lithium battery 602535 or 603035 : [https://www.aliexpress.com/w/wholesale-Lithium-battery-602535.html](https://www.aliexpress.com/w/wholesale-Lithium-battery-602535.html)
1 x Micro USB 4Pin Male Plug connector: [https://www.aliexpress.com/w/wholesale-micro-USB--Male-4pin-USB-Connectors.html](https://www.aliexpress.com/w/wholesale-micro-USB--Male-4pin-USB-Connectors.html)
2 x 40-pin Header Pins 2.54mm Male Single Row
A 32GB Micro SD Card (I used a Lexar 32GB from Amazon)
Black and Red Silicone Wire (around 26AWG )
Optional - Heat Shrink Tubing <pre>
</pre> >## Step 1: Charging Board
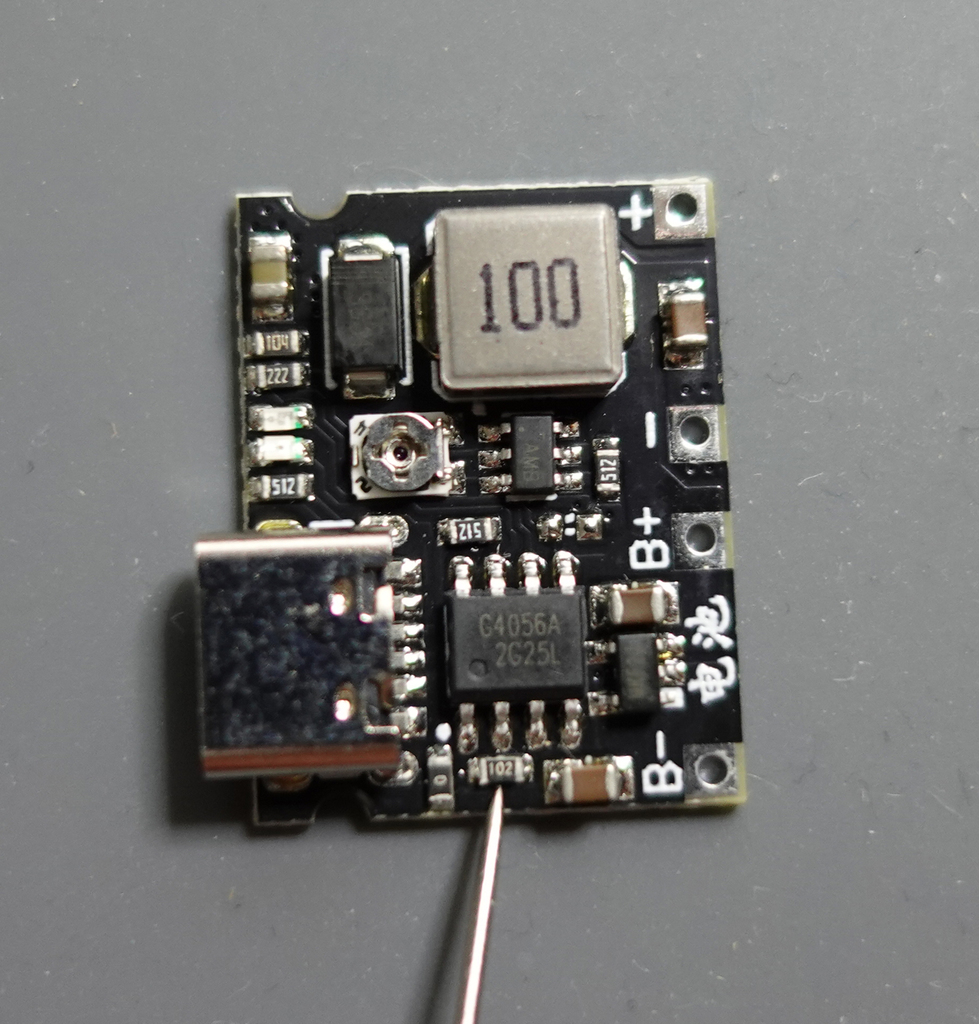
The charging (and voltage boost) board needs a resistor changed on it. This is the worst part of the whole project. My advice is to start with this. That way if you fail, you can just throw everything into the trash right from the get go.
By default the charging board outputs 1 Amp to the battery. This is too high for a 600mAh battery, and needs to be dropped down to 250mA by changing the resistor in the picture to a 5.1k 0603 resistor.
Use **lots** of light and a fine tip on your soldering iron. I also use a bit of flux paste. After you change the resistor, check your work with a loupe glass or some other magnifier.
Next, check the charging board is outputting 5v. Plug a 5v charger into the board and check the output. Adjust as needed using the output voltage potentiometer (the screw thing).
There are two solder pads marked "T" on back of the charger board. If your battery has a protection circuit (most likely it does), you are supposed to solder the points marked T together. <pre>
</pre> >## Step 2: Program the ESP32

While you can program the D1 Mini ESP32 after it is attached to the PCB, it might mean shaving down a USB data cable. Save yourself the bother and program it now.
Download this [Bin File Zip](https://drive.google.com/file/d/1bXusOZq6FEuDI1piCnWZVPy3Iq91Zb0v/view?usp=sharing) and unzip the bin file. Download the Espressif Flash Download Tool from [https://www.espressif.com/en/support/download/other-tools](https://www.espressif.com/en/support/download/other-tools). Unzip it. Plug the D1 Mini ESP32 into the computer's USB port and run the flash_download_tool_3.9.5.exe.
Set ChipType to ESP32 and OK it.
Change the setting in the Flash Tool so that it reflects the settings in the above image. (you have to type in the 0x00)
Select your active COM port and click start. Once the upload has finished, unplug the ESP32... job done. <pre>





Названия используются только для указания источника результата. Polyzon не аффилирован с перечисленными площадками.
Комментарии