
Бесплатно 
Anycubic i3 Mega S ULTIMATE Upgrade Guide
Thingiverse


# **🚀 Mi Ender 3 S1 mejorada – De stock a bestia de impresión**
La Ender 3 S1 ya es una impresora muy competente en su configuración original, pero tras un buen tiempo con ella decidí llevarla mucho más allá. Con las mejoras que he aplicado, ahora es capaz de hacer un Benchy en 23 minutos y sacarlo perfecto en 33 minutos, algo impensable en su estado de fábrica. Actualmente trabaja con aceleraciones de hasta 6000 mm/s² y velocidades de 300 mm/s, sin comprometer la calidad de impresión. Todo ello con una estabilidad y fiabilidad que la han convertido en una auténtica máquina de producción.
## **🔧 Klipper y Sonic Pad: el cambio definitivo** - El gran salto vino con la instalación de Klipper con una Sonic Pad (1). Esta combinación de Creality es muy sencilla de montar, y lo mejor es que añade la interfaz de Fluidd en el ordenador, lo que facilita mucho el control. El cambio es radical: aceleraciones mucho más altas, Input Shaping para reducir vibraciones y posibilidad de imprimir a velocidades que antes eran impensables. En un futuro pienso rootear la Sonic Pad para sacarle todo el potencial, y por aquí iré compartiendo el proceso cuando lo haga. **👉 Además, dejaré aquí mi printer.cfg modificado**
## **⚙️ Mejoras aplicadas**
### **1. Klipper con Sonic Pad ** - La instalación es muy sencilla al ser un kit oficial de Creality. Además de la interfaz en el pad, se puede controlar desde el PC con Fluidd, lo que facilita mucho la configuración y monitorización. En combinación con el resto de mejoras, es lo que permite imprimir un Benchy en menos de media hora.
### **2. Modificación de cabezal Taurus ** - En mi caso tuve que usar Taurus V5.Volcano.K1.CHCB-OT Hot End.18.0mm.WS, ya que con el hotend de alto flujo el montaje no daba la altura necesaria. El sistema proporciona una refrigeración de capa muy superior al de fábrica, lo que se nota especialmente en los puentes y detalles finos. 👉Refrigeración capa: https://www.printables.com/model/511962-taurus-v5-cooling-duct-for-creality-sprite-extrude 👉Refrigeración hotend:https://www.printables.com/model/928205-ender-3-s1-5015-hotend-fan-duct 👉Turbinas:https://s.click.aliexpress.com/e/_opat6dn || https://amzn.to/45UdMeu
### **3. Guías lineales en ejes X e Y ** - Opté por un kit específico para la Ender 3 S1, lo más fácil y directo, ya que solo hay que seguir las instrucciones sin hacer modificaciones adicionales. El movimiento ahora es mucho más estable y duradero, reduciendo al mínimo el mantenimiento. 👉 Eje x:https://s.click.aliexpress.com/e/_ooySysV 👉 Eje y: https://s.click.aliexpress.com/e/_oo7BoGd
### **4. Hotend de alto flujo** - La impresora ya tenía velocidad, pero faltaba acompañarla de velocidad en la extrusión. Este hotend me permite alcanzar hasta 22 mm³/s de caudal, frente a los 15 mm³/s del original. Con esto puedo aprovechar boquillas más grandes y mantener altos volúmenes de material sin problemas. 👉Hotend: https://s.click.aliexpress.com/e/_oDeTVv7 || https://amzn.to/4lQ9877 👉Boquilla alto flujo: https://s.click.aliexpress.com/e/_oDTmTWH
### **5. Ventilación en motores de ejes X e Y ** - Al subir tanto las aceleraciones, los motores comenzaron a perder pasos. Primero probé con radiadores pasivos en los motores X, Y y Z, pero no fue suficiente. La solución real fue añadir ventiladores, aunque lo mejor es combinar ambas opciones: radiadores para disipar y ventiladores para mantener estable la temperatura. 👉Diseño ventilador eje x: https://www.printables.com/model/919955-ender-3-s1-cooler-for-stepper-motors 👉Diseño ventilador eje y: En descargas de este post 👉Radiadores: https://s.click.aliexpress.com/e/_omEejM1 || https://amzn.to/4fS3NLc 👉Ventiladores básicos(4010 24V): https://s.click.aliexpress.com/e/_onrLpW5 || https://amzn.to/4oWeujY 👉Ventiladores silenciosos: https://amzn.to/4fWuf6E
### **6. Ventilador Noctua en la placa base** - Sustituí el ventilador original de la placa por un Noctua más silencioso y potente. Esto mejora la refrigeración de los drivers de la placa, prolonga su vida útil y reduce notablemente el ruido durante las impresiones largas. 👉Diseño: https://www.printables.com/model/462884-ender-3-s1-pro-mainboard-and-psu-60x25mm-fan-mount 👉Ventiladores: https://amzn.to/3JxoujD
### **7. Ruedas anti giro para la cama ** - Evitan que se desajuste el nivelado con las vibraciones de la impresora. Una mejora muy simple pero que ahorra muchísimo tiempo al no tener que calibrar continuamente. 👉 Diseño: https://www.printables.com/model/422895-ender-3-s1s1-pro-locking-bed-level-knob
### **8. Cadenas portacables en ejes X, Y y Z ** - Mejoran la gestión del cableado, evitando tirones y alargando la vida de los cables. Además, dan un aspecto más limpio a la impresora. 👉 Eje X: https://www.printables.com/model/813934-ender-3-s1-cable-chain-z-axis-x-axis 👉 Eje Z: https://www.printables.com/model/813934-ender-3-s1-cable-chain-z-axis-x-axis 👉 Eje Y: https://www.printables.com/model/417892-ender-3-s1-s1-pro-heating-bed-cable-chainholder-gu
### **9. Tacos de silicona en la cama ** - Sustituyen a los muelles tradicionales, eliminando vibraciones y manteniendo un nivelado estable. Una mejora barata que se nota desde la primera impresión. 👉Espaciador 16mm: https://s.click.aliexpress.com/e/_oBo8wb3 || https://amzn.to/3VlPF3u
### **10. Cepillo de purga ** - Mantiene la boquilla limpia antes de comenzar cada impresión, evitando restos de filamento en la primera capa. Muy útil para mejorar la fiabilidad en piezas largas. 👉Diseño: https://www.printables.com/model/1299944-ender-3-s1-pro-nozzle-wiper-brush-version 👉Cepillo: https://s.click.aliexpress.com/e/_om98477 || https://amzn.to/3VrsOn3
## **🛰️ Test Spacetest ** - El Spacetest fue clave en todo el proceso. Este test analiza hasta 81 parámetros distintos de la impresora, lo que me permitió ajustar al milímetro cada una de las mejoras realizadas. Gracias a él conseguí que todas trabajaran en conjunto de forma perfecta. Los resultados hablan por sí solos: menos ghosting, líneas más definidas y la posibilidad de imprimir a 300 mm/s con 6000 mm/s² de aceleración, manteniendo una calidad sorprendentemente alta. - https://makerworld.com/es/models/1690929-spacetest#profileId-1792451
## **✅ Conclusión** La Ender 3 S1 ha pasado de ser una buena impresora de serie a convertirse en una auténtica máquina de alto rendimiento. Con estas mejoras puede trabajar rápido, con precisión y con fiabilidad, alcanzando cifras que la acercan a impresoras de gamas mucho más altas. Ha dejado de ser una impresora de iniciación para convertirse en una herramienta de producción capaz de sacar piezas perfectas a velocidades extremas.
**Si tienes alguna duda, quieres proponer una mejora o compartir tus propias modificaciones, ¡estaré encantado de leerte y ayudar!**
**💡 He dejado algunos enlaces de afiliado a las piezas y mejoras que uso. Si compras a través de ellos me ayudas a seguir creando contenido y mejorando mis impresoras, ¡sin que a ti te cueste nada extra!**
----------------------------------------------------------------------------------------------------------------------------- # **🚀 My Ender 3 S1 Upgraded – From Stock to a Printing Beast** The Ender 3 S1 is already a very capable printer in its original configuration, but after spending quite some time with it, I decided to take it much further. With the upgrades I’ve applied, it is now capable of printing a Benchy in 23 minutes and producing a perfect one in 33 minutes – something unthinkable in its stock state. Currently, it runs with accelerations up to 6000 mm/s² and speeds of 300 mm/s, without compromising print quality. All of this with stability and reliability that have turned it into a true production machine.
## **🔧 Klipper and Sonic Pad: The Definitive Upgrade** The big leap came with the installation of Klipper with a Sonic Pad (1). This Creality combo is very easy to set up, and the best part is that it adds the Fluidd interface on your computer, which makes control much easier. The change is radical: much higher accelerations, Input Shaping to reduce vibrations, and the ability to print at speeds that were previously unthinkable. In the future, I plan to root the Sonic Pad to unleash its full potential, and I’ll be sharing the process here when I do. - **👉 I will also leave my modified printer.cfg here**
## **⚙️ Applied Upgrades** ### **1. Klipper with Sonic Pad** - Installation is very straightforward since it’s an official Creality kit. Besides the pad’s interface, you can control it from your PC with Fluidd, which makes setup and monitoring much easier. Combined with the rest of the upgrades, it’s what allows printing a Benchy in under half an hour.
### **2. Taurus Head Modification** - In my case, I had to use the Taurus V5.Volcano.K1.CHCB-OT Hot End.18.0mm.WS, since with the high-flow hotend the original mount didn’t provide enough height. This system offers much better part cooling compared to stock, which is especially noticeable on bridges and fine details. 👉 Part cooling: https://www.printables.com/model/511962-taurus-v5-cooling-duct-for-creality-sprite-extrude 👉 Hotend cooling: https://www.printables.com/model/928205-ender-3-s1-5015-hotend-fan-duct 👉 Blowers: https://s.click.aliexpress.com/e/_opat6dn || https://amzn.to/45UdMeu
### **3. Linear Rails on X and Y Axes** - I went with a specific kit for the Ender 3 S1, the easiest and most direct option, since you only need to follow the instructions without additional modifications. The motion is now much more stable and durable, reducing maintenance to a minimum. 👉 X axis: https://s.click.aliexpress.com/e/_ooySysV 👉 Y axis: https://s.click.aliexpress.com/e/_oo7BoGd
### ** 4. High-Flow Hotend** - The printer already had speed, but it lacked extrusion speed. This hotend allows me to reach up to 22 mm³/s of flow rate, compared to the 15 mm³/s of the stock hotend. With this, I can use larger nozzles and maintain high material throughput without issues. 👉 Hotend: https://s.click.aliexpress.com/e/_oDeTVv7 || https://amzn.to/4lQ9877 👉 High-flow nozzle: https://s.click.aliexpress.com/e/_oDTmTWH
### **5. Cooling for X and Y Stepper Motors** - With such high accelerations, the motors started to skip steps. I first tried passive heatsinks on the X, Y, and Z motors, but it wasn’t enough. The real solution was to add fans, although the best option is to combine both: heatsinks for dissipation and fans to keep the temperature stable. 👉 X axis fan mount: https://www.printables.com/model/919955-ender-3-s1-cooler-for-stepper-motors 👉 Y axis fan mount: Included in this post’s downloads 👉 Heatsinks: https://s.click.aliexpress.com/e/_omEejM1 || https://amzn.to/4fS3NLc 👉 Basic fans (4010 24V): https://s.click.aliexpress.com/e/_onrLpW5 || https://amzn.to/4oWeujY 👉 Silent fans: https://amzn.to/4fWuf6E
### **6. Noctua Fan for the Mainboard** - I replaced the stock mainboard fan with a more powerful and much quieter Noctua. This improves cooling for the board’s drivers, prolongs their lifespan, and greatly reduces noise during long prints. 👉 Mount design: https://www.printables.com/model/462884-ender-3-s1-pro-mainboard-and-psu-60x25mm-fan-mount 👉 Fan: https://amzn.to/3JxoujD
### **7. Anti-Rotation Bed Wheels** - Prevents bed leveling knobs from loosening due to vibrations. A very simple mod that saves a lot of time by keeping the bed stable longer. 👉 Design: https://www.printables.com/model/422895-ender-3-s1s1-pro-locking-bed-level-knob
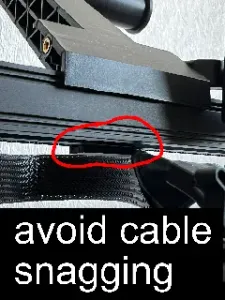
### **8. Cable Chains for X, Y, and Z Axes** - Improves cable management, avoids pulling, and extends cable lifespan. It also gives the printer a cleaner look. 👉 X axis: https://www.printables.com/model/813934-ender-3-s1-cable-chain-z-axis-x-axis 👉 Z axis: https://www.printables.com/model/813934-ender-3-s1-cable-chain-z-axis-x-axis 👉 Y axis: https://www.printables.com/model/417892-ender-3-s1-s1-pro-heating-bed-cable-chainholder-gu
### **9. Silicone Bed Spacers** - They replace the traditional springs, reducing vibrations and keeping bed leveling stable. A cheap upgrade that shows results from the very first print. 👉 16mm spacers: https://s.click.aliexpress.com/e/_oBo8wb3 || https://amzn.to/3VlPF3u
### **10. Purge Brush** - Keeps the nozzle clean before each print, avoiding filament residue on the first layer. Very useful to improve reliability on long prints. 👉 Design: https://www.printables.com/model/1299944-ender-3-s1-pro-nozzle-wiper-brush-version 👉 Brush: https://s.click.aliexpress.com/e/_om98477 || https://amzn.to/3VrsOn3
## **🛰️ Spacetest** The Spacetest was key throughout the process. This test analyzes up to 81 different parameters of the printer, which allowed me to fine-tune each upgrade with precision. Thanks to it, I managed to make all the upgrades work perfectly together. The results speak for themselves: less ghosting, sharper lines, and the ability to print at 300 mm/s with 6000 mm/s² acceleration, while maintaining surprisingly high quality. - https://makerworld.com/es/models/1690929-spacetest#profileId-1792451
## **✅ Conclusion** The Ender 3 S1 has gone from being a good stock printer to becoming a true high-performance machine. With these upgrades, it can work fast, precisely, and reliably, achieving results that bring it close to much higher-end printers. It has stopped being just a beginner’s printer and has turned into a production tool capable of printing perfect parts at extreme speeds.
**If you have any questions, want to suggest an upgrade, or share your own mods, I’ll be glad to read them and help!**
**💡 I’ve included some affiliate links to the parts and upgrades I use. If you buy through them, you’ll help me keep creating content and improving my printers – at no extra cost to you!**




Названия используются только для указания источника результата. Polyzon не аффилирован с перечисленными площадками.