
Бесплатно 
Philips OneBlade & KCD2 holder and organizer
Printables




What is it and why?
I made this modular storage and travel case for my Philips grooming/shaving things. While going with something perfect-to-shape would allow me to make such a storage box smaller, the main idea and my requirement were to make it modular. Because no, I don't need to take on a vacation all 50 shaving heads, I only need exactly this several. But at home, I am fine storing all of them together. And come on, I don't appreciate all those “put this adapter in the left top corner and this one here in the centre”. So…
An ideal (as I think) compact modular case for both travel, long-term storage, and just accumulating all the shaving tools “I might eventually need, but not right now”.
Compatibility
- Designed for my Philips All-in-One Trimmer MG9525 (which is actually a part of MG9550/15 set) - Would work with any trimmer that fits 166.8 x 41.8 x 58 mm (but can accommodate even a larger one with a custom module, check the Modular section below) - Fits all the known (to me) shaving heads and adapters - Does it work for you? Please let me know in the comments so that I can update the compatibility list
Confirmed to work with
All-in-One Trimmer / Multigroomers
- MG9525 - MG9550 OneBlade
- QI1864 Attachments / heads / combs / whatever you like to call them
- Virtually any, but if you want a list, here is what it was tested with already - Trimmers (steel, nose and ear, extra-wide hair) - Combs (precision trimming, 3-7 mm, 9-13 mm, 16-20 mm, body 3 mm, body 5 mm, eyebrow) - and literally any other that can fit in a module (check below)
Features:
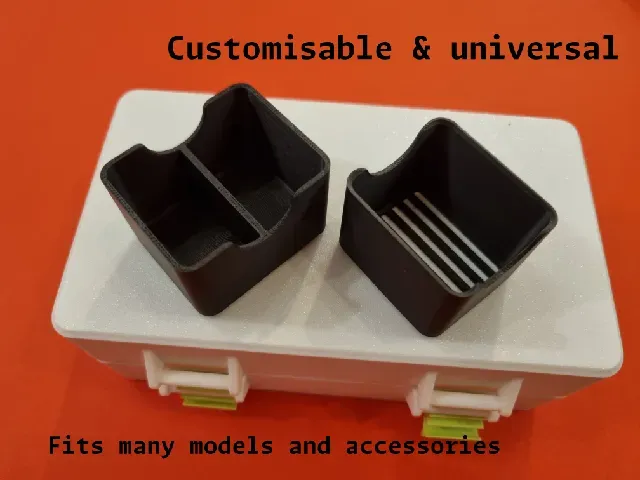
- Modular design to fit all the needed and allow the arrangement which is useful for you, not for me or anyone else. You can position your grooming/shaving device and all the attachments in the way you like them - Compact footprint for easy storage and travel - Sturdy design to make sure your things are safe and ready for use when needed - *Take what you need approach with cases of different sizes, all compatible with the same holding modules - 5 different types of modules in 2 variations - “standard” and “drying” - the last one is specifically for travellers. Designed to be used for drying your attachments after use and washing - no water collecting on the bottom and no need to put your shaving gear directly on a “maybe clean surface” in some hotel for drying.
How to select your storage
- Choose the option that fits your needs the most. E.g. 4-row case for storage and a 2-row case for travel - Choose whether you want to have a box with hinges (meaning two halves will stay connected when open) or with latches (two halves will be completely separated when open - Choose the types of modules. Keep in mind that each row can accommodate three 39 mm modules and one 53 mm module - Choose the module variation. standard has a solid bottom and drying has a bottom with holes to allow water release - Download the corresponding files, print and enjoy.
Box sizes:
- All the boxes measure 176 mm (length) and total 63 mm (height) when closed - Exact sizes for each model are provided below - For all the models, the height of the individual half of the print is: - With hinge: 34 mm (top) / 37 mm (bottom) - With latches: 33 mm (top) / 33 mm (bottom). 2-row box
- 117 x 176 x 63 mm 3-row box:
- 165 x 176 x 63 mm 4-row box:
- 213 x 176 x 63 mm - Please note, this model requires a print bed of at least 220 mm long in one direction. Modules
- Each box row can accommodate 3x small (39 mm) and 1x large (53 mm) modules - Sizes: - small (39 mm) - large (53 mm) - Types - single - double - triple (only for large 53 mm modules) - Variations - standard - drying Inner size limit (how much fits in each)
- Small - single: 33.6 mm - double: 17.1 mm (each) - Large - single: 49.8 mm - double: 24.1 mm (each) - triple: 15.5 mm (each)
Which files do I need?
For each single box, you need to print:
- Box bottom part - Box top part - Latches: - x2 for models with hinges or - x4 for models without hinges - Modules are up to your description, but remember to fill rows fully to avoid their sliding in the box. Refer to the images and description above for detailed info.
How to print
- Layer height: 0.2 mm or finer - Material: PLA / PLA+ / PETG / other - Supports: not required / check the section below to make sure Do I need to enable supports for printing this box?
- The general answer is no - The “most complicated part” of the print is the latch catches - the 24 mm long cylinders which are used to fix latches on a closed box. They are printed “in-air” in-between two solid parts of the box. This element should not be of a large complexity for most (even if badly) calibrated printers - If you are not sure whether you can print it, I am providing a small test print in a separate folder. Print it and see for yourself without the need to worry/waste plastic, or scrap lots of filament if something fails. If the print works well and you can assemble the two parts and use the latch normally, you don't need supports when printing the box itself - For testing supports, print both files from test-supports folder + one latch
How to assemble it
Hinges
- Cut two ~30 mm long pieces of a standard 1.75 mm filament - Align the bottom and the top parts of the box with their hinges. The hinges have low tolerances, so they should get together with a bit of effort (but nothing drastic) - Put the pieces of filament through the hinges. Don't force it. The holes are 2 mm, and even if you printed it really badly, it should still work. If you cannot push filament through the hinge, try slightly rotating two parts, one corresponding to the other - this will do the job, and the filament should go through easily - Done. Check that it works fine Latches
- Latches can go both ways - fixed on the top or bottom part and closing the other one. This is up to you - Put the latches on one half - Close the box - Close the latches. Don't force them. Depending on how well it printed, the first closing can be a bit hard (e.g. if some extra filament was left inside the latch or on the catch (the cylinders). Be gentle when trying, from the second attempt, it will go easily Assembly example for the test print
Printed as (for photos)
- 0.2 mm layer (including the bottom) - PLA+ (black), PLA Matte (white), HS-PLA (apple green) - Modules (as shown in black 3-row box): - module_full_grooming_with_cable - 5x drying_small_39mm - 1x drying_small_39mm_double - 1x drying_large_53mm - 1x drying_large_53mm_triple
Have any feedback on the model?
Please, comment. I made this model(s) for myself and my needs. Of course, it might not be ideal, but it should work well in 95% of cases. As for the rest 5%, your feedback can help improve it.
Also, did your shaving/grooming gear fit it well? Tell me - I will add it to the compatibility list.
Or maybe you want some more modules / some special ones - sure, why not? That is also not too hard 😉
Free for personal use
This model is free for personal use.
For commercial usage (meaning if you want to sell it), please contact me - we can think of something. Any commercial usage without an arrangement is forbidden






Названия используются только для указания источника результата. Polyzon не аффилирован с перечисленными площадками.