
Бесплатно 
The Ultimate Dry Box & Buffer System
Printables
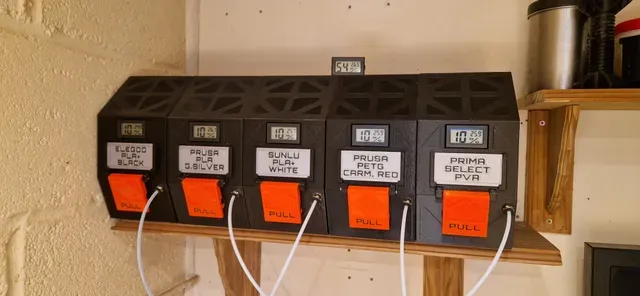
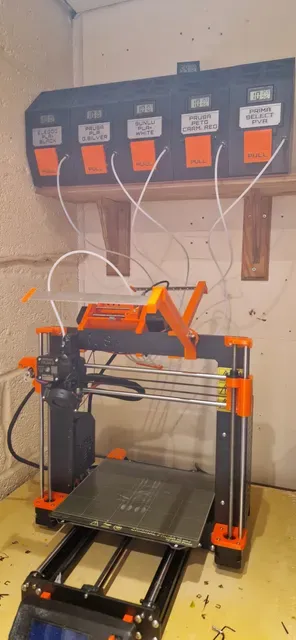
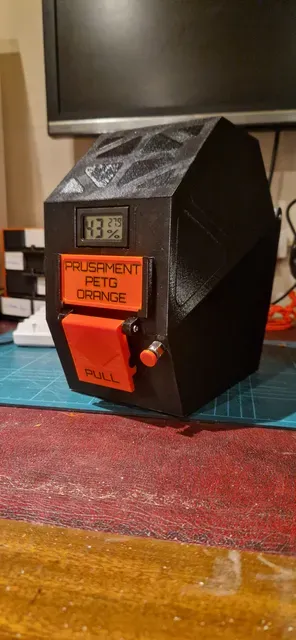


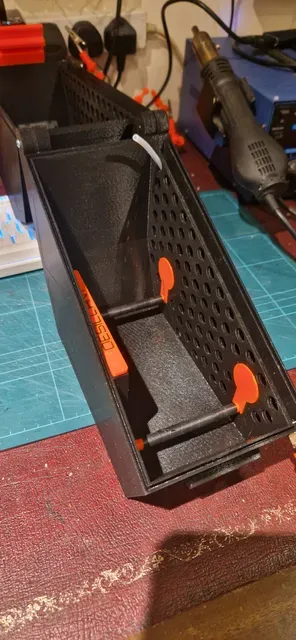
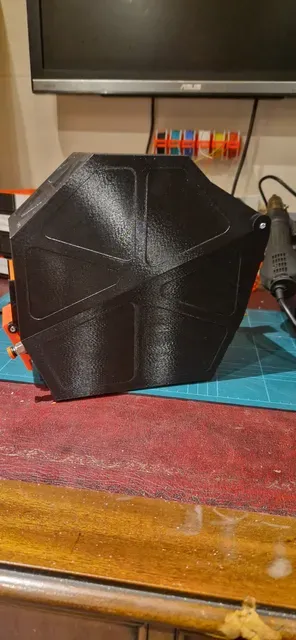


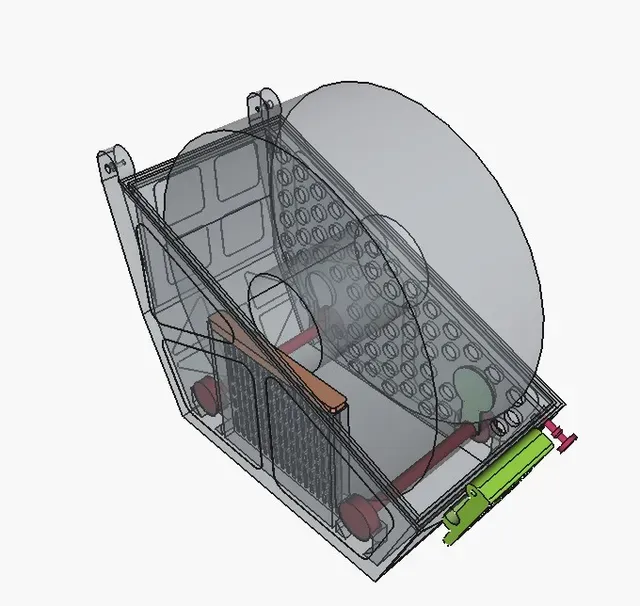
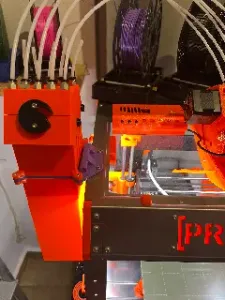
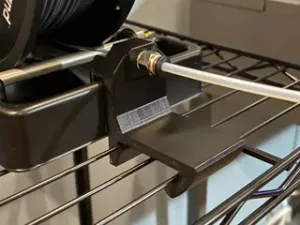
Introducing the "All-in-One Dry Box Buffer". Designed to be a direct path to the printer or MMU unit with a built in buffer and desiccant holder, keeping your valuable filament dry all the way to the printer, doing away with external buffer solutions.
Designed for up to a 203mm by 72mm spool.
Background:
I'm pretty limited by space and the MMU2 buffer mounted on my wall behind the mk3s has left me with some war wounds and caused many hurty words to be uttered.
Dry filament is highly recommended for normal single material printing and a total must for MMU setups. However I've yet to find a dry box solution to fit all of my needs.
So this led me to design my own. This has 2 desiccant compartments, in the base and within the lid, keeping everything nice and tidy. For the accents, I went for a kind of 80s industrial sci-fi theme.
Required external parts:
- 4x 608-2RS Bearings (These come with the MMU2 so can be reused) - 4x M3 12 to 20mm screws up to - 1x Hygrometer - 1x PC4-M10 pneumatic connector - 22.5cm PTFE Tubing 2.5mm ID 4mm OD - Desiccant 2mm or greater - Electrical tape (optional) Printed parts:
- 1x Dry Box and Buffer-BoxBase - 1x Dry Box and Buffer-BoxLid - 2x Dry Box and Buffer-Roller - 1x Dry Box and Buffer-Latch - 2x Dry Box and Buffer-Bearing Cap - 1x Dry Box and Buffer-Desiccant Cap Base - 1x Dry Box and Buffer-Desiccant Cap Lid - 1x Dry Box and Buffer-Pneumatic Connector Cap (Optional) - 1x Dry Box and Buffer-Tag (Optional)
Printing Tips:
Use PLA or PLA+ to keep costs down ;)
All parts are printed using a 0.6mm nozzle @ 0.3 layer height with 2 perimeters.
- For the Base and Lid set support material to 8 degree overhang threshold, 10mm brim and infill of 10%. You may also want to consider adding glue to the bed due to long print times. - Base orientation. Estimated print time 16.5 hours. - Lid orientation. Estimated print time 18 hours. - For the Pneumatic Connector Cap, Dry Box and Buffer-Desiccant Caps, Bearing Caps, Latch and Tag no brim or support material are needed and 10% infill is fine. - Feel free to add some text to the tag, latch, desiccant holder and caps. Would love to see what you do! - Orientation. Estimated print time 1.5 hours . - For the rollers use a 5mm brim, no supports and 100% infill, random seam with 120% seam gap. - Orientation for the rollers. Estimated print time 1 hours 10 mins.
Installation Tips:
- For better grip (as the spool and roller are of similar material) wrap some electrical tape around the rollers. There are 2 notches on the rollers so keep the tape between them leaving a 1cm gap either end. (optional) - Place both bearings on a roller and slide one of the bearings through the hole to the buffer section and lower it in place. Do this twice for front and back. Ensure the left bearing goes into its respective holder on the left. - Push the Bearing Caps into place (This stop filament within the buffer from catching on the slots) - Cut a piece of of PTFE tubing to approx. 22.5cm. Feed it through the tunnel and it will curl up towards the upper back of the box. Use the rubber end of a pencil to feed it fully though. - Feed the end through the dedicated PTFE ellipse hole (might need a rule or similar to bend it through while pushing the other end with a pencil. Do this until around 3cm of tube is in the spool chamber. - Push the tube in and out a couple of times so you get a nice curve for a smoother filament path. - Attach the lid to the base by screwing in 2x M3 12mm+ screws into the hinge. - Do the same for the latch. - Push the Hygrometer into the slot. - Slide the tag into place (optional) - Screw in the PC4-M10 connector. - Add the pneumatic cap (optional) - Add desiccant onto the compartments. - Add the desiccant caps into place - Connect the external PTFE tube going to your printer the outside quick release PC4-M10 connector. - Place your filament spool into the base from front to back and feed it through the PTFE tube. It will naturally curl up to the top of the buffer so you can grab it. - When ready to print, feed the PTFE tube through the PC4-M10 connector so around 1cm is visible inside the buffer compartment to the printer or MMU unit. - Feed the filament through the tubing into buffer, then through the front all the way to the printer. - Close the lid, secure the latch - happy printing :D Notes:
I have now full printed and tested this with 100s of retractions and no snags. I also don't think there is any need for a gasket as it seems to be pretty air tight already. Will update if required over time.
Feedback is welcome :)
Links for parts (UK):
- PTFE Tube https://www.amazon.co.uk/dp/B0DSGBSZVR - PC4-M10 https://www.amazon.co.uk/Kasoud-Straight-Pneumatic-Connector-Printers/dp/B0DSKC4DBQ - Bearings https://www.amazon.co.uk/XIKE-608-2RS-Steel%EF%BD%9CPre-Lubricated%EF%BD%9CDouble-Seal%EF%BD%9C608RS-Miniature/dp/B07JJ526NX?th=1 - Hygrometers https://www.amazon.co.uk/dp/B094N2KM7B - Desiccant https://www.amazon.co.uk/dp/B0DPXFT4L5
UPDATE LOG 12/08/2025
Object/Section Notes
Dry Box and Buffer-BoxBase - Added a dedicated hole for the PTFE Tube. - Extended the diameter of the roller insert so it turns smoother. - Added countersinks to the lid hinge holes for flush screw heads.
Dry Box and Buffer-BoxLid - Added countersinks to the latch hinge holes for flush screw heads.
Dry Box and Buffer-Latch - Added a pull flap to make it easier to unlock the latch. - Added some accents to make it look pretty.
Dry Box and Buffer-Bearing Cap - Extended the diameter a little due to the changes above for the BoxBase.
Dry Box and Buffer-Tag - Widened the tag a little for a more snug fit.
Dry Box and Buffer-Roller - Added guide notch for electrical tape installation so the spool correctly grips it.
Dry Box and Buffer-Desiccant Cap - New object to cap off the desiccant compartment so we don't get accidental spills when moving the boxes.
Dry Box and Buffer-Pneumatic Connector Cap - New object to cap off the pneumatic connector if box being used for storage.
Required external parts: - Removed the requirement for the cable tie as the PTFE Tube is snug enough.
Printed parts: - Added the Buffer-Desiccant Cap & Pneumatic Connector Cap.
Printing Tips: - Updated with more detailed instructions and print orientation.
Installation Tips: - Changed the method to install the PTFE Tube. - Added electrical tape trick to the rollers. - Added Desiccant Cap and Pneumatic Connector Cap - Updated pics.
Notes: - Now that I have printed and tested this I have updated the notes accordingly.
Next steps: - Removed the Pneumatic Connector Cap as this is now built.
Downloads - Updated all models and added the new ones.
UPDATE LOG 01/09/2025
Object/Section Notes
Dry Box and Buffer-BoxLid - Added a desiccant compartment
Dry Box and Buffer_Desiccant Cap Lid - New Part






Названия используются только для указания источника результата. Polyzon не аффилирован с перечисленными площадками.