
Free 
Rat Rig V-Core 3 Hinge For 6mm Thick Panels
Thingiverse


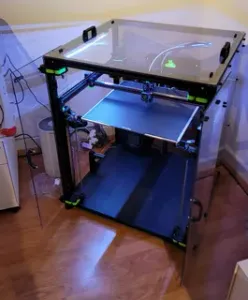
Improved version of the original V1 hinges for Ratrig V-Core 4 500mm and 400mm! The corner brackets do not have to be removed anymore.
Original version: https://www.printables.com/model/1090231-ratrig-v-core-4-split-front-panel-hinges
This design enables the RatRig V-Core 4 versions 400 & 500mm to use dual front panels which can be opened to the sides and around the corners up to half of the panels width. The hinge needs the listed parts down below and printed parts in PETG/ABS/ASA/PC/PA or any other strong and durable material. The panel doors need to have the holes for the door holders as well as the magnetic frame holders, dxf files for two versions (one with 2 magnet holders on the side, the other with 3) is included in the download. For stability 4 – 6mm thick panels are recommended, I found two magnet holder to be sufficient but three does better insulation.
All stl files have to be printed for a full set of hinges, they are already set to the right orientation for printing. -> Use the corresponding ZIP-archive!
Use at least 8 walls and 25% infill on the main parts! The used material should be stiff, rigid and have a heat deflection temperature which is suitable for the chamber temperature! Good choices are PC, ABS/ASA, PA6-CF or PET-CF. For low chamber temperatures, PETG could be sufficient, but it will bend more due to not being as rigid.
When placing the bearings inside of the frameMount parts, use a heat gun to soften the material a bit in the hole for the bearing. Only after that push it in, don't strongly force it in as it can break.
The following models require support, the normal support style should be prefered for this (support z-distance should be close to the object):
- backArm-Part1
- backArm-Part2
The models panelMount-Part3 have built in sacrifical layer for better counterbore hole, this can be pushed through after printing.
The bottom hinges use the frameMountAdapter which is placed beneath the corner support bracket. This part uses M5 heat inserts and the bottom hinges are secured using M5 screws.
The following additional parts are required:
Quantity
Description
12
DIN7 M8x32 cylindrical pin
24
608ZZ bearing
8
M3x14mm cap head screw
8
M4x8mm cap head screw
2
M5x8mm cap head screw
2
M5x12mm cap head screw
12
M6x10mm cap head screw
8
M6 T-nut (3030 extrusion)
8
M3 heat insert (Ruthex)
8
M4S (short) heat insert (Ruthex)
4
M5S (short) heat insert (Ruthex)
8
M6S (short) heat insert (Ruthex)





Names are used only to indicate the source of a result. Polyzon is not affiliated with the listed sites.
Comments